nate0123 said:

I really like this picture, Nate.

nate0123 said:
altspace said:Shhhh....she's sleeping.
FunkyBuddha said:Just fooled around w/ photoshop last night hahaha...

Javo said:the green mean..

NVP5White said:Really nice shot, Buddah. Its pretty easy to create these pictures if you plan ahead. I see some layering artifacts where it appears that the different images of you don't quite line up. I don;t knowwhat your workflow is, but this has worked for me:
1. Shoot multiple images without adjusting ANY camera perameters (not even focus).
2. Open in PhotoShop (PS) all images
3. Pick one image and make it your background; pull the other images on top of this one.
4. Apply a layer mask to each layer besides the background.
5. In the mask, paint over areas you wish to be transparent using a soft brush at 100% opacity.
6. CTL+SHFT+E to merge all visible layers and save
Tips: Make the background layer the one with the best looking background. Then make transparent as much as possible of the otehr layers so just the new you appears on top of the background. Using a soft brush (one that fades towards the edges) will hide the transition better then a hard brush or cuting and layering.
My first try at the multiplicity shot:
FunkyBuddha said:Yea that was my first attempt. I'll clean it up. I don't understand masks yet. Care to elaborate? LOL..
I just read photoshopchop.com
NVP5White said:I avoided layers for a long time. I didn't understand them and every time I tried to do something I failed miserably.
Okay, so masks are used with layers. If you have a layer, a second or third pic in a multiplicity shot, then you use the mask to hide or show different parts of the layer. I'll elaborate on my previous workflow below:
4a. Make the Layers pallet visible if its not already showing. It may be already grouped as a tab with Actions and/or History pallets.
You will see the 'background' layer as the first image. This will always be visible since it is the bottom layer. A mask can not be applied to the 'background' layer. The other images you dragger over will be 'layer 1', 'layer 2', etc.
4b. With the mouse, grab the small thumb nail (pinky nail, maybe) of 'layer 1' and drag it to the bottom of the Layers pallet to the rectangle with a circle in it. This will apply a Layer Mask to 'layer 1'. Rinse and repeat until all the layers have masks.
Now you can use the painting tools to 'mask-off' areas of a layer you want to be transparent. Use the brush tool or the gradient tool to paint those areas. Color is important here. You will use white to "show" the lay, which is why the entire layer mask (in the layers pallet) appears white when you add it. Use black to color areas you want to be translucent. Note that you can very the opacity of the brushes to achieve a more gradual blend, but for multiplicity shots you want the opacity to be 100%.
4c. Grab a brush and start painting the areas you want to be transparent. Be sure that the mask is selected in the layers pallet. It should have a grey box or brackets surrounding it, depending on which version of PS you have. Also, I recommend using a brush that fades towards the edges. This will make the transition from one layer to the next gradual. Note when you paint on a layer you don't see color; rather you see the layer below. This can be strange since the layer below looks just like the one youre working on in most places. Just remember that you are trying to mask-off all areas of the layer except for the part with you in it.
Continue this process until all layers have been masked off.
Done!
Masks are also useful with Adjustment Layers. I add Adjustment layer by selecting Layers --> Adjustment Layers ---> Curves, levels, etc.
Masks are also good for adjustments you want to make only to a portion of an image; any change you don't want to be global. The other benefit is that you can make an adjustment then go back to that layer later and continue to play with the change. I usually have two or three adjustment layers (or more with masks) on an image. I can tweak them here and there and back again using layers.
Another note about dragging images. Use the Arrow with an 'X' tool (upper right in the tools pallet) to move image layers. You can make sure they are exactly aligned by zooming to 200% and blinking the layer on and off using the eye ball toggle on the Layers pallet. Bump the layer in any direction pixel-by-pixel using the same arrow tool and click one on the layer. Then use the arrow keys to move the layer as needed until they are exactly aligned on top of the 'background' layer.
Good luck!

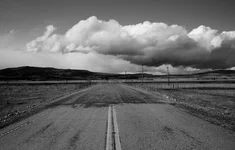
ZoominMX-5 said:Nice pictures! one of them reminds me of this
ZoominMX-5 said:Nice pictures! one of them reminds me of this