A Protege Story

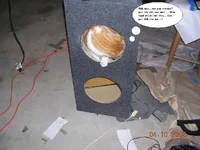
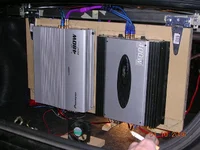
Awww yeah shawty. Amp Rack phase one complete. The b**** is mounted and temporarily wired up. I am going to leave it alone till I take care of some other things that need my attention. (if you didn't notice already my car lacks an interior right now)

However I would like to pat myself on the back for this one cause it's pretty much the coolest thing I have ever built.

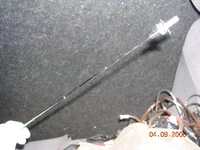
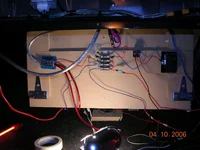
Favorite Tool (Pic 1) - the magnetic retractable bolt getter device. It is so tiny yet strong as hell. It held my bolt a lock washer and a regular washer up against the bolt till I could fish that thing down in the vents of my rear deck skeleton.

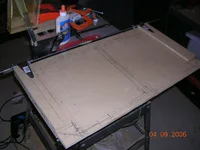
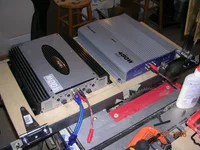
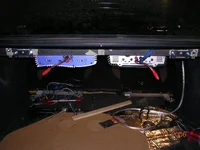
The Concept (Pic 2) - build a big door and flip it on it's side, chuck the amps on there and fasten it to the roof of your trunk. This was my inital sketching/placing of the amps. I hadn't intended for them to be mounted sideways (Pic 3) but that is how it seemed to fit with the airflow setup I am going to build later. This will be phase 2 with all the fixins.

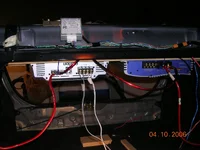
I had to put in a 2 inch steel bar across the back and bolt it to the trunk. It is solid when everything is tightend down (almost too solid) I have a feeling that it will shake itself loose after some hard driving so this mount setup is temporary till I find somebody who can weld my brackets and maybe fabricate some sort of lift system.

More pics below of the mounting...
 

Attachments

  • DSCN0943.webp
    DSCN0943.webp
    276.6 KB · Views: 246
  • DSCN0945.webp
    DSCN0945.webp
    201.5 KB · Views: 249
  • DSCN0946.webp
    DSCN0946.webp
    332.4 KB · Views: 268
  • OTownLounge.webp
    OTownLounge.webp
    107.4 KB · Views: 281
Amp Rack Continued...

Pic 1 - Amps hanging in down position. This is for wiring purposes and hopefully for display. I found it was easier to use a hinge for mounting then try and figure out how to make some level setup with the odd angles from my rear seats to the trunk. At the bottom you can see one of the fans I got for airflow. Those things are powerfull as hell. I got cold in my garage for the breeze it was kicking outside the trunk from there.

Pic 2 - Down on the backside. All of this was accesible from the rear seats. None of these devices are screwed down, just 3m sticky for now. Got my Borsch relay up there for display. When I'm done with all the wiring I want to make This side look pimp. display is good but the best thing about this rack is that all my connections to 90% of my devices are self contained. All I have to do is disconnect the main power and ground wires and The whole thing comes out.

Pic 3 - Rack closed, trunk view. One of my favorite parts about this configuration. I can tune my system from one spot, standing up, and in a position to hear changes from a relatively neutral spot. I made sure any switch or dial was exposed and that will continue with the beauty crap if I ever get to it.

Pic 4 - Seat down view. Another plus is having all your speaker/power crap in an easy to get to spot for installation. and the little plates that the wires are supposed to tuck into (or connectors if you are fancy like that) anyway those plates are now resting against the top of the screw which is now upside down. No get annoyed with the wire and plate game here folks.

Well that's it for tonight. Gotta get back to painting some more interior and I have to finish my fiberglass enclosures for my 6x9's.

Bumper comes on thursday. Gonna be sweet I tell ya.
 

Attachments

  • DSCN0956.webp
    DSCN0956.webp
    327.5 KB · Views: 268
  • DSCN0957.webp
    DSCN0957.webp
    239.8 KB · Views: 254
  • DSCN0948.webp
    DSCN0948.webp
    307.5 KB · Views: 287
  • DSCN0958.webp
    DSCN0958.webp
    193 KB · Views: 297
damn buddy. this looks great. Congrats. I can't wait to see more.

which is why IM subbin.


keep up the good work. I really like it. And, your cat is cute as s***. If it were my cat, he would be attacking me the whole time.
 
I knew you were going to ask that. I was on my way out the door otherwise I would have looked it up. I found it though.

http://www.stockinteriors.com/items... &MainCatId=1&Desc=Mazda_Protege_Carpet

My 2 cents on this carpet is this.

Number one is I'm glad I got it, however, if I could do it again I would make DAMN sure I got a carpet with the rubber backing on it rather than the cheapest foam, not even foam, on the planet. I put sound deadener in and ensolite on top of that so I really could have gone without an additional foam layer but I do think the sound deadening is enhanced with all the crap I have under there. The fibers are a b**** to cut through and the padding is placed in spots where you have to cut it like under the clutch, over the shifter and e-brake and where the seats connect in the back middle.

It's difficult to pre-cut those areas cause you just never know till you actually get it in how things are going to line up.

I should have done more pre-cutting before I slapped it in there.

There are tons of companys out there. You are basically looking for a Molded Carpet, Cut Pile (automotive carpet type), and protege in a search on google will bring up several options
 
Bumper

Awww hell nah. No he didn't.

New toy arrived today. Probably going to have this one painted by a pro if I can't figure out this painting thing. I will give the rear lip i just got (in the background) a shot with the paint.

Probably could have gotten a msp setup for what it cost to ship this thing but I wanted to keep the theme of suped up LX rather than LX to MSP. So I chose this guy from Corksport. Pretty much the sedan bumper with a lip all in one solid piece. Might try and make some scoop pillars next to the fogs similar to some of the aftermarket second gen bumpers.
 

Attachments

  • DSCN0961.webp
    DSCN0961.webp
    42.2 KB · Views: 259
  • DSCN0962.webp
    DSCN0962.webp
    38.2 KB · Views: 246
Update

I've been slummin over on the audio forum for a while. Those guys definately know their stuff. Lots of good info on anything audio over there. Get your search function on.

Speakers:

After three months I have decided to upgrade my upgraded speakers. my 5x7's and 6x9's are coming out and components and midbass drivers are goin in. So anybody that wants to upgrade their stock I'll have a 3 month old set of Alpines here shortly. front and back direct replacements slap em in. hit me up.

Project Silver trim has begun:

I've already painted some of the interrior silver but I had a thought on the exterior. My rims are silver. I honestly think black rims look good on a black car but I wanted a 16" wheel that looked good and there just wasn't anything that size that fit the bill. So I went with the silver drifters. After that I decided to paint the trim the same color, silver charcoal looked about right and so far it's close enough for me.

The Silver es has black accents in the trim, grill, headlights and so on. I figured I would do the reverse on my black sedan. So the door trim, upper grill trim and my headlights will be silver. rear valance and emblems also. Gotta get that chrome off my car with a quickness.

I have painted the first piece, hasn't been sanded or clear coated but i wanted to make sure I was going forward with it after the pics. Also posting a real rough sketch in paint of where the trim will be including the mirror cover I am painting.

Edit: By the way I did take the piece off to paint it. I don't recommend just masking and going at it if you can avoid it. The tape is to stop the rain while I do this. And GO HOKES!! The hokie nation will be upset to know that I am removing my stickers but I will have VT on the car but it's going to be more descrete. (I know I know the definition of a hokie is not descrete)

O-Town keeps hoping in my pictures. I honestly didn't know he was around. Like one of those ghost pictures or soemthing.
 

Attachments

  • silvertrim.webp
    silvertrim.webp
    131.4 KB · Views: 258
  • DSCN0976.webp
    DSCN0976.webp
    86.4 KB · Views: 267
  • DSCN0974.webp
    DSCN0974.webp
    70.4 KB · Views: 234
  • DSCN0975.webp
    DSCN0975.webp
    353.1 KB · Views: 280
Last edited:
Interior Update

I hate myself. I don't know why the hell I think I can do something off the wall and make it look good. My advice if you are just starting out is stick to the basics and get good at that.

I will post some pics but I am repainting the dash all over again (3rd time) 1st time didn't look good in the low areas. Now I just don't like it. The Doors are the same thing. the yellow dots were a retarded idea and wasted way too much time. I do think if i had just painted the door fabric black to begin with it would have been good to go. So if you are thinking about painting the door fabric, dupli vynl fabric is the way to go. I've got a post around here about how to get that color to stick and look good.

I do want to have yellow accents in the fabric so I will have to take it to a pro. Want to get a black fabric with a sewn edge in yellow like the seats.

The speaker grill I have hated since i got the car. I thought painting it would help but now it just looks stupid in a different color. it highlights the pointless shape. Going back to black baby.

The upper part of the door I tried yet another silver accent but it looks dumb because I am paining something that isn't a different part. it chipps and is really noticable. back to blak.

The control panel is a perfect piece to paint. comes apart and you can go to town, however i really messed up and sanded the crap out of my mistakes and eventually it turned smooth while the other parts have texture. Nothing to do now but sand the whole thing down till I can get some high build primer to make it look flat and then gloss it up.

The final crappy messup was the silver line across the dash. I had intenede it to be a seporator for the upper grey and the lower black but it doesn't adhere very well to the texture so I've gone completely to KRYLON FUSION satin black. This stuff is such a time saver and money saver. I can't afford to go through all this again on the textured vynl. Krylon is no sanding prep, just clean very good. i sanded a bit to rough things up and to improve adhesion but either way. No clear coat required. it looks good on the pieces I've done (dash pad was the only one i have a pic of)

I decided the transition of grey to black would look better than the grey eventually chipping line that I sucked on. plus most older sedans with black interrior have already faded between the cloth color and the plastic pieces. almost looks the same. whatever i am just ready to be movin on.

comments good or bad are always welcome on this project.
 

Attachments

  • DSCN0972.webp
    DSCN0972.webp
    83.8 KB · Views: 315
  • DSCN0970.webp
    DSCN0970.webp
    47.6 KB · Views: 332
  • DSCN0971.webp
    DSCN0971.webp
    39.2 KB · Views: 338
Krylon Fusion

Ok I promise no more long winded crap for a while.

I wanted to show what Fusion Black (satin) looks like on a painted piece with texture. I am very pleased with the results. Even though this is a flat black I don't feel the need to clearcoat. If you wait a week your first run will cure in 7 days. i've been punching this piece with my rings on and no chips. You can add more coats then. I only feel the need to do this on a few pieces. This particular one hasn't had the second coat but you can see how it gets in the grooves.

I kept the pics big so you can get a good look at the piece so if you got rats running on wheels in that machine don't even bother.

Pic 1: Color before
Pic 2: Painted piece
 

Attachments

  • BeforeKrylon.webp
    BeforeKrylon.webp
    67.8 KB · Views: 262
  • Krylon Satin After.webp
    Krylon Satin After.webp
    124.3 KB · Views: 347
O-Town

this was a planned picture. Some guy has been trying to buy my floor mat from canada but he has yet to tell me if he is going to get it offically or not.

So anyway man O-Town has grown pretty fond of your mat so if you want it I suggest you message me soon. He didn't look to happy when I told him I was selling it.
 

Attachments

  • O-Town Mat.webp
    O-Town Mat.webp
    26.8 KB · Views: 276
Project List as of now

This is just crap that I have committed to. No turning back. I'd love to do a whole lot more but I've cut myself off. The list is getting longer than the one of my completed tasks. gonna try and put this in an order that is managable.

Project List - updates

Painting
center console silver/black
Dash again!! black - For the love of god DONE
Vent Covers silver Done
Radio Surround silver/black Done
Cluster Cover silver
gas/truck release black
gas/truck release cover black
front lower door trim black - Done
a pillars black
glove box black Done
lower steering wheel cover black
rear deck black
Doors
lower trim black - Done
pannel covers silver
trim pieces silver
upholster upper cloth blk/yel
upholster steering wheel silver

Exterior
Door Trim silver - 1 side complete
grill trim silver
Mazda emblem front black
Mazda emblem back black
emblems rear "Protg'" "Mazda" silver
rear trunk valance silver
BUMPER black
Rear Lip black
Mirrors ?
Headlights silver - nahh black i think now
Tail Lights night shade - on hold

Fabrication
Kick Pannel enclosures blahh
rear deck holes - still got holes
beauty pannel

Audio
Wire front doors - Done
Amp rack secure
fan install
1sty ground kit again - postponed indefinately
finish deadener in rear
test eq - Works like a charm Done

Installs
Intercooler - 15%
Turbo!!!
boost gauge
oil pan tap
relocate washer and coolant
Exhaust
Front Bumper - 10%
Rear Bumper
finish carpet - Done
rear door ensolite
ebrake lever Done dammit my brakes are dragging
handles?
cig ligher Done
MAM Rings!! - Rumor going around that they might be deliverd this year

Locate
black seatbelts
xover/eq/signal processor - Done
 
Last edited:
I'm not taking it out. I need to get a better pic. basically i am painting the passenger dash pad, outer trim on the radio piece and the sunken areas just beneath the instrument cluster cover (just above the steering wheel. all black, noticibly black so it stands out and doesnt look like i missed on some paint matching excursion. the contrast will be in my doors too but it doesn't look too bad so far. That way i have black and grey mixed in the upper areas and then all black in the lower. I mean mazda mixed those colors with my steering wheel and the dash as it is.

wheel is black as night. so is the cluster cover.
 
Wally World

I can't believe what happened to me tonight. Bugging me so much I thought I would post it.

So I head out to the world to do my weekly wipe out of the Satin Krylon black spray cans and sure enough they have restocked and I take the last 4 cans of satin. Get some sand paper and 3m cloth and head over to the stereo section to pick up some speaker wire.

I stopped for what fealt like 3 minutes. Left the cart about halfway in the aisle and was looking at all the crap as I tend to do. I turn around and my cart is gone. GONE! I was like wtf. Knowing how dumb I can be I thought I had left it 3 rows back. No dice. I know exactly where I left it and that b**** was gone.

Then it hits me if I don't find it the last 4 cans of paint that I came all the way out there for are gone. I can't just go and pick up some more off the shelf.

All sorts of s*** was going through my mind like "how in the ******* world could some asshole be in this store and know that I took the last 4 cans of satin and JACK MY CART!! In the back of my mind I knew that was the least likely scenario but I was convinced that is what happened.

I comb the entire ******* store at 11pm looking at everybody like they are a thief. I'm even looking in grandmas cart to see if she is hiding them under the quilts.

I am dumbfounded. how the hell...

I go back to the scene of the crime. Walk it through with the special needs employee that was very kind to go with me on my scavenger hunt.

So I'm like. "Ok dude...I walked over here to look at the stereo crap and I left my cart around the corner right over here..."

Then I couldn't believe my eyes. right on the shelf above where I left my cart are 4 cans of paint, 1 3m cloth, and 1 package of 320 grit sandpaper. Some FUKTARD needed a cart so bad at that part of the store that they TOOK MY s*** out of my cart WHILE I WAS STANDING 10 FEET AWAY and put it on the god-damn shelf. Are you kidding me?!

I know exactly who it was to. When I did my initial check there was only one guy in the area who I know I had not seen before and he had a basket full of 4 10 gallon gas cans which where right by the spot where I left my cart.

Only in atlanta baby.
 
That sucks. But someday, we'll all look back at this and laugh. Oh, wait, I'm laughing today. Someday you'll look back at this and laugh.

Man, this looks like a hell of a project. Good luck with it.
 
it's annoying..down here we have to put 1 euro into a small slot at the shopping cart to release it from the next cart in the row (connected with a chain)... some people don't have 1 euro in their purse and then they try to steal your cart from you.. so lame..
 
TStar said:
it's annoying..down here we have to put 1 euro into a small slot at the shopping cart to release it from the next cart in the row (connected with a chain)... some people don't have 1 euro in their purse and then they try to steal your cart from you.. so lame..

I went grocery shopping in amsterdam and couldn't believe how much stuff they packed into such a small place. The conveyor belt was shorter than the carts over here. Makes you feel bad when you come back and see how much space we waste.

Headed back in the fall.
 

New Threads and Articles

Back