4-Channel amps

1sty said:
Dual 2


Its just not up to powering the ID sub as much as another amp would be.


Buy it or the alpine from an authorized dealer

Not without cutting out the back of the panel and fabricating a new cover.


OK, so then the Alpine F250 is the sub I want/need? It can run the fronts and I guess bridge for the sub and don't touch the rears? Will I even hear the rears? I'd get the Alpine from Best Buy.

I can't cut out the back panel, it's practically against the car body. I know it will have to protrude an inch or so. I will make up a false front and see what depth I'd need before I get to involved with the sub.
 
By looking at the space I simply don't see an 8 " sub fitting in there.
I could be wrong though

1st and most importantly, measure it. If it is atleast 8.5" wide and high then it can be done. Next, be sure the depth will clear the overall depth of the subwoofer as it will have to completely shut over the sub to hide it. If it is not deep enough then you will have to cut the back out of the panel.

For that space, don't go crazy with fiber glass. It won't be required. With some trimming you could probably do it all in 1/2 birtch plywood as the enclosure looks mostly square. Do whatever sides of the box you can in wood to save the time and effort of fiberglassing.
 
Kid Red said:
OK, so then the Alpine F250 is the sub I want/need? It can run the fronts and I guess bridge for the sub and don't touch the rears? Will I even hear the rears?
Use the head unit to power the rears. You will still hear them.

Kid Red said:
I'd get the Alpine from Best Buy.
I'll smack you if you do. You'll possibly pay more to get dick service or more likely no serive. Where are you located?


Kid Red said:
I can't cut out the back panel, it's practically against the car body. I know it will have to protrude an inch or so. I will make up a false front and see what depth I'd need before I get to involved with the sub.

Practicly is not totaly

CUT, CUT, CUT (thumb)

Either way, get those dimensions 1st.
 
Ok, so leave the rears alone (5 HU is weeaakkkkk tho)

I'm in Orlando, Fl. There's an car audio (JL Audio authorized) that has the Alpine, same price as Best Buy near me. That or Crutchfield really.

I can't cut, the car is 2 weeks old :(

The actual dimensions are-

deep- 4 1/2" curving to 4 3/4"
outside height - 7 3/4" tall
front 10" wide
internal height 12"

There is a 2" x 10" cavity at the bottom, like an area Mazda just left uncapped or something also.

So it's a 7 3/4"x10" opening 12"x4"10" internal with that 2"x10" cavity.
 
I'd go with the Eclipse over the Alpine. It will give you more power. There is also the Alpine MRV-F450...check the dimensions on that one.

You need 8.5" for the mounting baffle but remember that the cutout hole only has to be 7.125" and that's all the space you need inside the enclosure. If I were doing it, I would make a 3-layer baffle. Use cardboard to trace the outline of the opening (the widest part...assuming you won't be using the original panel). Since you'll be using a low-power 8 you can get by with 1/2" MDF. Cut 3 identical pieces based on the cardboard (A router with a special bit makes duplicating pieces easy). Take one piece and cut out the center so it is a square ring. tape this onto the panel and use it as your edge for fiberglassing. Don't get any fg on the outside edge of the ring.

Take the other two panels and temporarily fasten them together. Mark where the subwoofer will be mounted and drill a hole through both to use as a center hole for a perfect-circle jig with your router. Cut out the mounting hole (7.125" diameter) in one and cut out the outer subwoofer diameter from the other (8.5" diameter). If you glue these together the subwoofer should fit right in flush. When finished, glue this to the ring (after all the fiberglassing is done). The baffle will stick out 1.5" from the side panel. If you get some metal mesh you can make a grill for it that pops right into the baffle around the subwoofer.

That's how I'd do it anyway.
 
I'd like to reiterate that fiberglassing is NOT easy, very time consuming, veryverymessy, puts fiberglassdust allover your ca rif you don't mask everything off (you mentioned baby, I'd imagine fiberglassdust and babyskin wouldn't interact happily) honestly, if you do this, tape a coupel of trashbags between your passanger compartment and your sub area, and alos do as much of it outside of the car and away form thehouse as possible. Also fiberglass is fairly expensive. Expect to put about $150 into materials alone once you nickle and dime your way through it. here's form when i did mine. http://www.msprotege.com/forum/showthread.php/?t=59808&page=2&pp=15&highlight=fiberglass+mdf

Not trying to scare you off, trying to prepare you rather. And yes I'll throwin on the eclispe amp myself. Solid, clean, reliable, perhaps lacking a bit of oomph for your sub, but with your space limitations, you're going to be low on it anyway.

Also, another thing to entertain for saving money that could perhaps be better spent elsewhere is keeping stock speakers in the rear powered off of your deck. They're more efficient thatn aftermarket, generally don't have the highs (this is a good thing for rear speakers) and mostly cost nothign since you've already got them.
 
Last edited:
OK, so it's 2:1 in favor of the Eclipse. Are there any differences between the Eclipse and Alpine that I should consider like crossover, high/low pass, bass boost etc? The Eclipse is a AB class I think, will it run hotter then the Alpine (which is D class, correct-meaning it can't handle highs very well?)

Then, I can run either Alpine or the Eclipse WITHOUT LOCs, and leave the stock speakers in the rear and do not amp them. So, I' need the amp, wiring kit, the sub and fiberglass stuff basically.

As for the fiberglassing. I'm basically just making the inside of this compartment secure, stiff and airtight? How will I then attach the front baffle of chuyler1s to it? Is fiberglassing the inside my only option to making this small area ready for a sub? It's a solid molded single piece of plastic- will the plastic flex enough to distort the sound? Just have to ask because I don't know. And there's no other material I could laid inside simply for dampening and strength purposes?

Ok, so once I get the sub, I make the baffle. Then I'd mask everything off, protect every thing, cover everything etc. Then I'd have to fish thru some wire or something to make it easier for feeding the speaker wire right?

-How far to the edge of the opening would I need to glass?
-How am I attaching the front baffle and securing it to the glass?
-How long does it take to dry? I don't think I'll need to sand it, it will never be seen really. The MDF baffle would be the important part.
-What's this metal mesh for the grill?
-Is there a site that lists everything I'll need supplies wise and can I et everything like at Home Depot?
 
It seems that I can only get the Eclipse 3422 from an unauthorized dealer. THat amp is old and I can't get it from Eclipse or an authorized dealer. So, I might have to go with Alpine or Soundstream if I can find where tog et them. As for the Alpine I can get the older 240 or the newer 250. Any comments on those or another 4 channel amp that will work?

A few other amps that might work-
Phoenix Gold T400.4
Orion HP4600
 
Last edited:
www.selectproducts.com is a great starting point for fiberglass supplies, carpet/vinyl/cloth, and other stuff.

Fiberglass will mold nicely to MDF. Do some searches on google for things like fiberglass, subwoofer, box, enclosure, tire well, and so forth. There are many tutorials and the more you read, the more you will begin to understand what is involved.

(FYI, removing the spare tire is another way to get bass into your car w/o giving up cargo space...but you never know when you might need that spare)
 
Thanks for the link, that will come in handy. Do you think I can get some of that stuff locally though? I'll check around.
 
For amps. I don't know, you are really limiting yourself with a size thing. Did you check the size of the Alpine F450? Here are your requirements when shopping for amps...
1) Decent power for speakers and subwoofer (somewhere around 4x50 and 2x200 bridged would be my goal)
2) Decent crossover (80-250Hz variable with at least a 12db/octave slope)
3) Speaker-level inputs (saves money when connecting to factory system)
4) Good sound quality (100db S/N ratio or better for starters)

My top choices, assuming they fit would be the following:
http://www.mobilesq.com/store/product_info.php?cPath=26_46_49&products_id=76 (make sure to get the DVC 4ohm sub for this amp)
http://mobile.jlaudio.com/products_amps.php?amp_id=261
(make sure to get the DVC 2ohm sub for this amp)
http://www.crutchfield.com/S-wsPcax0kcK6/cgi-bin/Prodview.asp?c=3&g=120&I=500MRPF450&s=0&cc=01
(make sure to get the DVC 2ohm sub for this amp)

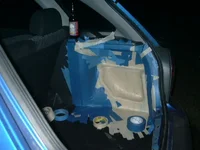
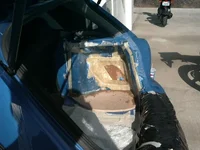
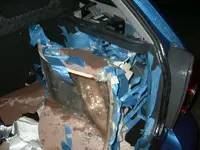
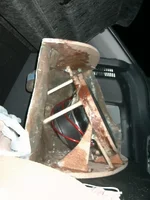
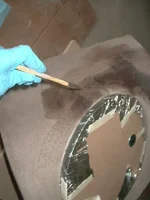
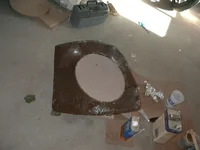
For small projects you can get fiberglassing supplies at Walmart in the automotive section (and brushes and mixing pans in the hardware section). However, you'll have to order the vinyl/carpet from SelectProducts or a similar online store because I have yet to find a local store that sells it.

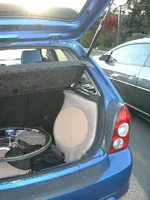
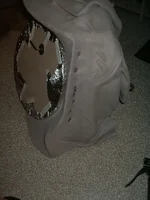
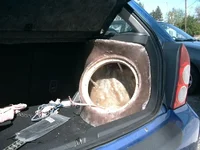
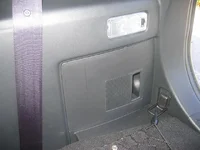
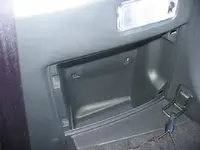
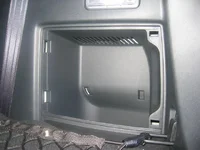
In your case, I would take out the panel and find a way to use it as a mold. Without the panel in front of me I can't really step you through how to do it. If you don't ever plan to remove the box, you could simply glue the mdf ring to the panel and then fiberglass directly to the panel to stiffen it up and seal any holes there might be. When you are finished, you can place a bead of silicon around the edge and screw the other baffle to the ring to complete the seal.

As 1sty mentioned, the more work you can do outside the car, the better. Otherwise the fiberglass resin will stink up your interior and it could take months before the smell goes away.
 
Yea, the 450 (and the other amps you listed) are all 13" wide which is too big. Ideally, I need an amp that is 11"x9"x2" or smaller. I guess the Alpine f250 then:
http://www.crutchfield.com/S-RS8spW214So/cgi-bin/ProdView.asp?g=120&I=500MRPF250

What about the tri-way crossover thing, would that be an option?

So no LOCs, just the amp to speaker level on just the fronts.

As for the panel, it's all one piece, built from one continuos mold. The entire back side has that pocket built into it's shape. There is nothing to take out, or off. Since it's one piece and inside, couldn't I use something strictly for sealing and maybe strengthening purposes? Like a dynamat that hardens or something?

I do not plan to remove the box, because there would be no way to as it's inside that compartment which is shaped like a curved L. So, I had planned on just slapping the fiberglass inside that compartment to seal and strengthen, the somehow attach the MDF baffle.

I still have to figure out how to attach the baffle. Do I build a frame inside that opening which would give me a lip to glue or screw to? I can take more day time pics if you want.

Didn't know that about the smell, I'll have to prepare better for that.
 
It's hard to tell from the photos but it looks like the pocket is a separate piece from the rest of the panel. It can't all be one mold. It will be worth it in the long run if you can remove everything as one piece. You can put it on a work bench and do all your fiberglassing and fabricating indoors (well, be sure to ventilate when fiberglassing).

Ok, let me try to describe some steps again.

1) remove the panel and create the 3 mdf pieces I spoke about before. The first one should be cut as a ring that will fit along the edge of the opening.

2) since the opening appears to be curved, place the ring on it as best you can and glue it into place (not sure what type of glue to use). Mask off the front face of the ring with masking tape so it stays smooth throughout the entire process.

3) Using fiberglass re-inforced bondo, fill in any holes or gaps there may be around the ring and inside the compartment. This stuff should stick to the plastic panel but I am not certain. You may want to scuff up the plastic with coarse sandpaper first. For large openings you may want to use masking tape on the back side to keep the bondo from falling through.

4) Mix a new batch of fiberglass re-inforced bondo with fiberglass resin until it has a sludge like texture. Pour it into the enclosure to provide a 1/2-3/4" layer. Do one side at a time and let it cure completely before moving to the next side. When dry it should provide enough strenth to the compartment for your sub. I have not worked with this type of mixture before but 1sty said he uses it to stiffen the inside of fiberglass enclosures after the shape is formed using fiberglass resin and fleece fabric.

5) Build a baffle for the front of the enclosure by cutting out a mounting hole in one of the pieces made in step 1. Screw this onto the ring (make sure to pre-drill all holes in MDF) and your box is complete

6) Wrap the box with trunk liner or vinyl for a finished look. Apply sound deadening material to the entire backside of the panel to keep it from vibrating. You may also want to apply sound deadening material to the panel on the opposite side of the car also if you hear it buzzing or vibrating.
 
WEll since apparantly this forum kills old pics, here's some form my fg project.

1.2cubic feet of styrofoam peanuts in a plastic bag to approximate volume.

mostly final taping off of my area.

first layer of glass and resin

Popping the mold.

Mounting rings hotglued and resined inplace with scraps and dowling. ANd sub fitted to test for clearance.
 

Attachments

  • P1020829.webp
    P1020829.webp
    52.1 KB · Views: 137
  • P1020833.webp
    P1020833.webp
    41.7 KB · Views: 140
  • P1020845.webp
    P1020845.webp
    66.9 KB · Views: 132
  • P1020849.webp
    P1020849.webp
    60.6 KB · Views: 133
  • P1020870.webp
    P1020870.webp
    48.8 KB · Views: 133
fleece loosely stretched, testfit and asthetics check.

Fleece stretched/hoptglued in place

soaking fleece in resin

Fleece soaked, 4layers of fg ontop

trimed, hole cutout and testfit


Note, this is simply how I did mine. Take note that the wood is VERY securely bonded to the resin. matter of fact right after I popped it and leyerd on a couple more layers of resin I coudl stand on the top shelf.

For your case things could possibly be simpler, especially if you can simply use your panel/cubby as a form and simply pop it out and layerup some thickness onto it, then it's just a matter of bonding a wood faceplate to it. This would be permanant, but clean and out of theway with little to no impact on useable space. PLUS you should be able to keep most of the mess out of your kidhauler... I really do think that's the best idea. And yea that cubby should be removeable wether you have to pull the whole damn panel or not it's doable. Yes it's weird pulling panels off of your new car, but it's rather painless really. PLUS you cna dynomat or whatnot while you'rebackthere and make your ride thatmuch quieter (esp in the rear wheelwell area I've found on almost all wagon/vans)


Now with your amp situation, what exactly is your available space again? is ther eroom for 2? sofar this is sounding like your best bet if you've got limited space, get a single 2ch amp for your fronts and then aseperate small single either mono or 2ch amp for the sub.
 

Attachments

  • P1020874.webp
    P1020874.webp
    83.9 KB · Views: 144
  • P1020886.webp
    P1020886.webp
    83.9 KB · Views: 129
  • P1020896.webp
    P1020896.webp
    43.2 KB · Views: 130
  • P1020899.webp
    P1020899.webp
    45.7 KB · Views: 132
  • P1000903.webp
    P1000903.webp
    86.5 KB · Views: 139
Last edited:
chuyler1- The panel is all one mold, there are no pieces. It runs from the back all the way to the front door and up to below the window. It's a huge piece, as some have had major issues replacing the rear speakers, 3rd row seat needs to be removed, etc.

Here are some more pictures to show in better detail-
 

Attachments

  • IMG_2385.webp
    IMG_2385.webp
    43.3 KB · Views: 142
  • IMG_2386.webp
    IMG_2386.webp
    27.7 KB · Views: 130
  • IMG_2387.webp
    IMG_2387.webp
    40.5 KB · Views: 126
  • IMG_2388.webp
    IMG_2388.webp
    38.8 KB · Views: 130
  • IMG_2389.webp
    IMG_2389.webp
    46.9 KB · Views: 124
You can see the compartment is part of the entire side panel and you can see how large that side panel is.

Also, I didn't realize that I have the seat to contend with, but I still have clearance it will just be really tight.

Thanks for the walk thru, I'll have to print that out.


Poseur- You did almost what I want, which is more recessed inside that panel then yours. Thanks for the pics, nice to see similar projects.
 
Back