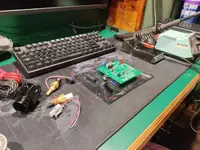
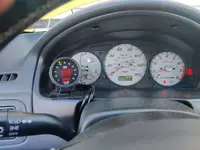
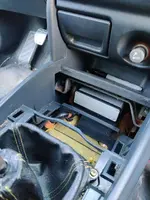
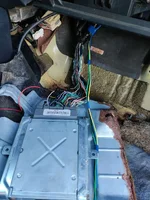
I'm going to build out this Thread with details on how to use a Speeduino to run the MSP, P5 or BJ Chassis with the FSDE in a piggyback Configuration. If you have ever successfully installed a SSAFC by soldering the wiring and not using those cheap vampire wire clips, then you can install a Speeduino. This is a great affordable unit for anyone who is capable of doing minor soldering and crimping of some wiring. The Speeduino will be have full control of Fuel and ignition, and the stock ecu will keep control of idle, AC, alternator charging etc. As of this weekend 3/16/24 I have successfully managed to get my MSP starting and idling with the Speeduino unit installed.
The Speeduino unit I installed was a unit from Openlogic EMS and can be purchased here:

 openlogicefi.com
Because our cam and crank sensors are VR style you will also need a VR conditioner for the unit:
 openlogicefi.com
If you're not comfortable with some minor soldering of some through hole PCB components, you can get a ready to go unit that contains the VR conditioner and a 2ft pre-crimped harness for approx $300 here: Fishdog (UA4C Seawolf) Speeduino ECU.
The only thing you would need to do on this unit is set the jumpers for VR on the board and do some wiring into the factory ecu harness.
All of these differennt Speeduino options all run on the same code and have the same options, some just need some additional assembly, order based on your experience, any of these options are still far easier than assembling megasquirt from the ground up.
Additional Parts that you will need for install:
GM IAT sensor and pigtail: Fast Response GM Intake Air Temperature Sensor IAT/MAT/ACT Kit 25036751 25037225 | eBay
GM Coolant temp sensor and pigtail: https://www.amazon.com (commissions earned)
Coolant temp sensor housing: https://www.amazon.com (commissions earned) (this comes with 1/8 npt thread, but can easily be drilled and tapped to 12mm x 1.5 thread to accept the GM coolant temp sensor.
A spool of automotive grade wiring for building your harness: 18 AWG TXL HIGH TEMP AUTOMOTIVE POWER WIRE 16 STRIPE COLORS 5 FT EA PRD | eBay
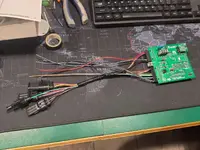
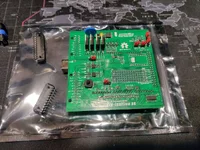
Attached at the bottom is a PDF of the Pinouts for the Detonation EMSx4 unit and what corresponding pin number of the stock ECU they get wired to. The pin numbers are listed at the beginning and end of each row of the ecu plug, making it very easy to count forward or backward through the rows to find the pin number you need. Once I get a decent startup tune squared away I will post it up here also.
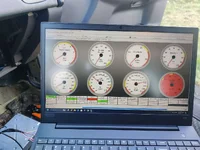
Google drive with my tune files can be found here: Speeduino Tune Files - Google Drive
This will be updated as I improve on the tune. My main mods are AEM intake, 2.5" j pipe back exhaust, FMIC, and a VICS, VTCS gutted intake manifold. Stock injectors, Stock Fuel Pump, stock turbo at 6 psi boost right now. It already pulls harder than the factory ecu with SSAFC at 9psi.
If you plan to run Batch Fire Injection with stock Injectors and stock boost, use the attached wiring diagram and the Batch fire tune I posted in the Speeduino Tune files I shared, tweak the tune and enjoy the car with absolutely no hesitation. you will not be disappointed with how much better the car drives. (I recommend this to get the feel for tuning the car, and stock boost is less risky until you get the hang of things.
If you need and help with Speeduino there are 2 facebook groups I recommend: Look up Speeduino Tuning, and Speeduino - Open Source, low cost engine management groups, there are plenty of knowlegeable people on there offering help.
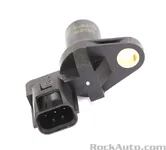
I switched to sequential injection once I upgraded to WRX injectors for a more stable idle, this required some tweaks. A 99 Miata camshaft position sensor and pigtail, changing the idle IAC valve to the speeduino for control and some wiring tweaks, I will update this once I get all the bugs worked out.
Word of advice, Unplug, or blockoff your EGR Valve. I found at times it would make my tune inconsistent, probably due to the factory ecu still opening and closing the valve like normal, this would throw off my air fuel ratio at times do to the oxygen change in the intake manifold.
The Speeduino unit I installed was a unit from Openlogic EMS and can be purchased here:
Pre-Ignition x4 — Slim Standalone Engine Management Kit — OpenLogicEFI
Pre-Ignition X4 is a compact, affordable, and fully Speeduino-compatible standalone ECU. Included: Pre-Ignition X4 ECU (assembled as pictured) Optional 4-Bar MAP & Barometric sensors Harness-side connectors and pins Arduino 2560 (clone) pre-installed with latest Speeduin
openlogicefi.com
Because our cam and crank sensors are VR style you will also need a VR conditioner for the unit:
Dual VR Conditioner (MAX9926) - Fully Speeduino Compatible — OpenLogicEFI
This module is based on the reference design of the MAX9926 Dual Channel adaptive conditioner by Maxim Integrated. For use with VR crankshaft and/or camshaft sensors, this module is universally compatible with any ECU featuring the standard 8-pin header as employed in Speeduino reference designs. T
openlogicefi.com
If you're not comfortable with some minor soldering of some through hole PCB components, you can get a ready to go unit that contains the VR conditioner and a 2ft pre-crimped harness for approx $300 here: Fishdog (UA4C Seawolf) Speeduino ECU.
The only thing you would need to do on this unit is set the jumpers for VR on the board and do some wiring into the factory ecu harness.
All of these differennt Speeduino options all run on the same code and have the same options, some just need some additional assembly, order based on your experience, any of these options are still far easier than assembling megasquirt from the ground up.
Additional Parts that you will need for install:
GM IAT sensor and pigtail: Fast Response GM Intake Air Temperature Sensor IAT/MAT/ACT Kit 25036751 25037225 | eBay
GM Coolant temp sensor and pigtail: https://www.amazon.com (commissions earned)
Coolant temp sensor housing: https://www.amazon.com (commissions earned) (this comes with 1/8 npt thread, but can easily be drilled and tapped to 12mm x 1.5 thread to accept the GM coolant temp sensor.
A spool of automotive grade wiring for building your harness: 18 AWG TXL HIGH TEMP AUTOMOTIVE POWER WIRE 16 STRIPE COLORS 5 FT EA PRD | eBay
Attached at the bottom is a PDF of the Pinouts for the Detonation EMSx4 unit and what corresponding pin number of the stock ECU they get wired to. The pin numbers are listed at the beginning and end of each row of the ecu plug, making it very easy to count forward or backward through the rows to find the pin number you need. Once I get a decent startup tune squared away I will post it up here also.
Google drive with my tune files can be found here: Speeduino Tune Files - Google Drive
This will be updated as I improve on the tune. My main mods are AEM intake, 2.5" j pipe back exhaust, FMIC, and a VICS, VTCS gutted intake manifold. Stock injectors, Stock Fuel Pump, stock turbo at 6 psi boost right now. It already pulls harder than the factory ecu with SSAFC at 9psi.
If you plan to run Batch Fire Injection with stock Injectors and stock boost, use the attached wiring diagram and the Batch fire tune I posted in the Speeduino Tune files I shared, tweak the tune and enjoy the car with absolutely no hesitation. you will not be disappointed with how much better the car drives. (I recommend this to get the feel for tuning the car, and stock boost is less risky until you get the hang of things.
If you need and help with Speeduino there are 2 facebook groups I recommend: Look up Speeduino Tuning, and Speeduino - Open Source, low cost engine management groups, there are plenty of knowlegeable people on there offering help.
I switched to sequential injection once I upgraded to WRX injectors for a more stable idle, this required some tweaks. A 99 Miata camshaft position sensor and pigtail, changing the idle IAC valve to the speeduino for control and some wiring tweaks, I will update this once I get all the bugs worked out.
Word of advice, Unplug, or blockoff your EGR Valve. I found at times it would make my tune inconsistent, probably due to the factory ecu still opening and closing the valve like normal, this would throw off my air fuel ratio at times do to the oxygen change in the intake manifold.
Attachments
-
 IMG_20240201_212943.webp106.1 KB · Views: 471
 -
 IMG_20240316_183448.webp48.4 KB · Views: 378
 -
 IMG_20240316_183442.webp80.9 KB · Views: 376
 -
 IMG_20240313_184655.webp65 KB · Views: 379
 -
 IMG_20240313_184649.webp103.4 KB · Views: 361
 -
 IMG_20240204_223006.webp125 KB · Views: 361
 -
 IMG_20240201_212949.webp151.2 KB · Views: 441
 -
DETONATIONEMSPEx4 Protege (batch Injection).xlsx - Sheet1.pdf62.1 KB · Views: 206
Last edited: