
You are using an out of date browser. It may not display this or other websites correctly.
You should upgrade or use an alternative browser.
You should upgrade or use an alternative browser.
Has Anyone Had Their Fuel Pump/Cover Leak?
- Thread starter mtnbiker26
- Start date
I used a drill{(to drill the screw heads ,if they are to rusted ),{TIP don't drill to deep leave as much shaft as you can to be able to unscrew them with a vise grip} when I did mine ,I had to stuff a rag in the big hole but I didn't feel to comfortable while doing it.
Installshield 2
Gothenburg Superiority
Lots of gasoline and very little air is nearly no danger at all...just a a little bit of gasoline and a lot of air...exact opposite...
the tank itself and whats inside of it is of little overall danger to anything..its the amounts leaking around the top, the vapor filling the car, etc...Its not going to explode like a movie, but you could flash yourself enough to think twice...as well as melt some stuff that will be a lot harder to replace (your interior)...
Brian is right, throw a match in a drum full of gasoline...and nothing will happen...but throw a match into a mostly sealed room where that gasoline has been sitting for a few hours...no more room...
This is a short video that might be helpful for those trying to figure out how to remove the fuel line quick disconnect with screwdrivers or a fuel line disconnect tool.
http://www.youtube.com/watch?v=vRTjYAxvaCs
A garage I took the Protege to quoted me $700 to change the tank and fuel body to cure the fuel leak. I bought a used tank and was about to have it installed but came across this awesome thread that pointed me to the problem and the solution.
Here's a summary of all the parts I purchased based on what different people have said:
McMaster-Carr - http://www.mcmaster.com/:
-92290A140 Metric 316 Stainless Steel Socket Head Cap Screw, M4 Thread, 8MM Length, .7MM Pitch, packs of 25 - $6.72
onlinemazdaparts.com:
(-BJ0E-42-16XE - fuel pump assy plate - $14.69 - optional, could reuse old plate without a problem since the rust is on top of the plate and not below)
(-FEH2-13-ZE4 - fuel pump washer - $4.43 - optional, possibly unless changing low pressure fuel filter)
rockauto.com:
-Beck/Arnley 0433010 (Mazda GY01-13-ZE0) - "In Tank Fuel Filter" (listed under "Fuel Filter" subfolder) - this is actually the fuel body and includes the fuel pump seal (Mazda ZL01-13-ZE5) - $27.79
-Airtex TS8024 (Mazda B25D-42-166) - Tank Seal, Rubber (Retainer plate gasket ) - $4.85
Total: $51.76 (parts) + ~$22(shipping) = $74 or about 10% of the garage's quote... now to see about those rusted screws...
Edit: Just completed this job. The rusty screws were the only difficult part. For 6 of the 8 screws, I used an Alden Grabit. The other two were too recessed to drill a Grabit bit straight into the screws, so I drilled off as much of the head as I could and finished off the bolt head with a chisel. (A drill bit extension would have helped a lot.) With the plate removed, there was just enough of the studs left for locking pliers to remove them, and both studs spun out easily.
If anybody needs the McMaster-Carr stainless steel screws above, PM me and I'll mail 8 of them to you for the price of shipping (about $3) vs ~$11 for 25 including s&h.
Last edited:
The strange thing about our fuel pump housing is that it contains the high pressure filter on the side of the housing. It runs half way around the housing and 3/4 of the way down. I intend to rip the top off my old housing (when I change mine shortly,... separating the white top piece from the black bottom piece) to inspect the filter media inside to see how much crap has built up in 11 years. I will try to post some pictures when I get to this job.
The filter being inside the housing is what is causing all the naming issues. (stupid ass place for a fuel filter,... why not an in line filter somewhere else like normal cars ??)
The filter being inside the housing is what is causing all the naming issues. (stupid ass place for a fuel filter,... why not an in line filter somewhere else like normal cars ??)
I bought the top replacement plate in Ottawa, On for about $14, then the red gasket that goes under that for $20 (a little much but I didn't want to have to order out). It did the trick, no leak after a day at least.
I couldn't get the 8 screws out. I soaked it in that can of stuff mentioned earlier to help loosen up the rust. I tried hammering it with a #2 Phillips to remake the head, then tried an easy out screw extractor. That sucked, it didn't get a grip at all, just kept turning in it's spot. I even drilled a little to burnish a smooth hole to have it go in deeper. Then I tried taking a piece of a hacksaw and making a slot on the screw head to use a flathead screwdriver on. I gave up and took it to a shop and paid 1/2 labor to remove them in 30 minutes.
I did the rest at home, replacing the screws with 8 stainless steel ones. I put in the new gasket and replaced the plate. I had a heck of a time with the fuel line side clips. I sort of ripped and teared to get them free, the side clips didn't really press in at all, very firm.
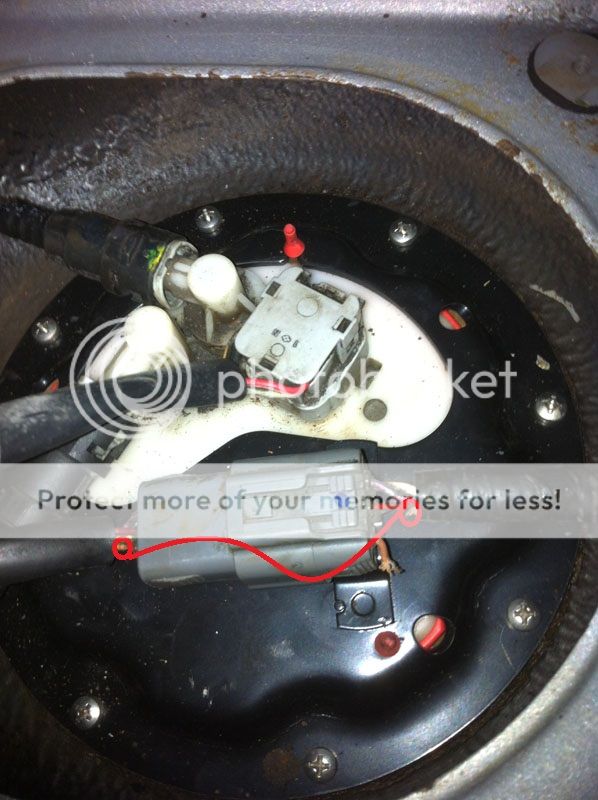
Question, the electrical plug that clip in on top, I notice mine was black taped but one of the wires were cut or ripped off. Can anyone tell me what this orange wire is for? Image added as attachment.

I couldn't get the 8 screws out. I soaked it in that can of stuff mentioned earlier to help loosen up the rust. I tried hammering it with a #2 Phillips to remake the head, then tried an easy out screw extractor. That sucked, it didn't get a grip at all, just kept turning in it's spot. I even drilled a little to burnish a smooth hole to have it go in deeper. Then I tried taking a piece of a hacksaw and making a slot on the screw head to use a flathead screwdriver on. I gave up and took it to a shop and paid 1/2 labor to remove them in 30 minutes.
I did the rest at home, replacing the screws with 8 stainless steel ones. I put in the new gasket and replaced the plate. I had a heck of a time with the fuel line side clips. I sort of ripped and teared to get them free, the side clips didn't really press in at all, very firm.
Question, the electrical plug that clip in on top, I notice mine was black taped but one of the wires were cut or ripped off. Can anyone tell me what this orange wire is for? Image added as attachment.
Well,... I found this info :

It looks like the orange wire goes into the connector and comes out as a brown wire,... Which is what your picture appears to show.


You could get a couple of these and pinch them on at both sides of the connector to rejoin the wire. (bypassing the connector):

Or two of these and a two inch piece of wire to join them:

You could peel back the black covering on either side of the connector snip the wire on the left side of the connector (make sure it's the same wire and pin on either side of the connector) Pinch on a butt connector and a two inch piece of wire then join it back to the wire on the other side of the connector with another butt connector.
It looks like the orange wire goes into the connector and comes out as a brown wire,... Which is what your picture appears to show.
You could get a couple of these and pinch them on at both sides of the connector to rejoin the wire. (bypassing the connector):
Or two of these and a two inch piece of wire to join them:
You could peel back the black covering on either side of the connector snip the wire on the left side of the connector (make sure it's the same wire and pin on either side of the connector) Pinch on a butt connector and a two inch piece of wire then join it back to the wire on the other side of the connector with another butt connector.
Last edited:
Soldering is fine,... I soldered a dripping gas tank before,.. it's not hot enough to get to ignition point. (I put out a lit cigarette in gas before,... just as a test)
If your fuel filter is new then there should be no gas or fumes anyway.
Soldering is always the best way to join wires. Using shrink tube makes a really neat job to go with it.
If your fuel filter is new then there should be no gas or fumes anyway.
Soldering is always the best way to join wires. Using shrink tube makes a really neat job to go with it.
Wow so much information in this thread. Glad I found it. ")
I notice there's gas smell every time i step near the car. I took off my back seats and panel and right away there's a strong smell of gas.
 [/IMG]
I've gone through this forum and notice that everyone has a problem taking the screws out. Based on the information I've gathered here, (clean, pb blast, wire brush, hammering # 2 driver on the screws) I wonder if this failed anyone? To the point you got to replace the entire fuel tank. I really would hate to do that. Thanks!
I notice there's gas smell every time i step near the car. I took off my back seats and panel and right away there's a strong smell of gas.
I've gone through this forum and notice that everyone has a problem taking the screws out. Based on the information I've gathered here, (clean, pb blast, wire brush, hammering # 2 driver on the screws) I wonder if this failed anyone? To the point you got to replace the entire fuel tank. I really would hate to do that. Thanks!
dude, if that's YOUR cover, you will probably need a new tank
That looks like the standard Canadian cover. Mine isn't quite that bad, but similar.
L0w_N_sl0w
Member
- :
- Mazda,Protege5
Did anyone experience hard starts due to the fuel pump leaking? I have a good drip of fuel under my car and been having excessive crank time.
http://www.image-hosting.net/images/messageboard/gotzoom/Protege 033.jpg The Black wire at the bottom of this, to the right near the grey connector, where does that connect? changed the pump on mine and can't find where that wire goes. any help?
http://www.image-hosting.net/images/messageboard/gotzoom/Protege 033.jpg The Black wire at the bottom of this, to the right near the grey connector, where does that connect? changed the pump on mine and can't find where that wire goes. any help?
I'm not 100 % sure but I think that black wire isn't used. It's been a while since I did mine but I'm pretty sure there was a wire that didn't connect to anything.
Here's a link to my thread,... there might be some pictures that can help.
http://www.mazdas247.com/forum/show...How-To-Change-Your-Fuel-Filter-(lots-of-pics)
http://www.image-hosting.net/images/messageboard/gotzoom/Protege 033.jpg The Black wire at the bottom of this, to the right near the grey connector, where does that connect? changed the pump on mine and can't find where that wire goes. any help?
I remembered that I still have my old housing so I went and took a picture.
It looks like that little black wire connects to the other black wire inside the black connector.
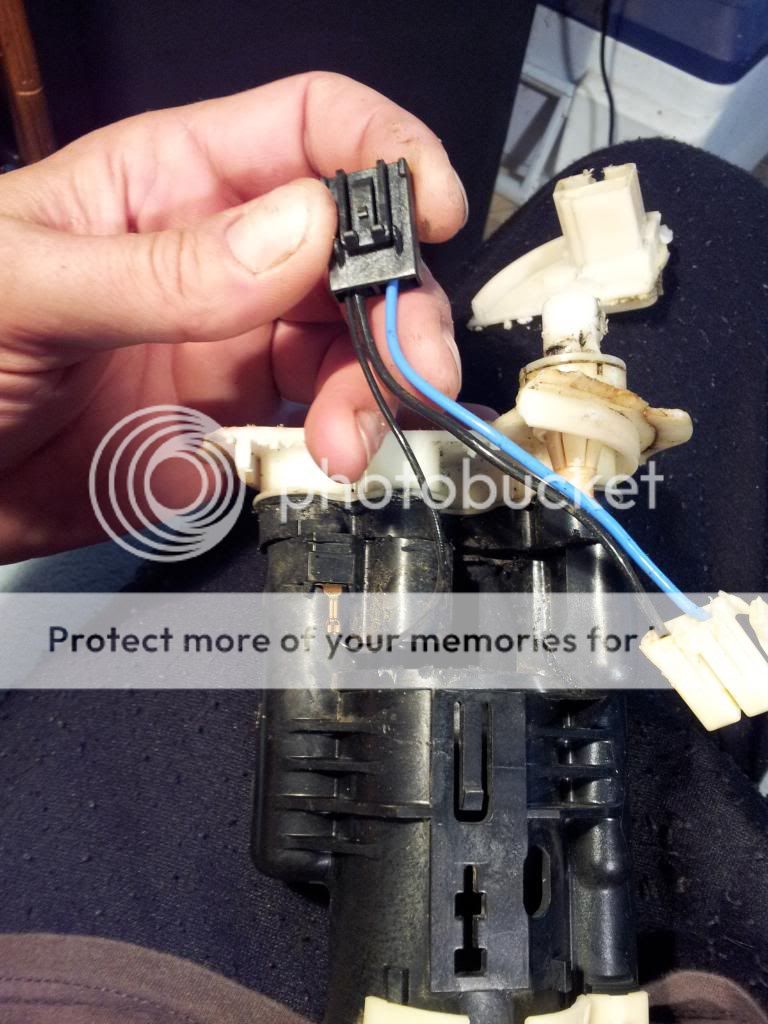
That wire goes to a tab in the housing but doesn't go anywhere or do anything ??? I'm 95% sure you can just leave that wire the way it is or try to plug it back into the connector.
I do recall that wire. It was connected when I pulled out the fuel filter assembly. The plastic housing may be hiding where the other end of the connection is going. Considering they took the time to mold that into the assembly and add a ground connection, I do not believe they did it for no reason.I remembered that I still have my old housing so I went and took a picture.
It looks like that little black wire connects to the other black wire inside the black connector.
That wire goes to a tab in the housing but doesn't go anywhere or do anything ??? I'm 95% sure you can just leave that wire the way it is or try to plug it back into the connector.
If that's an old fuel filter assembly, I guess you could always cut it open to see if the ground connection goes anywhere. I threw mine away.
I do recall that wire. It was connected when I pulled out the fuel filter assembly. The plastic housing may be hiding where the other end of the connection is going. Considering they took the time to mold that into the assembly and add a ground connection, I do not believe they did it for no reason.
If that's an old fuel filter assembly, I guess you could always cut it open to see if the ground connection goes anywhere. I threw mine away.
My housing was already cut. That wire simply goes nowhere. I figure maybe some other car uses the same filter housing and it's just extra for our car. It looks like perhaps another terminal would plug into it on the housing but there is no such terminal for our car.
Here's another pic.
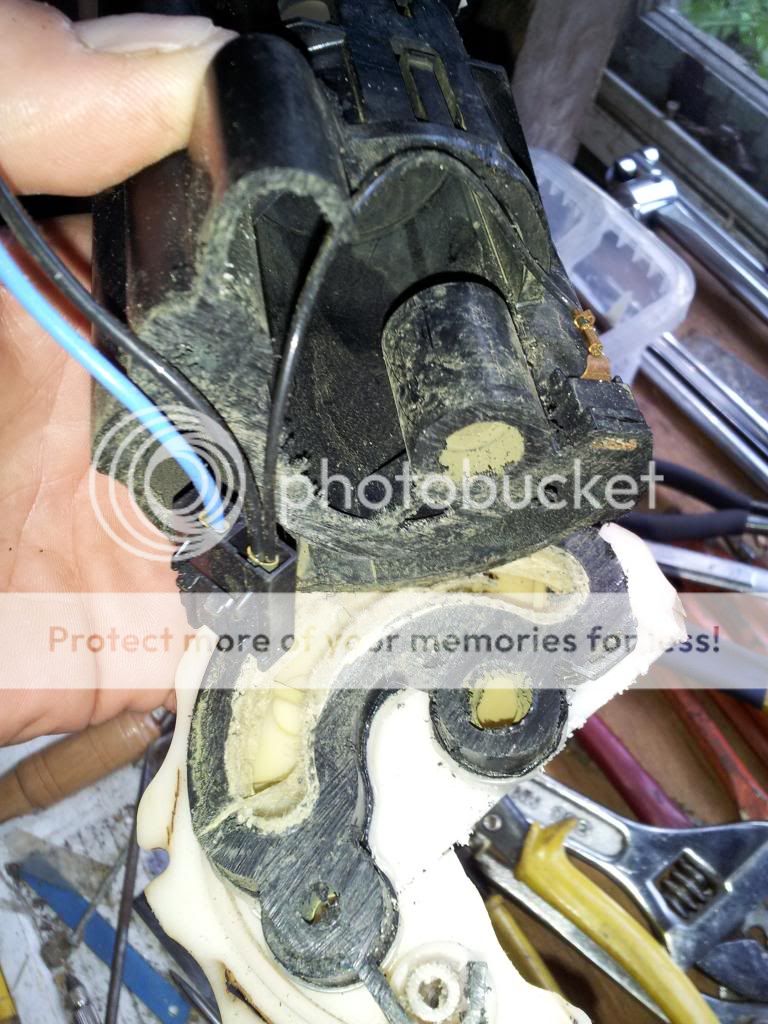
PS,... I keep all my old parts,... they come in handy for reference all the time.
New Posts and Comments

- Replies
- 1
- Views
- 65

- Replies
- 3
- Views
- 402
- Replies
- 0
- Views
- 65