What have you done to your MSP today?

Earful said:
Installed a Megan Racing Catback yesterday. This part is for a P5, but I had a friend TIG weld in the extension needed to fit the MSP. Tone is nice with this exhaust, very tight, not buzzy or noisy.

Looks good bro!
Yea, that exhaust muffler has a cool sound to it, nice!
 
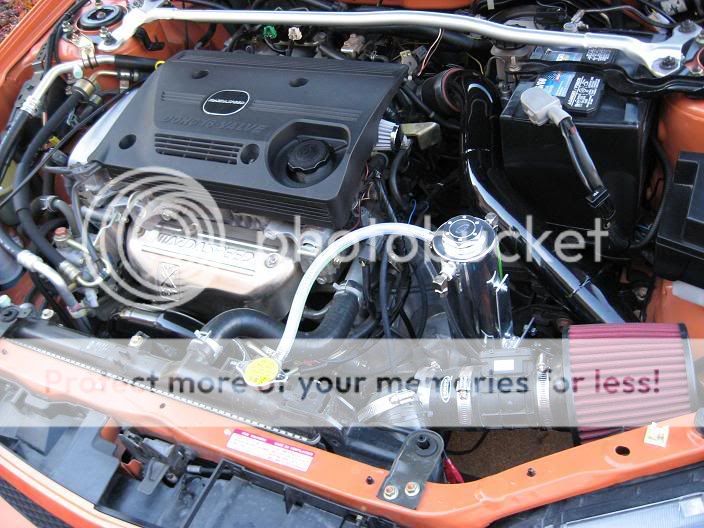
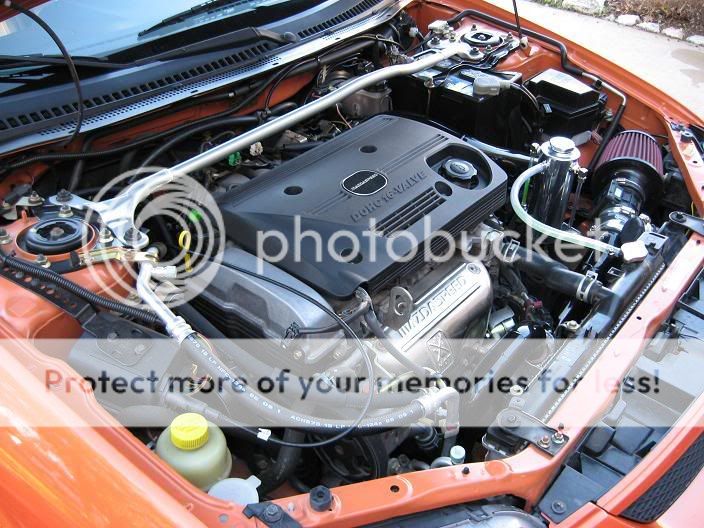
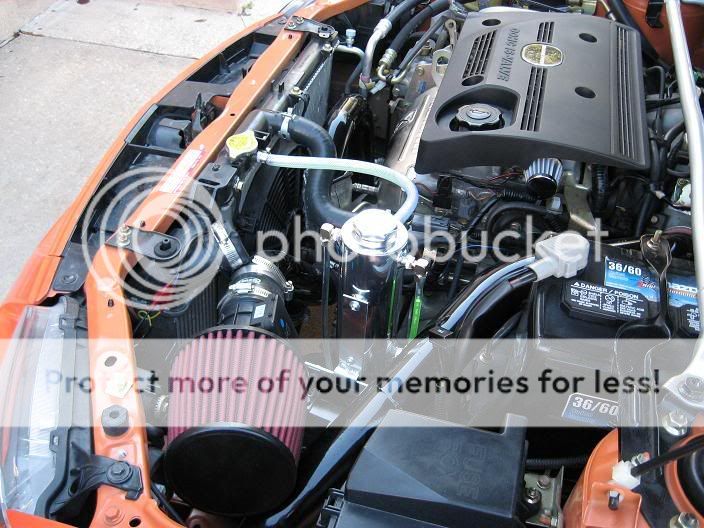
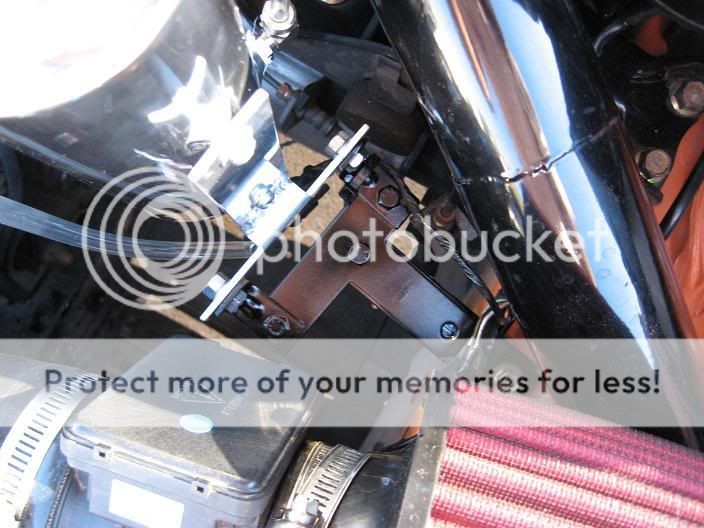
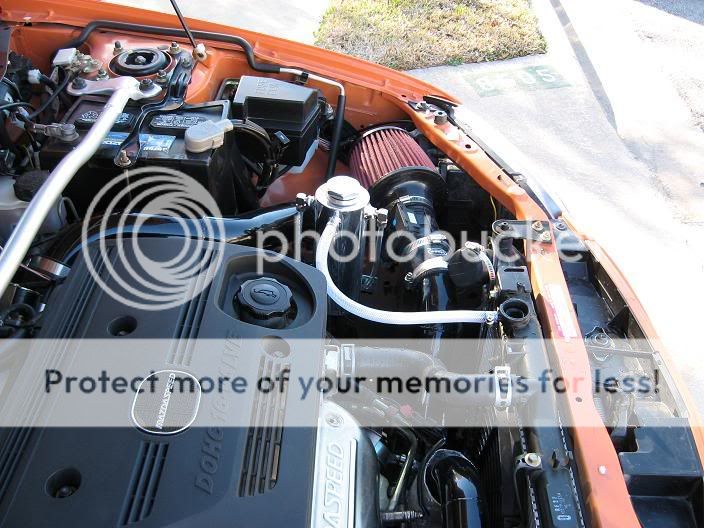
today i changed my coolant and installed my catch can that i got for christmas (woulda been on there sooner, but i had to secure in an extra hose and make a bracket for it). I think it turned out really well!!

IMG_0080.jpg


IMG_0078.jpg


IMG_0077.jpg


IMG_0075.jpg


IMG_0074.jpg
 
^^^ .. Wow, NICE!! I've been toying with the idea of getting another aftermarket coolant overflow tank, but I'm not sure which one to go with. I'll also need to get a bracket for it .. but I'm no good at fabricating that kinda stuff myself. I have none of the needed equipment.

I put in s'more coolant (since I lost some of it during the swapping of my exhaust manifold), and re-zip-tied the one corner of my radiator. Oh, and I replaced some vacuum line, too. Woohoo, I guess, LOL.
 
Rush said:
^^^ .. Wow, NICE!! I've been toying with the idea of getting another aftermarket coolant overflow tank, but I'm not sure which one to go with. I'll also need to get a bracket for it .. but I'm no good at fabricating that kinda stuff myself. I have none of the needed equipment.

I put in s'more coolant (since I lost some of it during the swapping of my exhaust manifold), and re-zip-tied the one corner of my radiator. Oh, and I replaced some vacuum line, too. Woohoo, I guess, LOL.

Thanks!!

the bracket was really just a t bracket and two L brackets, with some extra bracing underneath, all put together and then grinding the excess of with a drill. It wasn't too bad, i bet you could do it. I'm real pleased with it, i got this one from Protege Garage, its made by weapon R. I bet a greddy or something would be nicer, but probably substantially more $$. Oh and also, with this one i had to buy some small hose that would fit inside the main nipple, run it to the bottom of the tank on the inside, and seal it at the nipple with some gasket maker (because otherwise it would only catch overflow, and not let any coolant get sucked back in).
 
i have the same coolant overflow, weaponR makes nice stuff. I went with a different route though with the hose. I tapped it into the hole at on the bottom of the catch can. That way it is a gravity vacuum feed and it doesnt have to pull the overflow back up when needed. I assume that you ran another tube on the inside to act as a straw. I used a 6" L bracket from lowes to mount it, removed the bracket it came with entirely since the bolt holes on the L bracket matched up perfectly. For the price it really makes the bay look cleaner. Protegegarage carries them if anybody is looking for them
 
Velocifero said:
i have the same coolant overflow, weaponR makes nice stuff. I went with a different route though with the hose. I tapped it into the hole at on the bottom of the catch can. That way it is a gravity vacuum feed and it doesnt have to pull the overflow back up when needed. I assume that you ran another tube on the inside to act as a straw. I used a 6" L bracket from lowes to mount it, removed the bracket it came with entirely since the bolt holes on the L bracket matched up perfectly. For the price it really makes the bay look cleaner. Protegegarage carries them if anybody is looking for them


so did you create another fitting on the bottom?? Or did you remove the level check part?? You're right, i did do a 'straw' method, because there weren't any open fittings on the bottom.
 
jmv said:
so did you create another fitting on the bottom?? Or did you remove the level check part?? You're right, i did do a 'straw' method, because there weren't any open fittings on the bottom.
there is a drain plug directly in the center on the bottom of the can. I just used brass fittings, a threaded L and then a barb threaded onto that. It was the lowest point in the can, that way it can get every bit of coolant back if needed and there is no resistance to get it. Gravity feed FTW. You should be fine with the straw method though, I just didnt really want to rig up an inside tube, what kind of ID is the tube you're using? I actually was installing it at first and had it set up, I even custom cut up the OEM coolant resevoir bracket to work then stood back and tried to figure out how it was gonna get fluid back when it needs it, ran to Lowes and found the stuff I needed, redid it. I am much happier with the L bracket I used rather than the bracket it came with. I couldn't get the original one tight enough with the bracket I mounted it to, but just the L bracket alone is stiff as hell now.
 
i'm not 100% on what the ID of the hose i used was, it was 1/4" outside diameter though. It was the closest fit hose i could find, and i used some silicone water pump gasked maker to seal it up real well.

The L-bracket thing is a nice idea, but i don't think it would have given me the length that i would've needed. I used a t-bracket and 2 smaller l-brackets to attatch to the bracket it came with. When that wasn't quite strong enough to keep it from vibrating alot, i added a thick strip of metal underneath the t-bracket, which held it pretty firmly.
 
Last night... lets see...

I changed my oil (mobil 1 10w30) and filter (mobil 1 filter)
Also changed out my Trans fluid (Royal Purple 75w90)
I greased my bushing to rid myself of the squeek, but ofcourse it rained today, so it probably wont last long.
I also ripped out my charcoal canister + all the extras and blew out all of the gas in the canister. I swear I had almost a quart of gas in it. Worst part? I never top my tank off.

In either event it was a good way to spend 2 hrs. Im rebalancing my wheels next week and turning/replacing my rotors... depends on what I see when I pull them off. Thatll be my temporary fix until I buy new/better rotors...

the only thing Im dreading? replacing teh timing belt... Hopefully Ill get that, the sparkplugs, clean my pulleys (dirt buildup from a wasp nest) and flush the coolant system all in one shot.

after that maintenance is out of the way I can worry about aftermarket goodies :p
 
1. install Perrin fuel rail
2. install fuel pressure gauge (engine compartment)
3. install fuel pressure sensor for Defi
4. install oil sandwich adapter for oil pressure sensor for Defi)
5. install passenger Sparco harness
6. cleaned up some more wiring from manifold
7. removed Optima battery decal
8. lowered car 1/2" more
9. install GTspec trunk cage with trunk matt
10. new windshield
11. All AWR motormounts.
 
Pirana said:
1. install Perrin fuel rail
2. install fuel pressure gauge (engine compartment)
3. install fuel pressure sensor for Defi
4. install oil sandwich adapter for oil pressure sensor for Defi)
5. install passenger Sparco harness
6. cleaned up some more wiring from manifold
7. removed Optima battery decal
8. lowered car 1/2" more
9. install GTspec trunk cage with trunk matt
10. new windshield
11. All AWR motormounts.
been busy?
 
Hehehe, thanks for the compliments...I forgot I put some of DGs carbon fiber trim on the radio bezel....just the outside trim...looks great.
 
yeah the outer trim piece look great. I need to replace one of mine though because it cracked when I was removing it one time.
 
Pirana said:
1. install Perrin fuel rail
2. install fuel pressure gauge (engine compartment)
3. install fuel pressure sensor for Defi
4. install oil sandwich adapter for oil pressure sensor for Defi)
5. install passenger Sparco harness
6. cleaned up some more wiring from manifold
7. removed Optima battery decal
8. lowered car 1/2" more
9. install GTspec trunk cage with trunk matt
10. new windshield
11. All AWR motormounts.

The trunk cage is sex eh!? ohh yeaa.....
 
I installed my Vibrant 3'' S-pipe back exhaust yesterday
When My AWR MM come in which should be tommorrow I will put them on, as well as my familia badge.
 
Back