
You are using an out of date browser. It may not display this or other websites correctly.
You should upgrade or use an alternative browser.
You should upgrade or use an alternative browser.
Mixing fiberglass and MDF... need help.
- Thread starter Poseur
- Start date
howsolost? please let me know actually, as well as anywhere else that's confusing. Mostly I'm jsut putting up my exact thoughts I haven't really thought outside the box about this much yet. I'm kind of in the process of writing up a how-to. that I hope to be simple and clear.
Last edited:
I was going to mention that most installers staple the fleece to the trim ring, but you seemed to have a good idea brewing. I guess it didn't work out quite as planned.
Another tactic is to hold off on gluing the trim ring to the mounting ring until you have layed down the fleece. Then you place the trim ring over the fleece to pin it down. As you lay down the fiberglass layers, it gives you a good gauge as to how thick it is. If you used a 1/2" trim ring, you need to keep laying glass until you reach the top of it. I've never tried this method so I don't know how well it works, but I've seen it done in how-tos presented in magazines. I'm not sure how you actually glue the trim ring.
Edit: BTW, it looks really good other than the stuff you need to trim off. I don't see any wrinkles in the fleece...that will save you so much time in the long run.
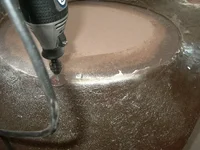
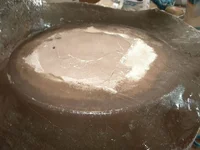
yea, looks good. but sndsgood is right, now the fun part is almost over. now youll have to get some sandpaper action going on. although, i really dont mind sanding much. ive done quite a bit of it, so im used to it i guess. but isnt it amazing how much resin that fleece can soak up. on the first tutorial i read he said that he only used like 8oz or something like that for the fleece. so i mixed up a batch of like 10oz or so and ended up using another 5oz. then when i went to do some more work to it i found that the resin didnt even soak all the way thru. damn thick ass fleece. so then i had to resin the inside of the fleece and lay some mat up in there, just to be safe. i dont think itll be a problem tho. oh, and since you have access to air tools, id suggest using a little mouse or a similar rotary type sander. i used those when i worked building furniture. they are awesome, and theyll save you tons of time. only problem is after a while your hand goes numb from the constant vibration.
yeah mouse sanders work pretty good, i think i'd like to get one of those 3 way sanders too.
poseur one thing i would suggest and this is just purly cosmetic, but i would add a piece of mdf to the top piece, cut it to match up perfectly with the edge of your cars trim panel. this way it will look more of a flush piece rather then a box sticking in there.
poseur one thing i would suggest and this is just purly cosmetic, but i would add a piece of mdf to the top piece, cut it to match up perfectly with the edge of your cars trim panel. this way it will look more of a flush piece rather then a box sticking in there.
I just about did the staple thing, but I didn't want and uneven sortof multi-surfaced flat kind of look, that and for some reaosn the wood stuff my friend snagged from shop for my rings is too dense ot staple into. It's this weird high density stuff. Hopefully the resin'll soak in to it atleast. Butyea, as far as the ridge goes. I very likely wouldn'thave had it if I'd known not to puddle resin around it in hopes that it would soak in. Oh well. It'll actualy just get me used to sanding, etc. One of my friends has a badass new little DeWalt mouse sander kinda thing that I've been eyeing everyime I pass it in his garage, he already understands it'll be out of his posession for awhile, and, well prettymuch I know way toomany ppl, I should be able to get ahold of most anything, heck I could even manage a jackhammer if I needed it *L*
As for the thought on a trim-piece for the top. That's a good idea, and something I've been considering, but I've kind of got a weird angle that I'm dealing with and clearing that cover as well as sitting at whatever angle it needs to be might prove to be tricky. I guess I could just match thop top of the arc that hangs over, then take it to the belt sander and grind off the majority of the top edge to angle-match it. And then the cover dips down and doesn't stay level witht he top of that shelf all the way across. The other problem is that midway back there's that "hook" where the cover attaches, so that'd need to somehow be accomodated. Perhaps I can actually make a ridge to get the back part up even with the shelf and then taper it down to the point....hmm... something to have thought of before fleecing *L*...
I'm really looking forward to getting a couple more layers no it then trimming it out today so I can actually place it and hook up my sub and make sure it's not gonna flex.
Oh, yes, BTW... NO WRINKLES!!!
I just remembered that. Like I said, that top-plate let me stretch that sucker TIGHT... I think I'll keep using that method, seems to work alright, and if I can just be a bit more cautious around the edges I shouldn't have the big ridge to deal with. (although it's really nothing once you hit it with a sander, or dremeltool, etc
I just remembered that. Like I said, that top-plate let me stretch that sucker TIGHT... I think I'll keep using that method, seems to work alright, and if I can just be a bit more cautious around the edges I shouldn't have the big ridge to deal with. (although it's really nothing once you hit it with a sander, or dremeltool, etc
nice and smooth...
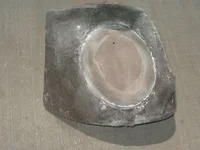
Okay, so that went easier than I thought. Between the trusty dremal, and my friends badass little mouse sander, my edges are gone without a problem. and actually I sorta intentionally left a bit of an indentation all around so that it would show the circular surround. notsure if I'll stay with that look or smooth it over, but I've got some time to decide.... Layed up atleast 2 layers all around. just this one last bit to dry and I should be structurally complete... hmm... okay, so maybe I'm gonna go mix up one more batch and finish off the pile of pre-cut cloth that I've got seeingas I'm likely done wiht it, and besides, a little overkill never hurts, eH?
Okay, so that went easier than I thought. Between the trusty dremal, and my friends badass little mouse sander, my edges are gone without a problem. and actually I sorta intentionally left a bit of an indentation all around so that it would show the circular surround. notsure if I'll stay with that look or smooth it over, but I've got some time to decide.... Layed up atleast 2 layers all around. just this one last bit to dry and I should be structurally complete... hmm... okay, so maybe I'm gonna go mix up one more batch and finish off the pile of pre-cut cloth that I've got seeingas I'm likely done wiht it, and besides, a little overkill never hurts, eH?
Attachments
sndsgood said:yeah mouse sanders work pretty good, i think i'd like to get one of those 3 way sanders too.
a mouse sander is next on my list of tools to get
") between 2 rotozips, 1 dremel, a right angle grinder with sanding disc attatchments, orbital sander, belt sander, and a 3-d sander, i've got most of it covered
between 2 rotozips, 1 dremel, a right angle grinder with sanding disc attatchments, orbital sander, belt sander, and a 3-d sander, i've got most of it covered") the 3-d sander is great for the finishing work, cause it comes out so even and smooth. it sucks for lots of sanding, so use an orbital or mouse for that. the right angle with finer grit works pretty good, if you've got steady hands.
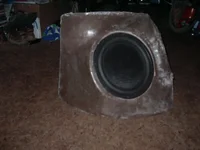
the 3-d sander is great for the finishing work, cause it comes out so even and smooth. it sucks for lots of sanding, so use an orbital or mouse for that. the right angle with finer grit works pretty good, if you've got steady hands.Okay, we have not only a shape and form, but an actual structural box... I just cut it out, there's a couple slight fit issues, and I'll have to work on that, but I HAVE A BOX!!! yay. I'm soo giddy. As for the fit issues. It's mostly from the overlapping fleece that wrapped around the back. Should all comeoff relatively easily, Just hope there's enough stuff left structurally to keep the bond. The other bad. (and this one's a bigger booboo) I cut into the trimring a bit with my rotozip (towards the right/rear side) Nothing I'm too cocerned about seeing as I've got a good share of filling and smoothing to do anyway, but (bang) mostly it was just a bonehead move... Honestly I was just soo excited to be so close that my rotozip bogging down a good bit as it veered towards going through my trim ring didn't even phase me and I just pushed a bit harder....(braindead Ohwell. Like I said, nothing that's un-fixable, or even something to fret over all that much. just that I am dumb...
There's all sortsa fg dust and fleece bits all over though so I'm gonna go abuse some carwash vac's before I slap my Sub in it....
There's all sortsa fg dust and fleece bits all over though so I'm gonna go abuse some carwash vac's before I slap my Sub in it....
Attachments
well, basically the fleece is what you use to get a shape to glass on top of. After you've got your skeleton layed out, you stretch fleece over it all. this gives you something that you can then layup your fiberglass onto. thepart that may be confusing isthat I'm possibly considering putting another layer of fleec eon top of my fiberglass just so it will be smoother easier. but in lgiht of wake's bondomix suggestion I may just go for that instead.
Structurally, I'm sure it does something, but after trimming out the fairly saturated fleece from the back of my mold as well as stray fiberglass, I'm not really allthat sure that fleece is the strongest of stuff either. The actual fiberglass is MUCH stouter. Basically it does add thickness. and that can't hurt. But it cut through and peeled off rather easily relative to actual fiberglass. I'm glad now that I went ahead and used upmy cloth on the face of my box. basically I've got a minimum of 5layers on the face all around on top of the fleece. And there's actually more like 10 layers on the large broad flat area towards the left(front of car) side of the box. The fiberglass itself is where you really get your firm structure from. Depending on what exactly you're doin with it, however fleece may be sufficient.
Structurally, I'm sure it does something, but after trimming out the fairly saturated fleece from the back of my mold as well as stray fiberglass, I'm not really allthat sure that fleece is the strongest of stuff either. The actual fiberglass is MUCH stouter. Basically it does add thickness. and that can't hurt. But it cut through and peeled off rather easily relative to actual fiberglass. I'm glad now that I went ahead and used upmy cloth on the face of my box. basically I've got a minimum of 5layers on the face all around on top of the fleece. And there's actually more like 10 layers on the large broad flat area towards the left(front of car) side of the box. The fiberglass itself is where you really get your firm structure from. Depending on what exactly you're doin with it, however fleece may be sufficient.
Last edited:
Yep I am dumb...
Okay, so I messed up... Notsure if you noticed all of the extra stray fibers and pulled-up pieces of glass that I jsut sort of left floating around inside my box. BUt my sub certainly does... I dropped my sub in and dorve for a bit appreciating haveing FULL music back again. I then stopped at a big empty parkinglot (2 am and all) Opened the hatch, grabbed my remote so I could turn it up, and got back there only to hear a ticking rattly noise. Yep, Every little string or half-resined bit of fiberglass I had sticking up on the inside was rattling just like it should. Don't know why it didn't occur to me earlier, but oh well... Would've been MUCH easier if I'd trimmed it all out before pulling my fleece, but *shrug* ohwell. that's why they make those flex-hose attachments for dremel tools. (this whole project has re-affirmed my fondness for the thing) Needless to say my arms are itchy from reaching in and pulling out whatever chunks I could with my pocketknife and some malice... I'll get more tomorrow, and hopefully I can get enough. If all else fails, perhaps this is a good use for some of that spray-on insulation.
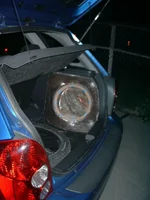
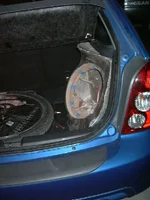
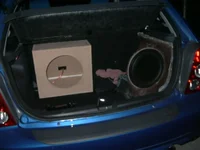
Anyway, so HEY I've got a box! Even got some pics side by side with my old one.
Okay, so I messed up... Notsure if you noticed all of the extra stray fibers and pulled-up pieces of glass that I jsut sort of left floating around inside my box. BUt my sub certainly does... I dropped my sub in and dorve for a bit appreciating haveing FULL music back again. I then stopped at a big empty parkinglot (2 am and all) Opened the hatch, grabbed my remote so I could turn it up, and got back there only to hear a ticking rattly noise. Yep, Every little string or half-resined bit of fiberglass I had sticking up on the inside was rattling just like it should. Don't know why it didn't occur to me earlier, but oh well... Would've been MUCH easier if I'd trimmed it all out before pulling my fleece, but *shrug* ohwell. that's why they make those flex-hose attachments for dremel tools. (this whole project has re-affirmed my fondness for the thing) Needless to say my arms are itchy from reaching in and pulling out whatever chunks I could with my pocketknife and some malice... I'll get more tomorrow, and hopefully I can get enough. If all else fails, perhaps this is a good use for some of that spray-on insulation.
Anyway, so HEY I've got a box! Even got some pics side by side with my old one.
Attachments
dont add another layer of fleece just use the extra fg cloth if u want to. u may not get all the fleece soaked up when your doing it and then youlle have this thin layer on top that will crack when your sanding it. only use fleece for that first skeleton layer.
and be very careful with any part that was wrinkled, it may look perfectly flat to you but when you get done bondoing and priming and resanding your likely to find slight ripples that will need allot of attention.
another thing to fix is the part near the rear hatch. it doesnt line up great. nitpicky but i can get that way sometime.
yeah wake, ive got a belt sander an orbital sander a mouse sander a dremel and i still want the 3-d one. course i just need to break down and get a compressor so i can get a real power sander
looks pretty good. much better than the old MDF thig, huh? i wouldnt run your sub to awfully much without cleaning the inside of the box very well tho. all those little fibers and dust particles get inside and itll wear the sub out alot quicker. thats going to be one of my problems too. if i was smart at all i wouldnt have cut the hole out and just left fleece stretched over it so that nothing can get inside. or at least put a temporary cover on it. instead ive got tons of fg dust allover. i think im going to take it to the heavy duty car wash vacs like you said and clean out most of it, then just wipe it out till i get it all. but anyways, that definately is much prettier than your old one and you just saved your hatch a lot of space. itll look really nice once you get it painted. oh, and how did the sub sound in the new box?
Alright, im kinda getting it now. Generalizing things usually helps me understand the process better...
wood frame
then fiberglass to build up some walls and s***
then the ring
then you stretch the fleece (make sure to get flower,pengiun or bunny print)
soak it with resin
lay up more fiberglass over the fleece
then the rest is just cosmetic shiz
am i following? the only thing i dont really get is the bottom of page 5 (the foil on the disc thing with the puller contraption), but ill read it again...
New Posts and Comments

- Replies
- 6
- Views
- 1K