Mixing fiberglass and MDF... need help.

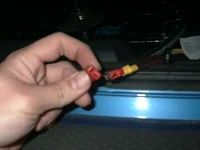
Dex> that part isn't entirely necessary, but seeing as just stretching fleece over the top of the shape that I made would not let it sit flush with my ring, The folil covered disc was simply a temporary step to stretch the fleece and hold it down flush with the face. The purpose of the foil is to keep the resin from soaking into the wood disc and making it a permanant thing. One super important step to not take lightly is prior to EVERYTHING else, prep the helloutta yer area. tapetapetape, and cover over anything else that you reasonably can. one of the biggest nasties I came across is all of the fiberglass dust. Little tiny fibers that jsut float around in the air while you're working with your cloth and mat (especially while cutting) Took about $4 at the carwash vacs to get up most of the stuff, and I can still see little fibers of it on occasion. And on the taping front. you might want to use a release agent. I didn't. made it tricky but the blue tape eventually peeledup. I spent like 6hours taping off my car.


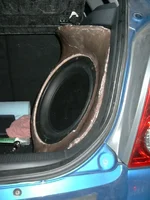
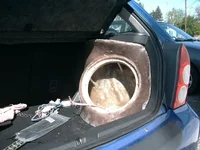
snddsgood> yea Like I said, still have some fit issues. I've got some more trimming to do. alot of it's my overlap on the bottom of the box, I got a little carried away withgooping the resin on the fleece there, so I'm gonna go out to my buddy's shop and hit it with the airtools in a bit.

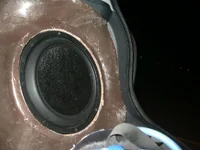
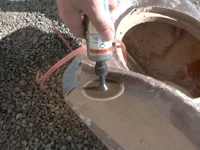
Sam> yea I did go vac it out pretty touroughly actually, but then I came across all of the whiskers and little pieces of PITA half-resined cloth that were stuck to the box, just sticking up. I think I'm gonna actually just wash it all out with water, though. Just make sure it's a bight sunny day to leave it out in afterwards. Plus I figure I can use the water to Get a good measure of my volume while I'm at it...
 
Last edited:
sndsgood said:
yeah wake, ive got a belt sander an orbital sander a mouse sander a dremel and i still want the 3-d one. course i just need to break down and get a compressor so i can get a real power sander

i with i had a compressor too. my friend's dad has a nice compressor with an air powered orbital sander that is just sick for sanding down larger stuff(thumb)
 
sam1 said:
hey dexter, you seem kinda lost. i dont know if youve seen this site yet, but ill post it anyways. it really helps. http://www.e-kittan.com/fibre.html http://web.njit.edu/~cas1383/proj/main/
Sweet dude, yeah i was kinda lost for a little bit, but now i totally get it. Wicked. I've read e-kittan's tutorial WAYYY back when it was first written, i just totally forgot about it.

sweet...i cant wait to get goin on this....phuck you bad MSP/Kenwood enclosure....
 
Ahh, airtools are nice...

Y'kno I just remembered it's actually MY compressor, just my friend's the one with the tool attachments. I'm especially fond of this dremel-tool-on-crack one. cuttoff/sanding wheel. once again, made a hour-long dremel job into morelike 15min. AND I could blow off most of the dust afterwards...

At anyrate, it sits in there MUCH better now. I think I'm gonna actually glue in some fleece "pads" (think felt pads) just so I don't scratch up my plastic side-panel behind the box toobad. I noticed a little bit of marks on a couple spots. Tomorrow I'm gonna actually wash it with water to kill the rest of the glass-dust, and try to get an accurate liquid-volume measure while I'm at it.

Something else occured tome today. From one of my other worlds. RC cars often use a thing called "dean's connectors" they're designed for 14g electric motorwires and are an upgrade for battery packs. They're made to be a very compact, very efficient (zero loss) connection point. SO naturally I'm gonna solder a couple of these lil' bastards onto the back of my box and to the ends of my amp-wire. I'll get pics when I dig 'em up.
 

Attachments

  • P1000903.webp
    P1000903.webp
    86.5 KB · Views: 187
  • P1000899.webp
    P1000899.webp
    56.4 KB · Views: 189
Dexter said:
Sweet dude, yeah i was kinda lost for a little bit, but now i totally get it. Wicked. I've read e-kittan's tutorial WAYYY back when it was first written, i just totally forgot about it.

sweet...i cant wait to get goin on this....phuck you bad MSP/Kenwood enclosure....
SO, coming from a beginner who JUST did this, My best advice for you is, patience... don't rush this stuff. It'll take a bit to master, yes. But don't let slip-ups slide. Take care of them right then and there. It's REALLY easy to whip out the dremel and cutout a poorly-layedup section. and I HIGHLY reccomend doing it. I just had to reach aorund inside my box forlike an hour with the dremeltool flex-cord thing removing all of my little "flaps" and leftover strings... NOT fun. It's inside the box, yes, but there still will be airflow and it may just effect your speaker. Also, depending on your mold, pop it out of your car as soon as possible, and do the majority of your glassing in the garage or something it's MUCH easier that way, and much nicer to have all that FG dust out of your car.

It's kinda frustrating. I feel like I've Just now gotten the hang of things, and now it's over with. Not easy, and kind of a PITA, yes, but it's prettymuch set that I'm gonna HAVE to build another... (I've got this naughty fiber-blob box with sub-floor slot-port Idea that i just can't get out of my head)

At any rate. I'm far from done as far as finishing and such goes, but I'm done making the fiberglass box. Let me recommend that if at all possible keep your beats intact and working while you work on your glassing. I was going INSANE... Don't know why. it would've been simple enough to just put my old one back in the box... Guess any work-time was going into the new box.
 
dude if your really wanting to do more my rear seats are getting pulled out for my amps and eq's in about a month, your welcome to drive to indy to help with all the layout and sanding lol


think about this, with my box instead of using the wood with aluminum foil i used my subwoofers. imagine cutting them out and trying not to damage your subs lol
 
fits like a glove now. and its all done besides sanding and painting. now thats going to be fun. im glad im carpeting mine. im still unsure about what fabric to get tho. im leaning towards redoing my whole trunk and boxes in suede or something similar. thatd be pimp style. not sure tho because the whole reason of making these boxes was to be able to actually use my trunk. but i aint stickin s*** in there if its all nice and pretty.
 
Snds> dayem, yea that would scare the bejeezus outta me. I was actually thinking your mention of using your actual subs for stretching with while I was brutally currint out mine. that must've taken awhile, eH?

Hey sam, you got pics of yours at all? I'm curious to see it now. I already showed you mine, show me yours! *L*
 
Last edited:
Okay, so I did my washing/volume test. took 32 1-litler cokebottles full of water to fill my box to the bottom of the mounting ring. Of course, due to the shape of my box, there was alot of leftover space un-filled with water that extends forward beyond what gravity would do for me. So here's the guesstimate part. I'd figure that to be about an extre 3-4 liters.

Sothen takign thsi information to http://www.convert-me.com/en/convert/volume we get the following...

Factually we KNOW I atleast have 32liters this equals 1.13cuf.

Nowthen going by my guesstimate (I'm pretty certain it's accurate) 36liters gives us 1.27cuf. Basically what I'm saying is, damn, I'm good. I setuot shooting for as close to my currrent eD-recommended 1.2 cuf box as possible. and wound up just about exactly there (they figure .1cuf displacement for the sub itself) so essentially after woofer displacement, I've got a 1.17cuf box...

Nowthen for the crappy part.... Okay, so I was filling slowly and carefully after taping off my bolt-hole really well and I realized a bit of a trickle of water (not enough to be volumetrically substancial, but I DO have a leak. It's around both sides of my wood mounting plate piece. Good thing I water-tested it 'else I'd have never noticed. but it is a little soppy around there. I think instead of trying to do it in the box, I'm gonna simply layup a bit on the outside around this seam. But first Fortunately I've got a nice 85degree sunny day to sun-dry my box with (I'm a bit concerned of water in the wood, but *shrug* I also managed to geta TON of glass dust out of my box this way. it was amazing howmuch was floating on top of the water.
 
Last edited:
yeah took me problaby an hour to get both 10's out. it didnt help that my trim ring around the sub was dead on so i had no space whatsoever to pry it out.
 
damn, you did get just about as close as possible huh. but that sucks you got a leak. maybe you could just take some bondo or kitty hair fg and slap it in there liberally on those areas. that should do it. but im sure a layer or two extra on the outside would do just about the same. especially since the box is already perfect airspace inside. but yea, i do need to get some pictures of mine. none as of yet, but hopefully soon. my project has been on the back burner for a couple weeks now. i have one box totally done, except the carpet, and one that only needs like 2 more layers. i would stick just the one in there for now, but i cant just cant have only one sub now. it just sounds wrong. id rather have none at all=). but i did get some glass layed up last night. and when i get paid in two weeks, theyll finally both be done. woo hoo.
 
i prefer to use packing peanuts for the volume test. cut a card board box down to 12x12x12, leaving the top open of course, and use that as a 1 cu ft measurement;) but you can't test for leaks that way.
 
Yea, I tried peanusts as well, but figured it wasn't entirely accurate, and yea I wanted to check on the leaks front as well. but mostly it was a matter of washing out any extra f/g dust, etc. (there was ALOT) I figured it wouldn't be the best of stuff to be sirculating through my sub...
 
Poseur said:
Yea, I tried peanusts as well, but figured it wasn't entirely accurate, and yea I wanted to check on the leaks front as well. but mostly it was a matter of washing out any extra f/g dust, etc. (there was ALOT) I figured it wouldn't be the best of stuff to be sirculating through my sub...

it's great, if you want to cook the VC(flame2)
 
Alright, so Everything is patched up, and I coated whatever else seemed even remotely likely to need it with a couple layers as well. Got my Dean's connectors soldered on and shrinkwrapped to boot. For those un-familiar with dean's connectors, talk to someone who's into R/C, they're a zero-loss very simple, solid connector that basically consists of 4 solid bars and 2 springs, generally used for battery and motor-leads. Just so happens that they're perfect for 12-16g wire... almost too convenient.

Yes, my box is still un-finished, but I'm gonna live with it for a week or so and make sure I'm keeping it and not passing it along and making myself another. (It'd be silly to have it color matched only to decided I really do need to go ported, and have a 80% chance of having to paint it again to re-sell it.

Anyways, Ahh it's nice to have bass again. I really really missed it.
 

Attachments

  • P1010001.webp
    P1010001.webp
    24.7 KB · Views: 189
  • P1010003.webp
    P1010003.webp
    66.2 KB · Views: 173
  • P1010006.webp
    P1010006.webp
    77.4 KB · Views: 225
  • P1010010.webp
    P1010010.webp
    68.6 KB · Views: 261
i had never really thought about using deans connectors, but they do give a soilid connection. great idea.
 
i bet you could find them at radioshack or maybe a computer repair shop. i think they use them in toys too, like rc cars, to connect the battery.
 
Not really the toys section, the only place I've really seen them is hardcore R/C shops. Prettymuch stock cars and kits come with cheezy plug-style connectors that are sloppy and lose alot of power, these are a stupidsimple upgrade of sorts. And, like I said, about 3bucks a pair. You can buy them in bulk as well for alot cheaper.
If you want to find them online check towerhobbies.com, they usually have everything. YOu'd be looking for specifiaclly the motor/battery connectors as the servo connectors and others are tiny.
 

New Threads and Articles

Back