- :
- TX
- :
- 2001 Mazda Protege DX 1.6T
So this is my first and current project. Until recently, I had no idea how cars really even worked so you might see some things that you’ll hate, or you might see some things you’ll love. Either way, this build has brought me a fun journey that I’m hoping to see to completion.
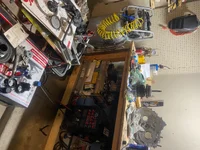
I’m mostly through the bulk of the engine build and turbo install after a good year and a half, but here’s a little overview of everything that I’ve done:
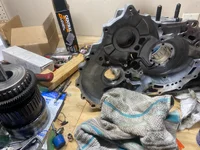
After pulling a fellow 1.6 from the Local pick’n’pull, I crossed my fingers and took it to the engine builder to have the block and head resurfaced, cleaned, and the block over-bored to 78.5mm.
After a rough 8 months, I finally got everything back and started scouring the internet and forums for every little scrap that I could find to guide me.
I had quite a few hiccups of buying the wrong parts and a LOT of calling around to places like Cometic, ARP, SplitSecond…etc.
Despite the fact that it is an automatic and that I was told plenty of times to jump ship and just get an MSP or even a new car, I am quite an obstinate and persistent person sooo…in the face of this challenge, I figured, “I’ll just do it myself”
Which of course meant learning to weld, fabricating, wiring…yada yada.
I don't have deep pockets, or a lot of time...but I love challenges and I wanted this to be something I could look at and be proud of as a project that was truly built, not bought.
Well, a year and a half later, this is where we are!
Parts List:
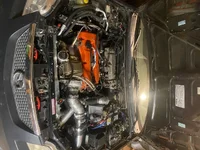
Turbo setup
- Custom Turbo manifold
- Custom Downpipe
- Custom 2.5" axleback exhaust with vibrant resonator
- Evil Energy through and through muffler (near future)
- GT2871r Maxpeedingrods turbo
- Turbo Smart CompGate40 wastegate w/ 5lb spring
- ARP exhaust studs
- Mishimoto 13 row intercooler
- Custom 2.5" hot and cold charge pipes
- HKS bov
- AEM dryflow filter
- Relocated MAF
- AEM afr gauge
- Glow Shift boost and oil pressure gauges
- Walbro 255 fuel pump
- Custom Bash bar
Engine setup
- Eagle rods
- Wiseco 78.5mm pistons
- ARP head studs from a Volkswagen Golf
- King Racing bearings (trimetal)
- Almost deleted the oil squirters, but decided against it
- Cometic Spacer plate
(Pistons we’re contacting the head by roughly .002mm and even though the B6 Miata has almost the same headgasket, Cometic apparently could not make me a gasket so I settled for the spacer)
- Boundary Stage 2 oil pump
- AWR front engine mount
- PQY oil catch can
- Balanced crank
- Miata 256cc injectors
- Mishimoto Radiator
- Mishimoto thermostatic sandwich plate and oil cooler
- SSAFC V1 (hopefully this coming weekend...I'm kinda scared to put it on)
Suspension Setup
- Refurbished P5 calipers (disk conversion in rear)
- Eibach lowering springs with KYB struts
- Racing beat 22mm front sway bar
- AWR endlinks (front and rear)
- AWR 21mm rear sway bar
- AWR trailing arms
- Megan Racing adjustable lateral links
- Motegi m116 rims
Interior Mods
- Power windows
- Aftermarket Power locks
- P5 shifter (can't seem to get the tiptronic to work yet, and yes everything is wired up correctly. i assume the program is just a part of the ecu for the P5)
- P5 instrument cluster
- Dash cam
- ATOTO head unit
- JBL speakers (Front, Mid, and rear)
- P5 steering wheel
- Shift knob from my buddies BRZ (and hopefully, potentially his seats too)
Exterior Mods
- P5 front bumper
- Hella twin horns
- Evo8 wing
- 2015 Mustang Roush vents
- Maybe mods: Vortex generators, Splitter, side skirts, window deflectors
I’m mostly through the bulk of the engine build and turbo install after a good year and a half, but here’s a little overview of everything that I’ve done:
After pulling a fellow 1.6 from the Local pick’n’pull, I crossed my fingers and took it to the engine builder to have the block and head resurfaced, cleaned, and the block over-bored to 78.5mm.
After a rough 8 months, I finally got everything back and started scouring the internet and forums for every little scrap that I could find to guide me.
I had quite a few hiccups of buying the wrong parts and a LOT of calling around to places like Cometic, ARP, SplitSecond…etc.
Despite the fact that it is an automatic and that I was told plenty of times to jump ship and just get an MSP or even a new car, I am quite an obstinate and persistent person sooo…in the face of this challenge, I figured, “I’ll just do it myself”
Which of course meant learning to weld, fabricating, wiring…yada yada.
I don't have deep pockets, or a lot of time...but I love challenges and I wanted this to be something I could look at and be proud of as a project that was truly built, not bought.
Well, a year and a half later, this is where we are!
Parts List:
Turbo setup
- Custom Turbo manifold
- Custom Downpipe
- Custom 2.5" axleback exhaust with vibrant resonator
- Evil Energy through and through muffler (near future)
- GT2871r Maxpeedingrods turbo
- Turbo Smart CompGate40 wastegate w/ 5lb spring
- ARP exhaust studs
- Mishimoto 13 row intercooler
- Custom 2.5" hot and cold charge pipes
- HKS bov
- AEM dryflow filter
- Relocated MAF
- AEM afr gauge
- Glow Shift boost and oil pressure gauges
- Walbro 255 fuel pump
- Custom Bash bar
Engine setup
- Eagle rods
- Wiseco 78.5mm pistons
- ARP head studs from a Volkswagen Golf
- King Racing bearings (trimetal)
- Almost deleted the oil squirters, but decided against it
- Cometic Spacer plate
(Pistons we’re contacting the head by roughly .002mm and even though the B6 Miata has almost the same headgasket, Cometic apparently could not make me a gasket so I settled for the spacer)
- Boundary Stage 2 oil pump
- AWR front engine mount
- PQY oil catch can
- Balanced crank
- Miata 256cc injectors
- Mishimoto Radiator
- Mishimoto thermostatic sandwich plate and oil cooler
- SSAFC V1 (hopefully this coming weekend...I'm kinda scared to put it on)
Suspension Setup
- Refurbished P5 calipers (disk conversion in rear)
- Eibach lowering springs with KYB struts
- Racing beat 22mm front sway bar
- AWR endlinks (front and rear)
- AWR 21mm rear sway bar
- AWR trailing arms
- Megan Racing adjustable lateral links
- Motegi m116 rims
Interior Mods
- Power windows
- Aftermarket Power locks
- P5 shifter (can't seem to get the tiptronic to work yet, and yes everything is wired up correctly. i assume the program is just a part of the ecu for the P5)
- P5 instrument cluster
- Dash cam
- ATOTO head unit
- JBL speakers (Front, Mid, and rear)
- P5 steering wheel
- Shift knob from my buddies BRZ (and hopefully, potentially his seats too)
Exterior Mods
- P5 front bumper
- Hella twin horns
- Evo8 wing
- 2015 Mustang Roush vents
- Maybe mods: Vortex generators, Splitter, side skirts, window deflectors
Last edited: