Observations...
I replaced my stock P5 rear crossmember with a crossmember from an MSP today, and also added a racingbeat rear sway bar. I wanted to post a couple tips and observations from my experience.
These are not intended to be in any sort of order...
1) From a side-by-side comparison today (sorry, I didn't take pics of this) the MSP and P5 rear crossmembers are practically the exact same. There are only two differences that I could find:
a) The swaybar mount locations are reenforced
b) Important Note!! The MSP rear crossmember does NOT have the bolt sticking out of the top-most swaybar mount location. The P5 horseshoe bracket is held on by a nut at the top, and bolt at the bottom. The MSP crossmember uses a bolt in both locations. If you switch out your crossmember, you will need to purchase two extra bolts for this reason. I am getting the bolts tomorrow, and will post the bolt size at that point...
2) One
can replace the crossmember without air tools, I did it today. Yes, it would go much faster with them, but not all of us have such luxuries.
3) I've read in posts elsewhere that say you can not unbolt the lateral link bolts until the crossmember is totally unbolted (hence the reason most say that air tools are needed). I found this to be not true. I was able to get a wrench on the outsides of the crossmember, and a 1/2" drive ratchet on the inner part of the bolt. I did have to use a small piece of pipe for added torque. My 24" breaker bar was just a bit too long. An 18" breaker would be perfect.
4) I was majorly concerned about screwing up my camber by removing the lateral link cam bolts. Don't be too concerned about this. As it were, all you need to do is mark the position of the nut in relation to the "egg shaped" washer. The washer also has a small notch in it. This notch is also important to be marked. When you take it apart, just note the position of the notch (mine was straight up) and when you tighten the bolt, make sure the notch is in the same position. When you take it apart, you will easily be able to see how it works...
5) Not using air tools, you run more of a risk breaking off bolts from putting long stresses on them. Air tools put short bursts of torque on bolts, which is a better way about it... Anyway, there is a small stamped plate that connects the top of the crossmember to the floor of the trunk. There are two bolts that bolt the crossmember to this plate. I broke off one when removing it. This plate is easily removed from the 3 12mm bolts that go into the floor of the car. I was able to drill out the broken bolt and replace it. This bolt is a M8-1.25 x 20 bolt. I got one from Lowes...
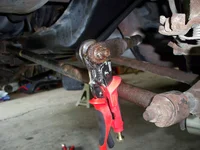
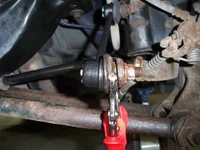
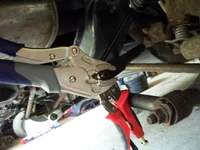
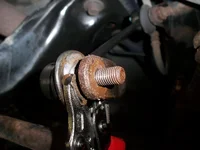
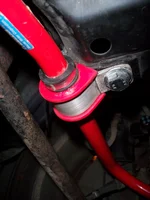
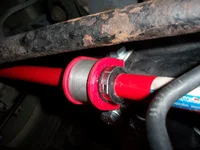
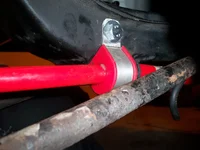
6) Of course, the damn endlinks are the hardest part of the whole process. I soaked them (as well as all bolts in the project) in PB Blaster the night before and the morning of, and still, I had trouble with the endlinks. When taking off the passenger side, I ended up stripping the nut. So I looked into alternative ways of removing the nut. In the attached pictures, pictures 1 and 2 show that a 5" pair of vise grips can just clear the rubber boot and grab the flat part of the bolt behind the sway bar. Then, a large pair of vice grips (I think mine are a 10" pair) can grab the nut and hopefully get it off. I let the 5" vise grips bottom out against the lateral link so that it couldn't turn. This method worked out well and with some patience and a bit of luck, you can get the nut off. On the passenger side, it came off with out damaging the rubber seal. On the driver's side, I wasn't so lucky- but the damage to the rubber boot was not
that bad. Pic 4 shows my success.
7) Most likely, you will end up stripping the endlink nuts getting them off. You can get replacements at Lowes. The size is M10-1.25. I also bought M10 washers to put on there since the original is a flare nut.
8) If you are putting on a racingbeat swaybar, then you probably were smart enough to order 20mm urethane bushings from AWR. You should note, however, that the stock P5 horseshoe brackets will
NOT fit over these bushings. A good option is to get the AWR spacer blocks (at an outrageous $35 each) plus AWR horseshoe brackets (I assume they sell these). ...Or you can take the frugal route and make your own horseshoe brackets out of aluminum or steel flat stock from Lowes. I choose aluminum because it is so much easier to bend into proper shapes. I honestly don't know what size I bought, but it most likely was 1" x 1/8" x 3'. I just took one of the bushings with me and eyeballed which width would fit best.
Note: If you choose this route and make your own, be sure to measure off of the MSP crossmember, not the P5 one. I made this mistake, but fortunately the 3' of stock was enough for two sets of brackets- the first which were too small, and the second which fit nicely. I didn't take pics of these, but I will take some tomorrow.
9) Put some anti-seize on the endlinks so that the next time you need to take them off, it isn't such a nightmare...
That's about all I can think of right now. Hopefully this helps you guys if you run into any of these situations... I'll post the bolt size for the swaybar brackets tomorrow as well as picks of the custom brackets.