
***DISCLAIMER***
Attempt this retrofit at you own risk... I am in no way responsible for damage to yourself or your parts that you are working on... serious injury may occur or even death.
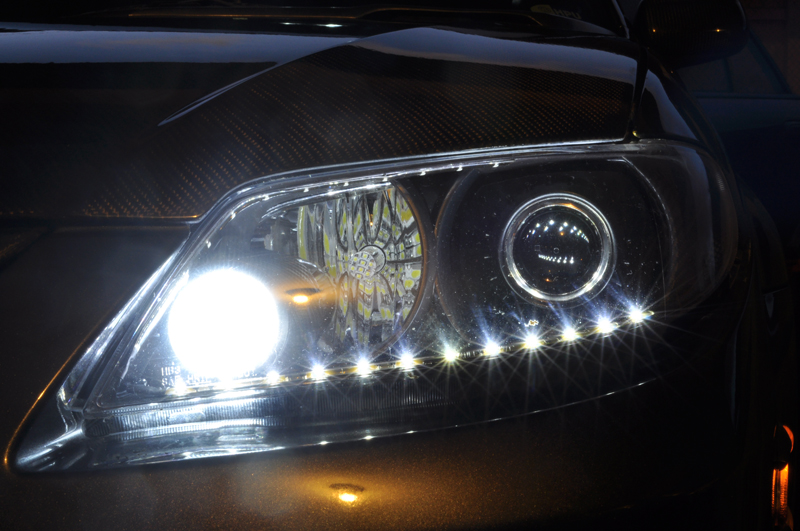
Here is how I did my TSX Projector retrofit into my protege5 headlights. This is how I did it and in no way the only or correct way to do it. Attempt this retrofit at your own risk.Attempt this retrofit at you own risk... I am in no way responsible for damage to yourself or your parts that you are working on... serious injury may occur or even death.
Difficulty: Intermediate - Advanced
Parts/Hardware List:
1) Pair TSX Projectors ($100-$200)
2) Pair Projector Shrouds I recommend e46r shrouds ($25 - $55 Optional)
3) Pair Protege5 Headlights ($???-$500)
4) Pair V-LED 12" White LED Strip ($19.99 - Optional)
5) 3m Carbon Fiber Vinyl ($7.00 - $10 a sq.ft about 4sq.ft per light Optional)
6) 1x Flat Black Spray Paint Hi-Temp Preferred ($4 - $6 Optional)
7) 8x 2" #8 Machine Screws ($2 - $4)
8) 8x #8 Bolts ($2 - $4)
9) 8x #8 Nylon Lock Nuts ($2 - $4)
10) 32x #8 Washers ($2 - $4)
11) 1x Roll Of Blue Painters Tape Wide/Narrow ($4 - $7)
12) 1x Clear RTV Silicon ($3 - $4)
13) 1x HID Kit w/D2s bulbs ($???-$200)
14) 1x Computer Power Supply ($10 - $25 Optional)
15) 1x Computer Fan Connector ($1 - $5 Optional)
16) 1x Sharpie Fine or Regular Tip ($2-$3)
17) 1x Red Or Blue Loctite ($3-$5)
18) Misc. Wire Connectors
Tools:
1) Phillips Screw Drivers (multiple sizes)
2) Flat Head Screw Drivers (multiple sizes)
3) Butter Knife
4) Exacto Knife
5) Precision Or Regular Scissors
6) Heat Gun Or Blow Dryer
7) Conventional Oven
8) Oven Mits Or Equivalent
9) Dremel w/Cutting, Sanding, Drilling, And Shaving Bits
10) Dust Mask And Eye Protection (Optional)
Now On To The Fun Part...
*NOTE Prior To Doing Anything. Mask Off As Much As You Can To Prevent Damage And Getting Unwanted Areas Dirty. Also Be Sure To Paint Any Surfaces After Doing Cuts, Drilling, Sanding Shaving. Touch Up Painting Will Also Be Necessary.
Step #1 Removing Front Bumper Cover) First You Have To Remove The Bumper And Headlights From Your Vehicle... There Are Many Guides On The Forums That Explain How To Do This... Even Though I Didn't Find Any LOL... If You Can't Figure This Step Out You Should Not Attempt To Hack Up Your Headlights And Retrofit Projectors (encourage
Step #2 Opening Headlamp Assembly) Once You Get The Headlights Off You Have To Pry Them Open... There Is Another How To On The Forum For This One... Fortunately I Know Where This One Is At http://www.mazdas247.com/forum/showthread.php?t=114394
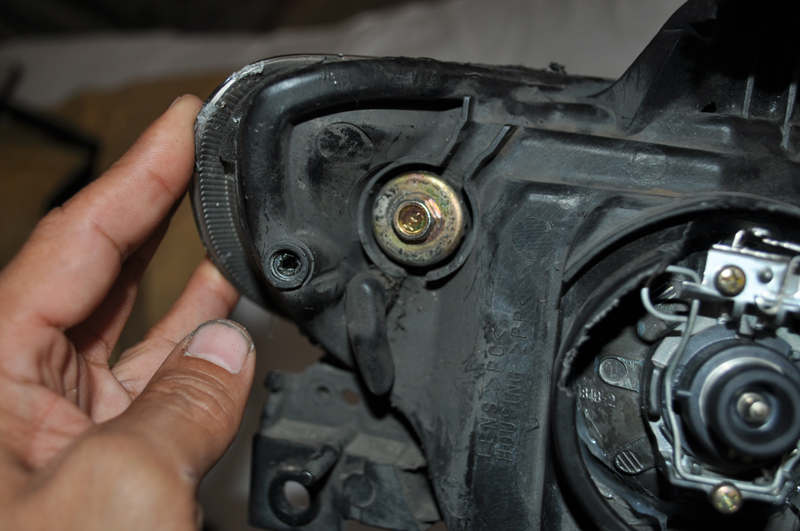
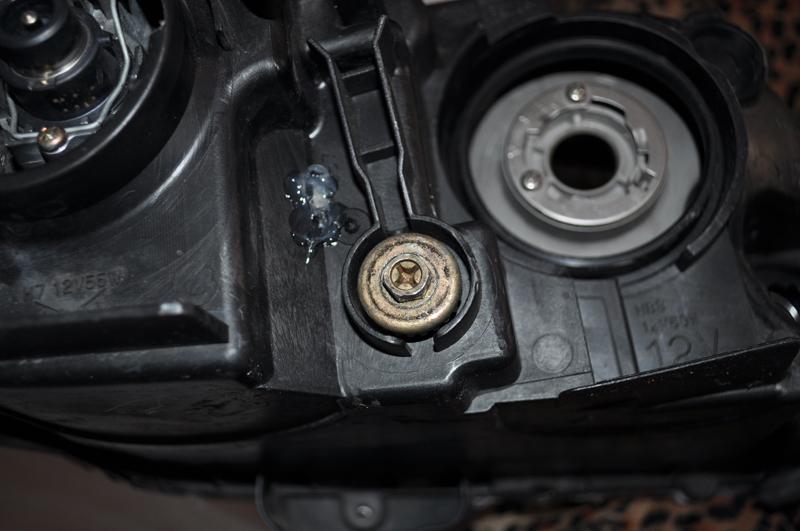
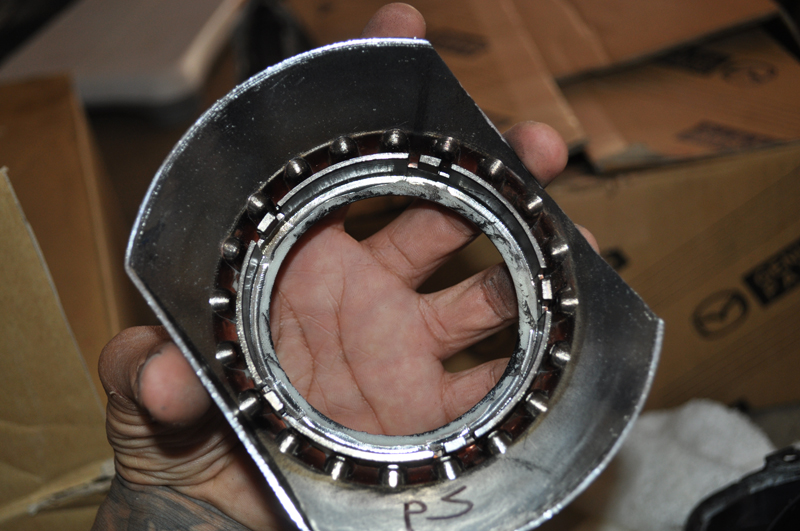
Step #3 Separating Headlamp Housing And Reflector Bowls) After Step #2 Above You Should Be Able To Completely Disassemble Headlamp Assembly. There Are Two 10mm Bolts On The Rear Of The Headlamp Housing. One Near The Outside Of The Headlamp Assembly And One Towards The Bottom Middle. Be Sure To Alternate Between Bolts When Removing. The Outside Bolt Should Become Free First. See Pics Below
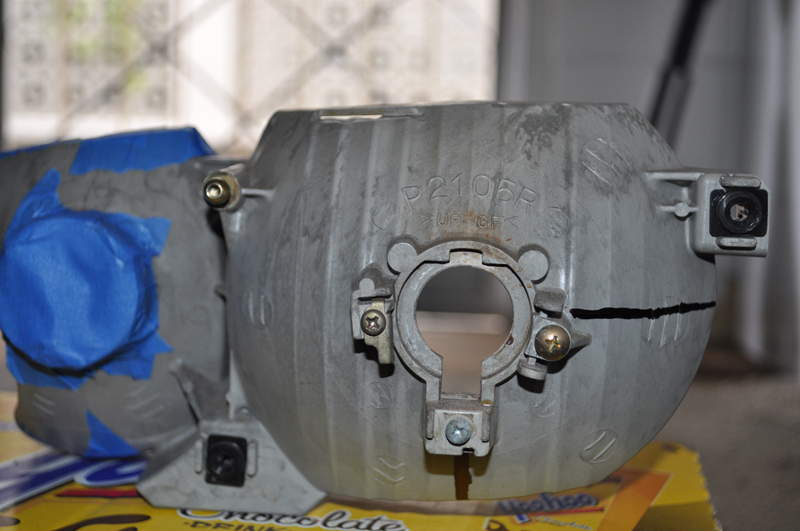
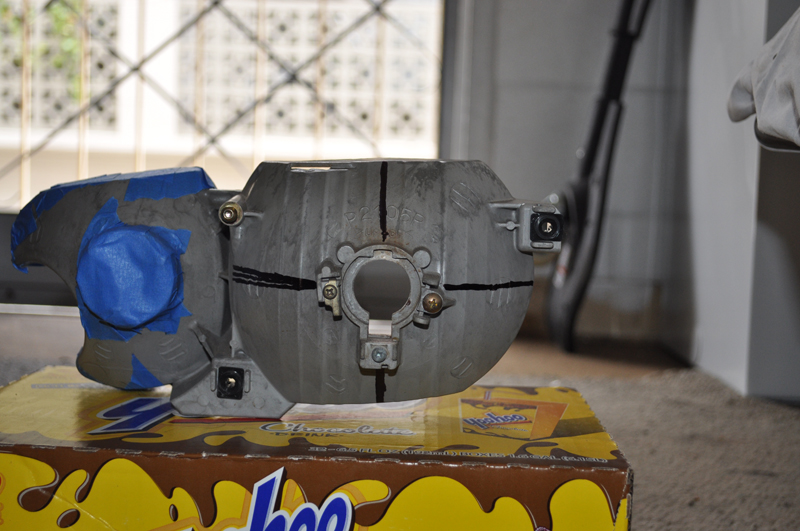
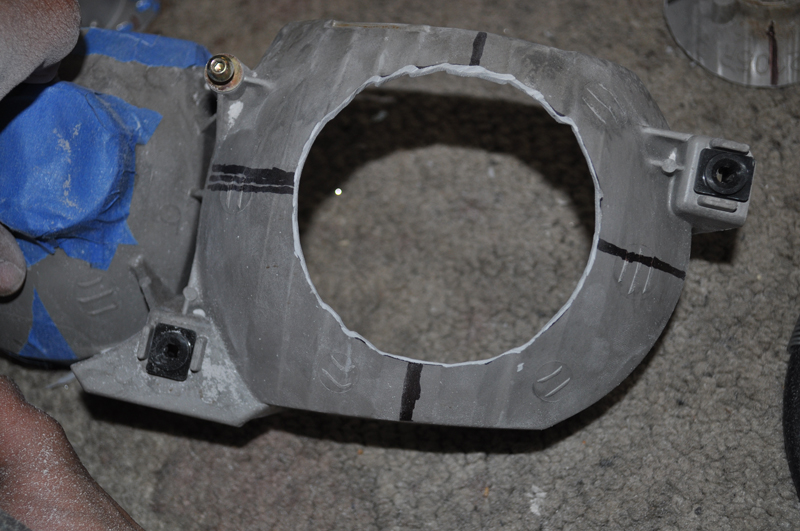
Step #4 Measuring And Cutting Reflector Bowls) This Is The Tricky Part. Mostly Because A Lot Of This I Done By Just Eyeballing It. I Would Like To Point Out That There Is A Trapazoid Shaped Flat Spot On The Bottom Of The Reflector Bowl. This Is What I Used To Level The Reflector Bowl While Making My Marks. Also Based My Marks On How The Stock Halogen Bulb Would Sit In The Reflector Bowl. I Started By Making The Vertical Mark First To Find The Bottom. Just Look At The Bottom Notch On The Stock Halogen Bulb Hole And Eyeball The Center And Draw A Line Straight Down. After I Made The Bottom Mark I Guesstimated The Top Vertical And Horizontal Marks. Use Your Best Judgement When Making These Marks. It Is Very Important. As For The Circle Cut. You Will Need A Very Big Hole. There Is Already A Nice Circle Marking On The Back Of The Reflector Bowl. I Just Used My Sharpie And Traced It Then Cut It With My Dremel Cutting Bit. Do This For Both Side Reflector Bowls. See Pics Below.

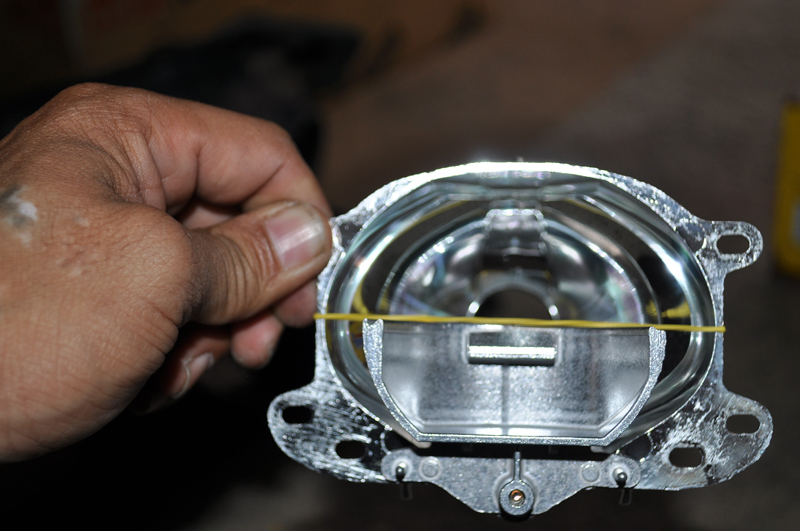
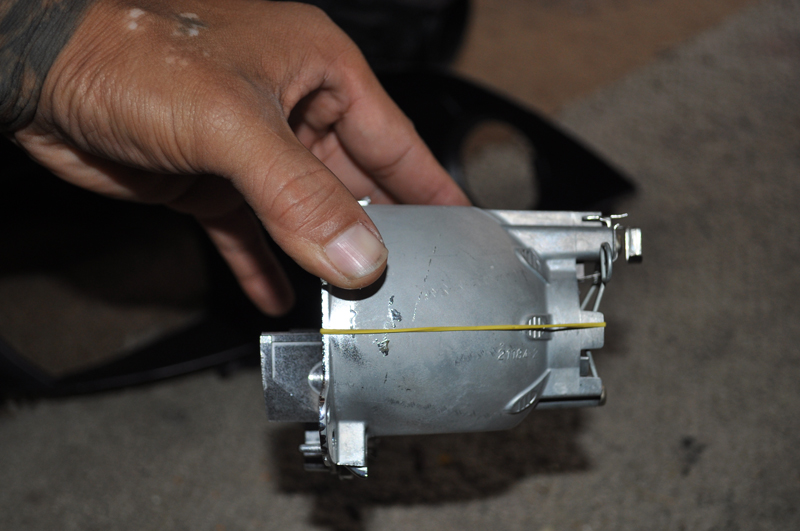
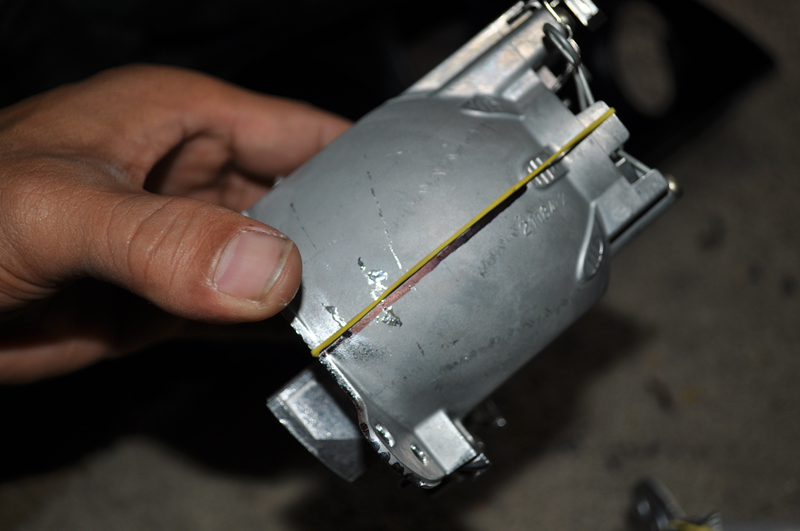
Step #5 Measuring And Marking Projectors) On The TSX Projectors There Is A Little Notch On The Top That Marks Top Dead Center. On The Bottom There Is A Screw That Marks The Bottom. The Bottom One I Just Eyeballed It. As For The Sides I Took A Rubber Band And Wrapped It Around The Projector Housing. In The Front I Made The Rubber Band Flush With The Cutoff Shield Within The Projector Then Eyeballed It Going Around To The Backside. I'm Sure There Is A Better Way But This Is How I Did It. Once You Are Satisfied With How The Rubber Band Is Going Around The Projector. Take Your Sharpie And Make Your Marks. Also Make Mark On The Top That I Forgot To Take Pictures Of But You Will See Them Later In This How-To. Do This Step To Both Sides. See Pics Below.
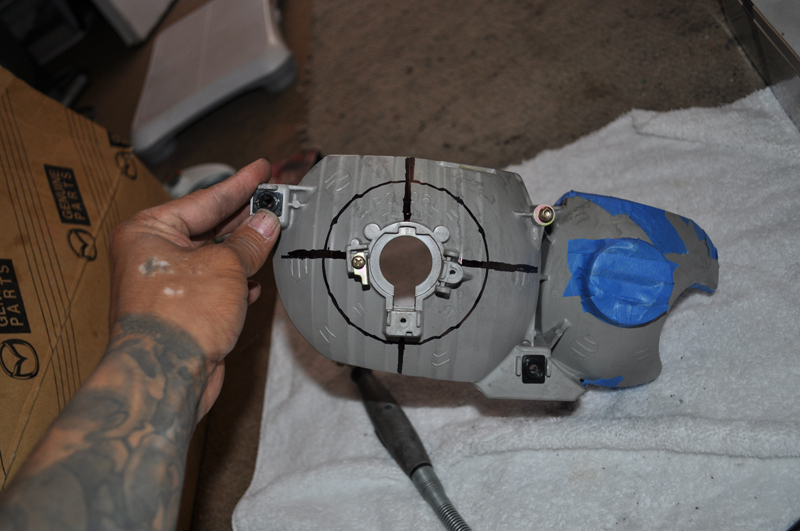
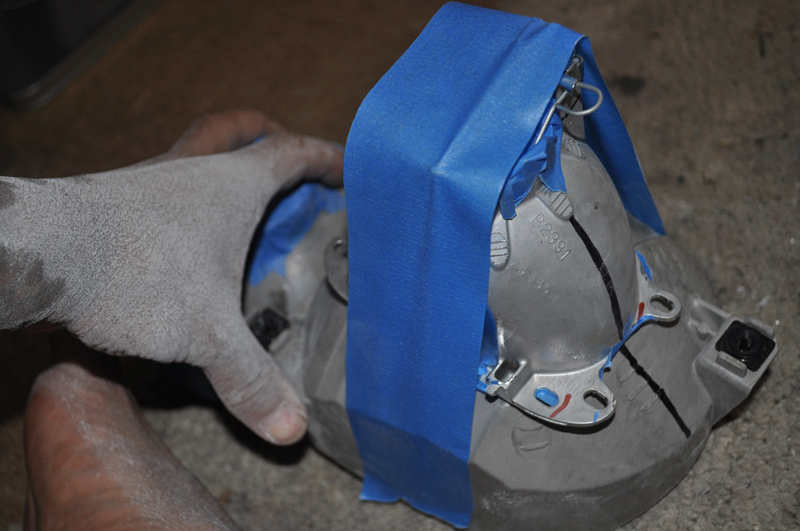
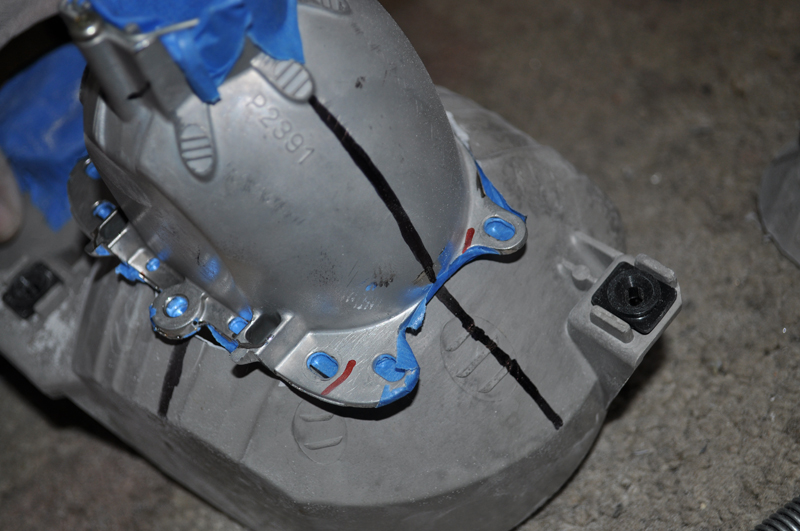
Step #6 Lining Up Projector And Drilling Holes Into Reflector Bowls) *NOTE Make Sure The Bulb Retaining Clip Loops Are At The Top. Once You Have All Your Marks On Your Projectors And Reflector Bowls You Can Start Drilling The Holes For Where Your Projectors Will Be Mounted. I Placed The Projector On The Backside Of The Reflector Bowl And Lined Up All The Marks I Did In The Previous Steps. Once Lined Up I Used Some Blue Painters Tape To Secure The Projector To The Backside Of The Reflector Bowl. After I Got It Secured I Used My Dremel And A Drilling Bit. Drill Through The Four Outside Mounting Holes That Are Located On The Projector Housing. I Didn't Drill All The Way Through But Instead Just Made Marks First. After I Unsecured The Projector Housing Then I Completely Drilled Through The Reflector Bowls. Start With A Small Drill Bit. No Matter What Your Holes Will Not Be Exact Cuz For Some Reason After Assembling The Projectors Together The Bolts Will Not Line Up Perfectly. This Is Where I Used My Dremel And A Pointed Shaving Bit To Get The Holes The Right Size With Proper Placement. I Will Cover This Later. See Pics Below
Step #7 Assemble Your Projectors) *NOTE Do Your Color Modding Or Any Projector Modifications Prior To Assembling. See Color Modding Section Below. Assembling The Projectors Are Pretty Straight Forward Hence Why I Didn't Take Any Pictures Of This Process. To Assemble Your TSX Projectors You Will Need 4x 2" #8 Machine Bolts, 8x #8 Washers, And 4x #8 Nuts Per Side. Stick One Washer On each Of The Four Bolts. Attach The Two Parts Of The TSX Projectors Together. Stick The Four Bolts Through The Four Outside Mounting Holes On The Projectors. Put Another Washer On Each Of The Four Bolts. Screw On Your Nuts To Each Bolt. Before Tightening All The Way Add Some Red Or Blue Locktite Then Tighten All The Way.
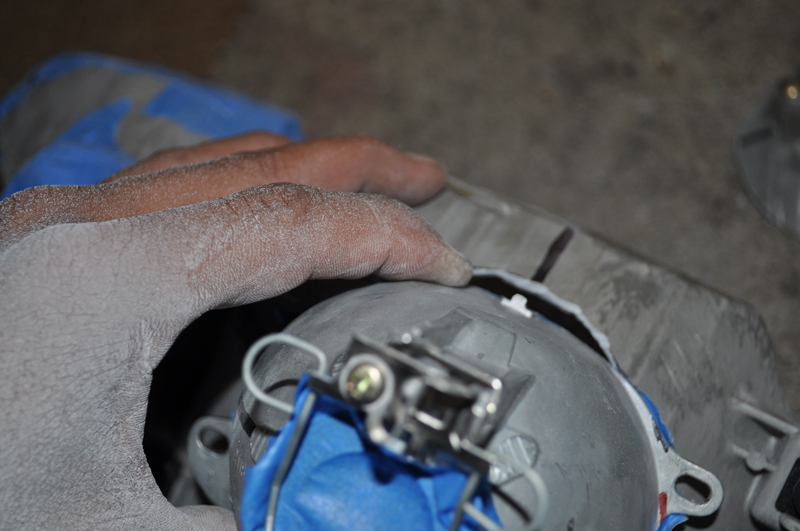
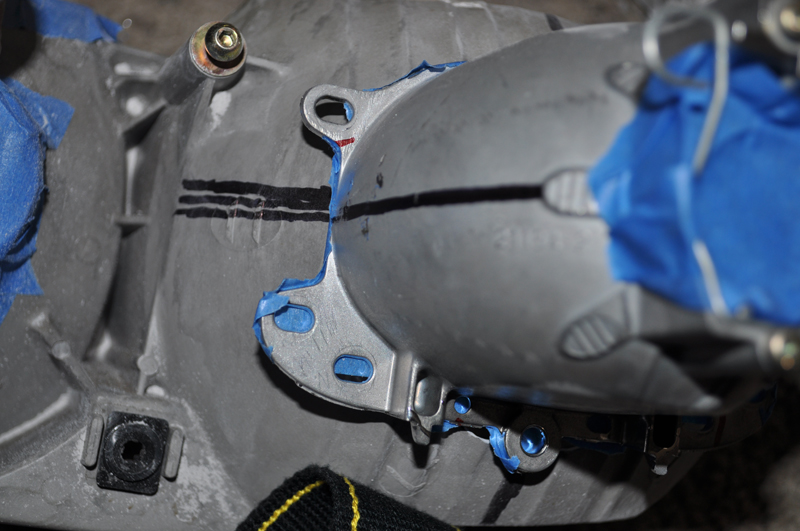
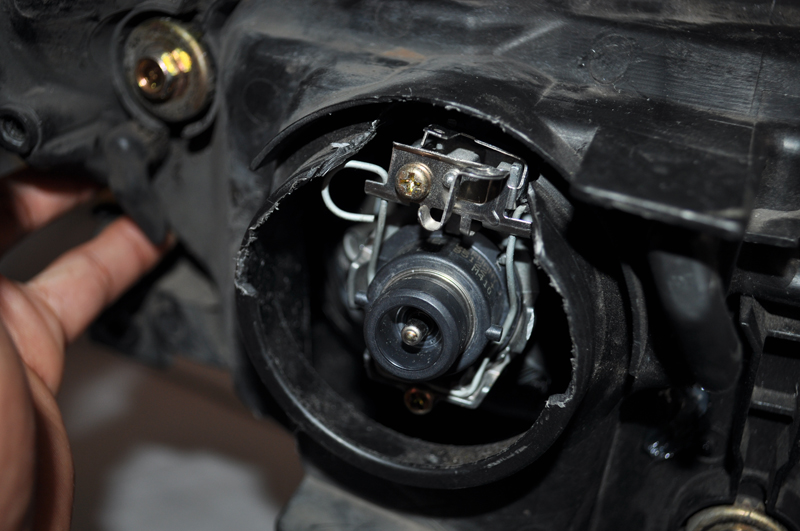
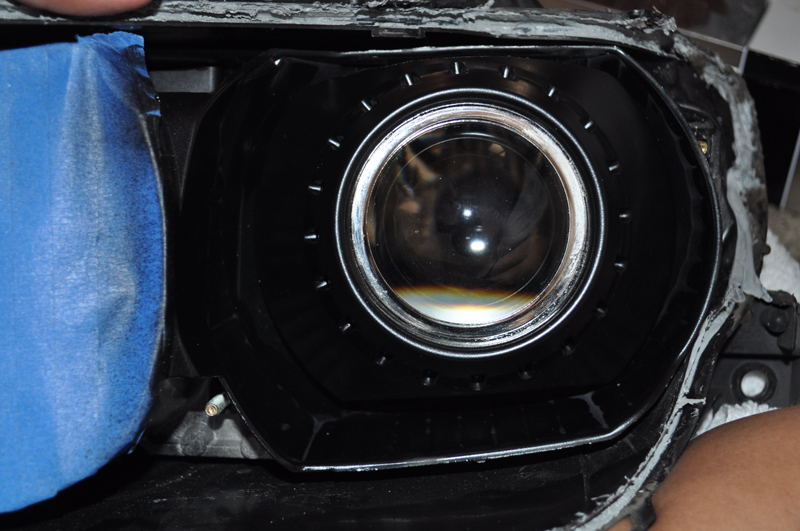
Step #8 Mounting Assembled Projectors To Reflector Bowls) *NOTE Make Sure The Bulb Retaining Clip Loops Are At The Top. You Will Have To Put The Assembled Projectors In Through The Front Of The Reflector Bowls. Try To Line Up Atleast Two Of The Four Bolts To The Four Holes You Drilled Through The Reflector Bowls In Step #6. Like I Said After Assembling The Projectors For Some Reason All The Bolts Don't Line Up With All Four Holes Precisely. You Can Just Line It Up As Best As Possible. After I Lined It Up As Best As Possible I Eyeballed It Again To See Where And How Much I Had To Shave The Mounting Holes To Get The Bolts To Go All The Way Through. After You Get The Bolts All The Way Through Your Marks On The Projector Housing And Reflector Bowls Should Still Line Up. If All The Marks Line Up Your Cutoff Line SHOULD Be Horizontal. After You Have Everything Lined Up Place One Washer And One Nylon Lock Nut On Each Bolt And Tighten Them All The Way Down. Be Sure Not To Over Tighten Them. After I Was Satisfied With How The Projectors Were Mounted I Put A Layer Of Silcon Around The Projectors And All Four Bolts. You Will Need To Cut The Bottom Inside Bolt All The Way Down Using A Cutting Tool Or Just Use A Shorter Bolt. This Is Because When You Remount The Reflector Bowl To The Headlamp Housing That Bolt Will Come In Contact With The Headlamp Housing And Prevent You From Aiming The Projectors Lower If Needed. See Pics Below For Examples Only.


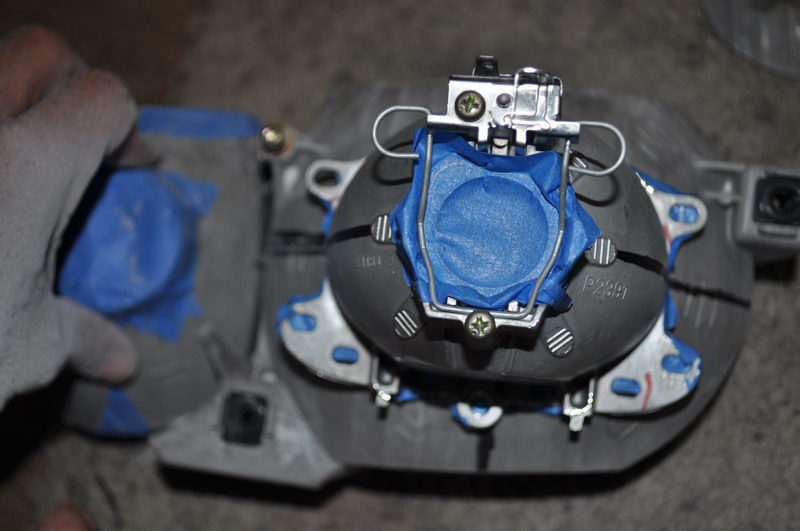
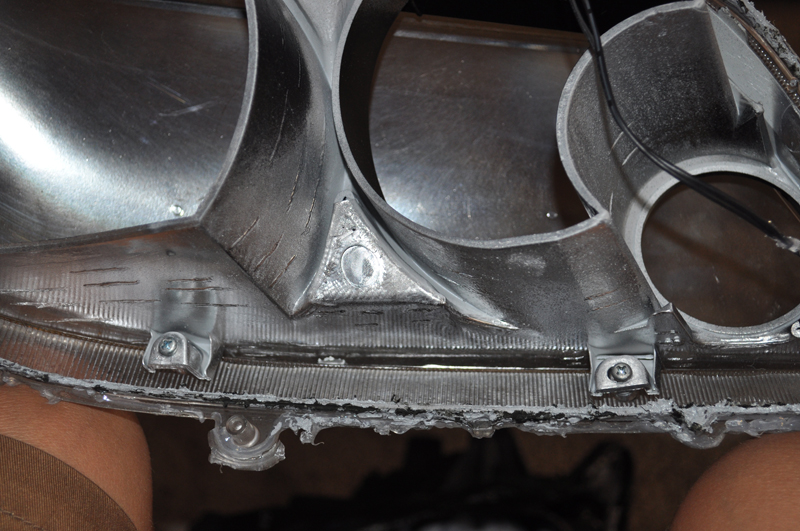
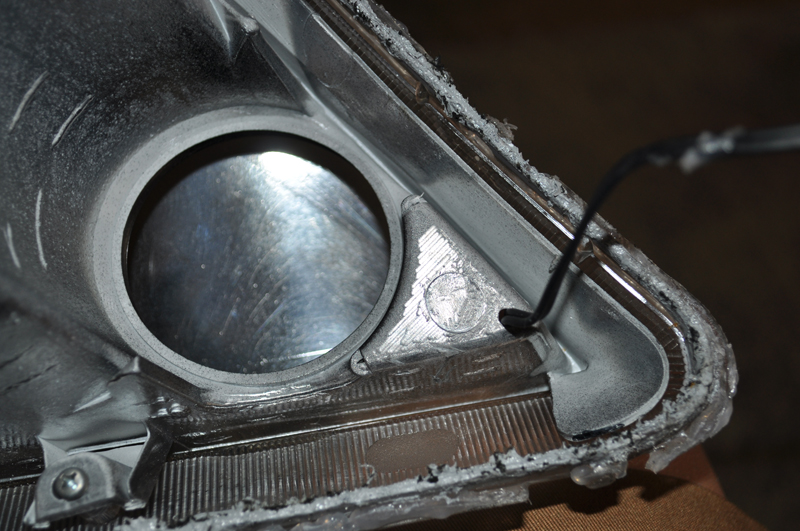
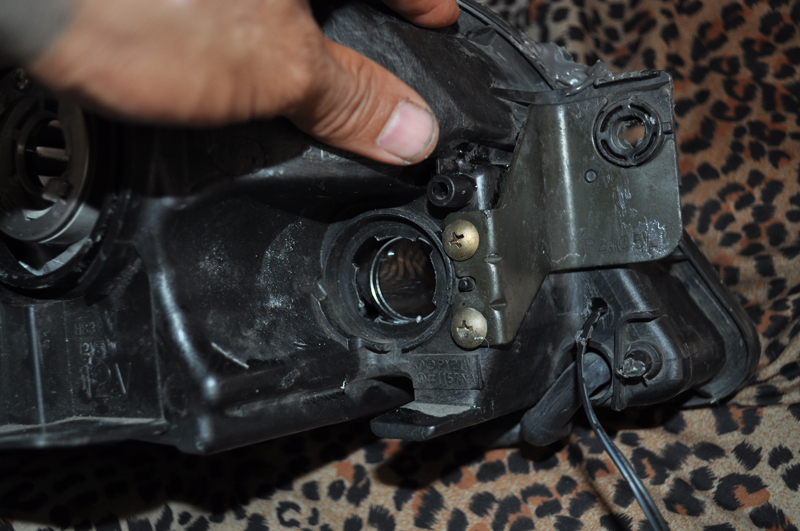
Step #9 Modifying Headlamp Housing) If You Did Everything Like I Did Then You Will Have To Modify The Back Of The Headlamp Housing. This Is Because The Projector Is Mounted Pretty High In The Reflector Bowl. When The Projector Extrudes From The Back Of The Headlamp Housing It Will Come In Contact With It. This Will Prevent You From Aiming The Projectors Lower And Also Prevent You From Changing Bulbs Without Completely Disassembling The Headlights. LOL... Again I Just Eyeballed It. But If You Want You Can Make Your Cuts More Precise To Keep It A Little More Clean Looking. After Modifying You Should Still Be Able To Get The Dust Cover Over The Back Of The Headlamp Housing. Though Some Modification Of The Dustcover Will Be Needed. I Used My Dremel And A Cutting Tool To Shave Off What I Needed. Shave Off The Outer Ring From The Back Of The Headlamp Housing. After That You Will Need To Completely Cut Off The Top Part Of The Rear Circle Where The Projectors Extrude From The Back Of The Headlamp Housing. Do This Step To Both Sides. After You Get This Far You Will See For Yourself What Needs To Be Cut Or Eventually Strip Your Adjustment Mounting Tabs On The Reflectors. See Pictures For Examples.

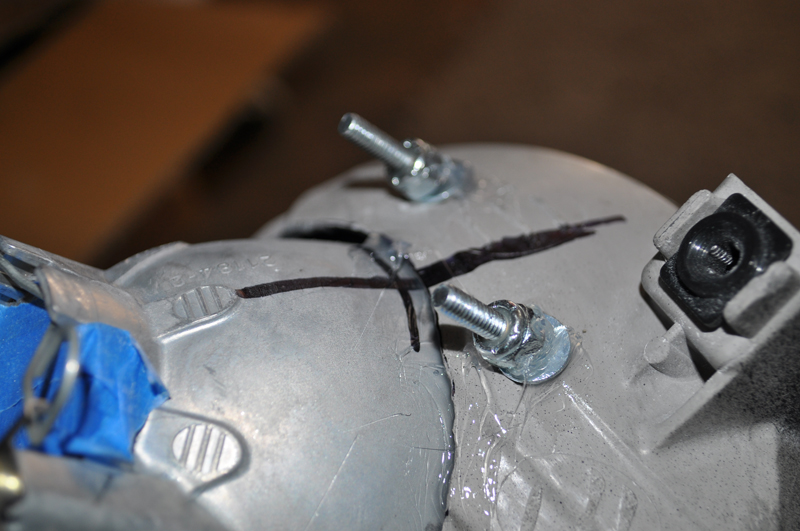
Step #10 Mounting Reflector Bowl Back To Headlamp Housing) Put The Reflector Bowl Back Into The Headlamp Housing And Line Up The Mounting Bolts. Tighten The Bottom Bolt First Then As The Outside Bolt Comes In Contact With The Reflector Mounting Tab Start Tightening That Side Also. Be Sure To Alternate Between Tightening Each Bolt. The Outside Bolt Doesn't Have To Be Tightened All The Way. Just Go About Halfway With The Outside Bolt. As For The Bottom Bolt Go As Far In As Possible. This Is To Aim The Projector As Low As Possible.
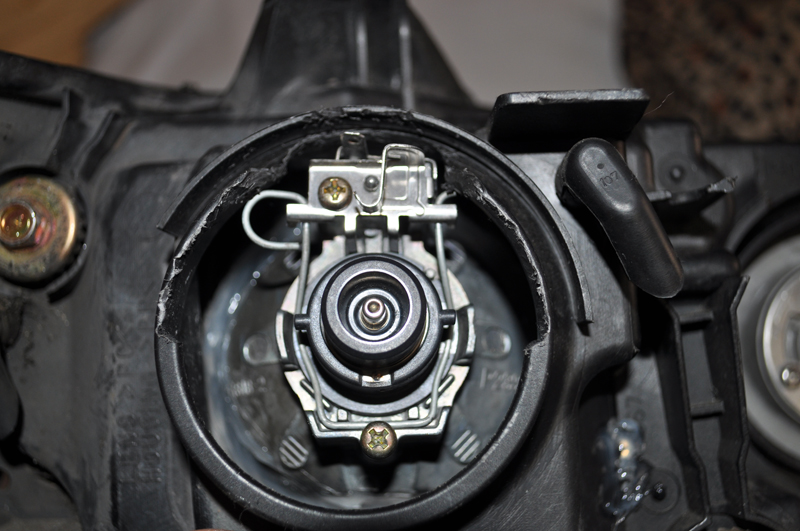
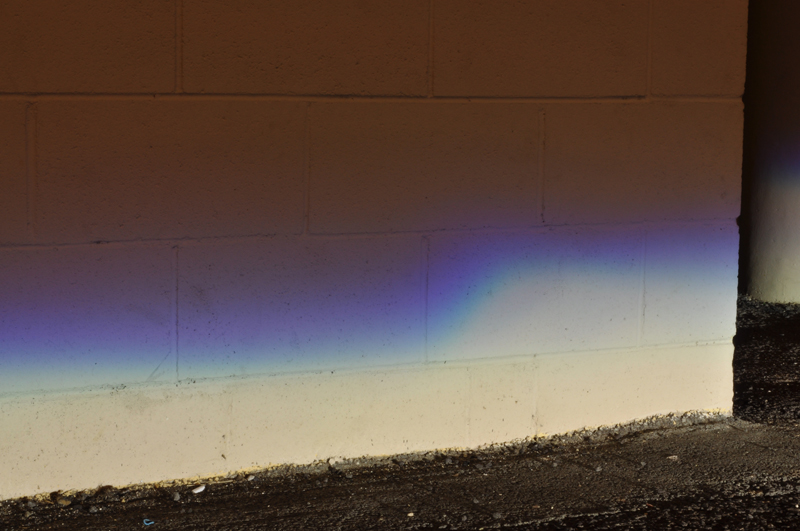
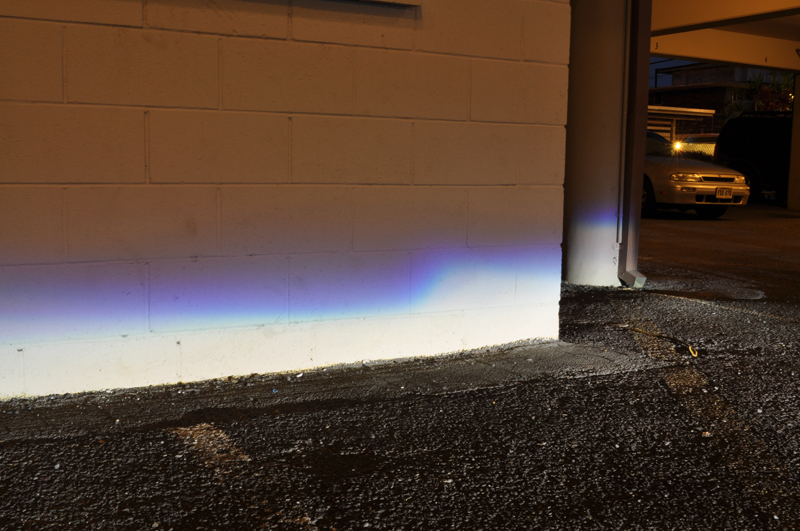
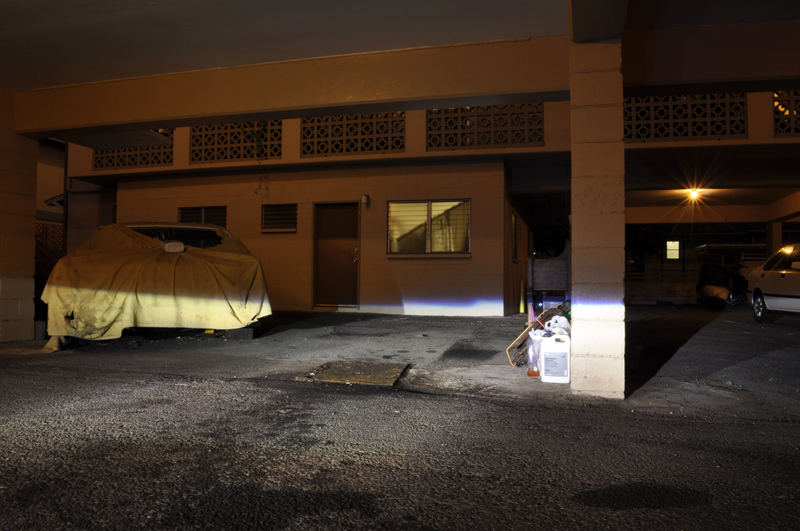
Step #11 Testing Aiming Position Of Projectors) *NOTE I Did Not Completely Reassemble The Headlamps Yet. I Haven't Put The Clear Lens On Yet. This Is Just Incase You Have To Do Some Serious Adjustments To How You Mounted Your Projectors To The Reflector Bowls.Since In Step #10 We Aimed The Projectors As Low As Possible There Are Only Two Outcomes That Are Possible. One Being Good And One Being Bad As What Happened To Me. After Installing The Headlights Onto The Car I Found That My Driver Side Was Pointing To Low (This Is Very Good). As For My Passenger Side It Was Pointing To High (This Is Not Good). I Solved This Problem With Step #9 For The Passenger Side As I Forgot To Cut The Back Of The Headlamp Housing.
Step #12 Reassemble Your Headlights And Install Them Back On The Car) *NOTE Only Continue With This Step If You Are Done Retrofitting. See Below For Optional Stuff That I Did To My Headlights Before Completing This Step.Not Sure But This Should Be Covered In The How-To In Step #2.
***OPTIONAL Stuff That I Also Did To My Headlights***
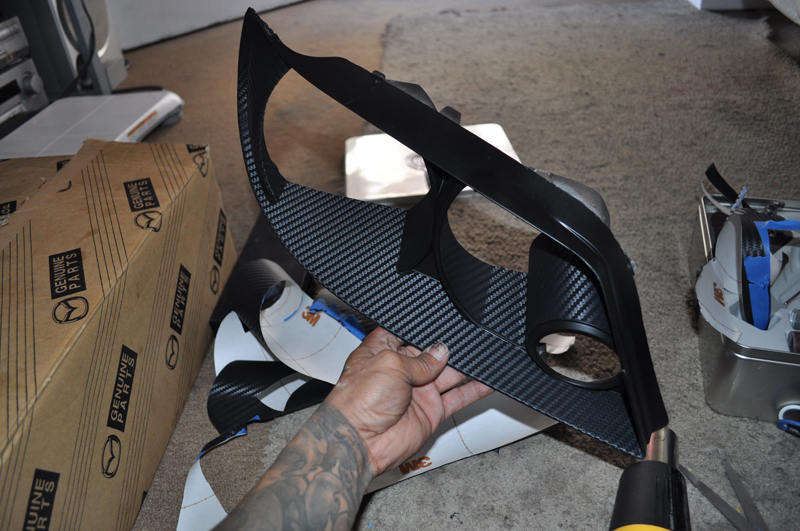
Applying 3M Carbon Fiber Vinyl:
This Part Of My Retrofit Was Pretty Tedious But Very Doable. You Will Need At The Most 4square Feet Of 3M Carbon Fiber Vinyl Per Headlamp (I am over estimating). Templates Made It A Lot Easier To Get The Proper Size Pieces To Cover The Bezel. This Came Out The Best For Me As I Tried Several Different Approaches. Templates Are The Best Because It Doesn't Require Any Stretching Of The Vinyl Except For Wrap Around Portions.
Step #1 Removing Bezel From Headlamp Housing) See Step #2 Of TSX Retrofit Section Above. Basically All You Have To Do Is Unscrew The Bezel From The Clear Plastic Cover. There Are Two Philip Screws Located Near The Bottom Of The Clear Plastic Cover. After Unscrewing You Can Pull Upwards On The Turn Signal Side To Pull It Out Of The Clear Plastic Cover. See Pic Below.
Step #2 Painting Bezel Black This Is Highly Recommended. No Matter What You Will Not Be Able To Cover The Entire Bezel With The 3M Carbon Fiber Vinyl (Unless You Are God LOL... Seriously It Is Very Hard). This Is Why I Painted My Bezel Black To Kinda Mask The Areas The Vinyl Does Not Cover. A How-to On Painting The Bezel Black Can Be Found In Step #2 Of The TSX Retrofit Section Above. This Is What I Did. I Just Got Some Black BBQ Grill Paint. It Doesn't Require Any Prepping Of The Bezel. So I Just Laid A Few Nice Coats Of It On The Bezel. Sorry No Pics.
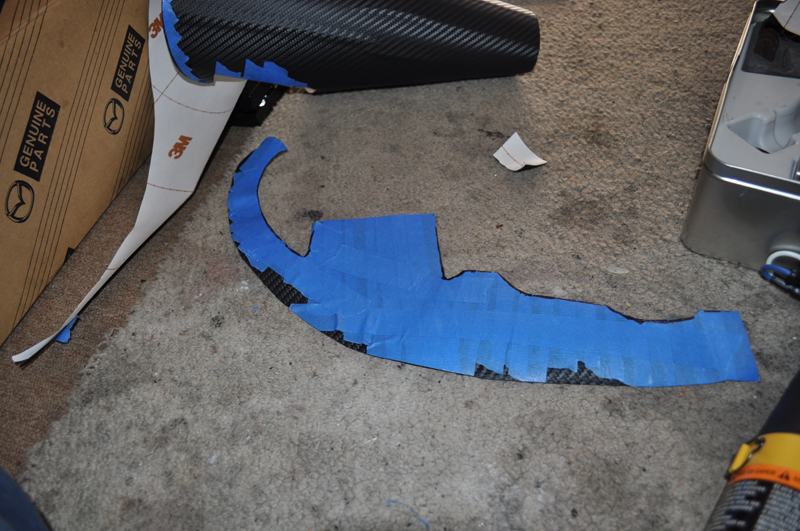
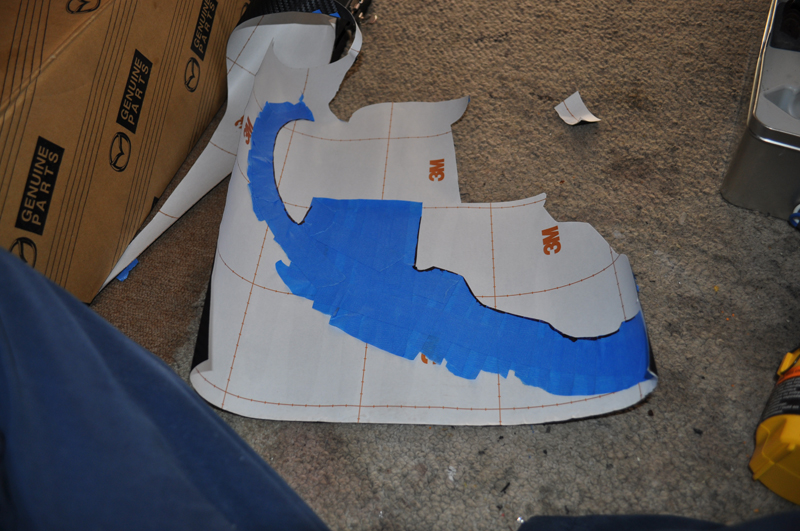
Step #3 Masking The Bezel) Do This Part In Sections. I Did Mine In Five Sections Although I Only Took Pictures Of The Large Portion Of The Bezel. Here Is A List Of The Sections I Did. Lower Portion (large flat area of bezel), Outside Portion (flat spot towards the outside of bezel), Inside Main Circle Portion (main headlight area), Inside Secondary Circular Portion (highlight area), And Turn Signal Portion (round part over turn signal). I've Tried Several Ways To Do This But This Turned Out To Be The Best And Easiest Way. Do One Section At A Time. Cover And Overlap The Section With Blue Painters Tape Making Sure You Go Over And Past The Area You Are Masking. Take Your Finger Nail Or Hard Object And Push Against The Edges Where You Will Be Marking With Your Sharpie. The More Perfect You Get It The More Perfect Your Templates Will Be. Coming Out The Back Of The Bezel You Can Mark Also. For The Inside Portions (front face of bezel) Be Sure To Be Exact With Your Marks Coming Out To The Front. The Backside You Don't Have To Worry About Because You Will Be Leaving Some Extra Vinyl To Wrap Around To The Backside Of The Bezel. See Pic Below For An Example.
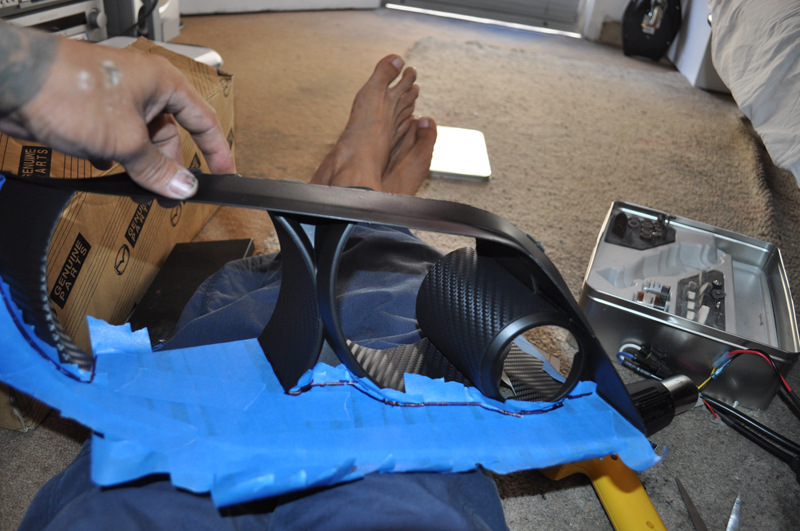
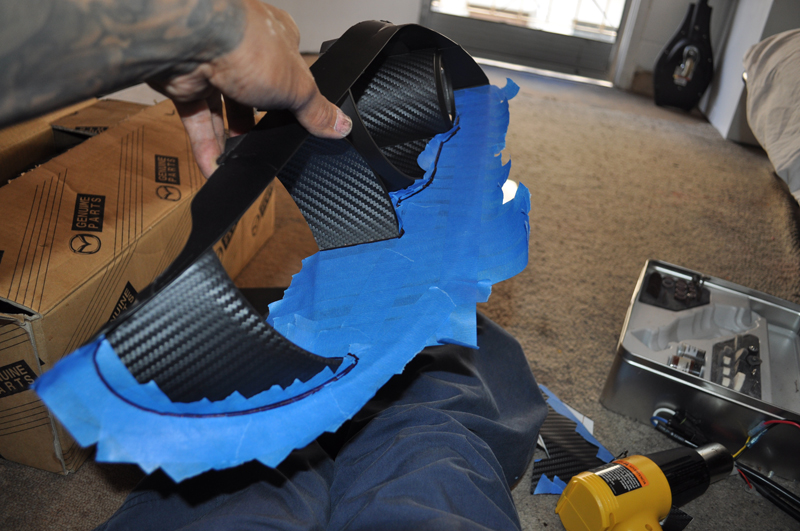
Step #4 Cutting Out Your 3M Carbon Fiber Templates) You Will Only Have To Make The Templates From Step #3 Above For One Side. To Get The Other Side You Will Use The Same Template But Apply It To The Opposite Side Of The Vinyl. Carefully Remove The Blue Painters Tape From The Bezel Making Sure It Stays Intact. I Added A Few Extra Pieces Of Tape To The Mask Prior To Pulling It Off To Keep It All Together. After You Get It Off Place The Mask Onto Either Side Of The Vinyl Depending On What Side Bezel You Are Doing. For Parts That Will Be Wrapped Around The Bezel Make Sure You Leave A Little Extra Vinyl To Do This. Use A Little Common Sense While Cutting. I Used Precision Scissors To Cut My Vinyl. See Pics Below.

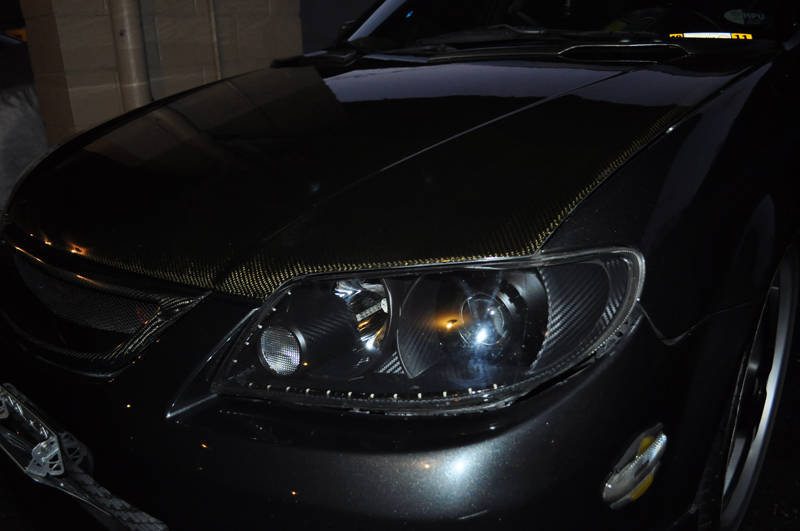
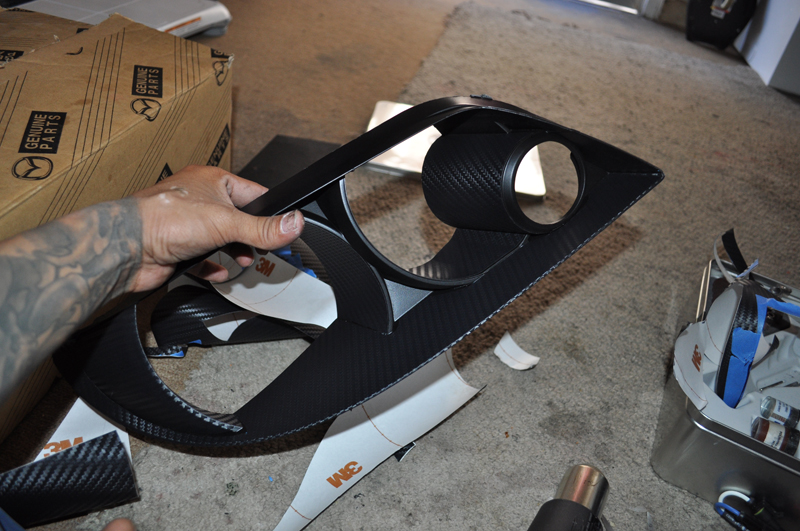
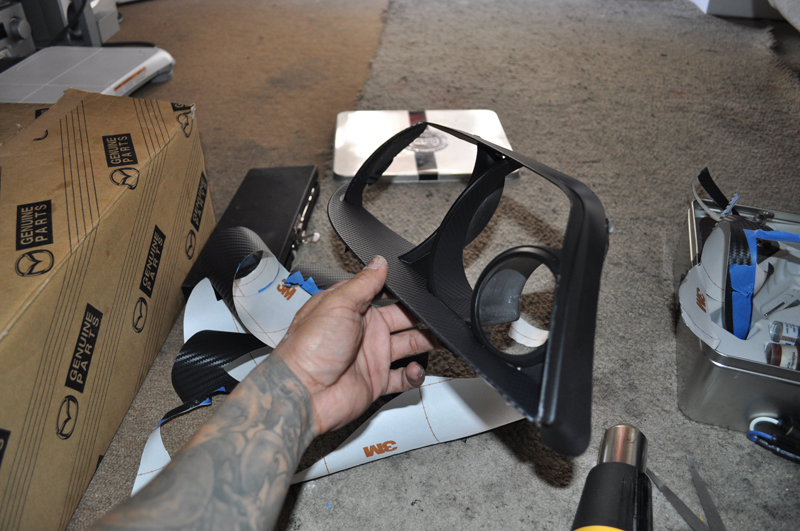
Step #5 Applying 3M Carbon Fiber Vinyl To Bezel) Again Do One Section At A Time. Peel The Vinyl And Attach To The Proper Section. Use Your Heat Gun To Properly Activate The Adhesive Feature Of The Vinyl And Press It On Using Your Hand Or The Backing The Vinyl Came Off Of. Also Use Your Heat Gun To Stretch The Parts Of The Vinyl That Is Being Wrapped Around The Bezel. Use Your Exacto Knife To Cut Off Excess Vinyl (the parts of the vinyl that you wrapped around and is not actually sticking to the bezel itself). Repeat For Each Piece You Apply. After All Is Said And Done Hopefully Your Bezel Looks Like Mine Or Better. See Pics Below For Example.

Painting Main Reflector Black
*NOTE Do All Your Cutting And Drilling Prior To Painting Unless You Wanna Paint Twice Because Be Sure You Will Scratch Some Paint Off If You Paint First And Cut/Drill Later.
This Is To Make Your Retrofit Look A Little Cleaner And OEM Looking.
Step #1 Masking Highlight Reflector Bowl Make Sure You Completley Mask Off The Highlight Reflector Bowl To Include The Bulb Hole Located On The Back. I Used Blue Painters Tape. Sorry No Pics But Shouldn't Be To Hard To Figure Out.
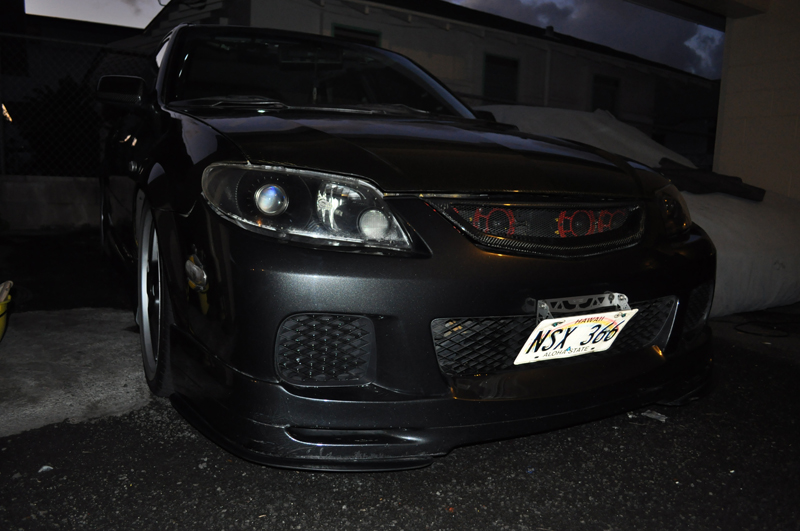
Step #2 Painting Main Reflector Bowl Just Like Painting Your Bezel Black You Can Do The Same To The Main Reflector Bowl. I Used Dupont Black BBQ Grill Paint. Hehe I Liked This Paint Because It Doesn't Require Any Prepping. But Then Again This Is How I Did It. If You Are Lazy Like Me Then You Can Do It Like I Did. See Pic Below On How It Turned Out After The Projector Was Mounted.
Adding V-LED White LED Strip a.k.a Audi Style Lights
Some Don't Like This But I Think It Looks Cool. I Can't Afford An Audi But I Can Make My Lights Looks Sorta Like Theirs
")
Step #1 Drilling Holes Into The Bezel And Headlamp Housing) You Will Have To Drill A Hole Through The Bezel Near The Turn Signal Hole. I Used My Dremel And A Drilling Bit To Make The Hole. Then I Used My Dremel And A Pointed Shaving Bit To Make The Hole Big Enough To Feed The LED Strip Wires Through. After You Make Your Holes You Can Mount The LED Strip On The Front Outer Portion Of The Bezel Like I Did. You Will Also Need To Drill A Corresponding Hole Through The Back Of The Main Headlamp Housing To Feed The LED Strip Wires Out Through The Back. After Reassembling Headlamp Housing Be Sure To Silcon The Holes You Made In The Back To Keep Moisture Out And Keep The Wire From Moving. See Pics Below For And Example.
Step #2 Wiring LED Strip) You Can Wire Them Into Your Parking Lights After You Mount Your Headlamps Back Onto Your Vehicle. The Wires Are Polarity Sensitive But Have A Built In Circuit To Prevent Reverse Polarity. If You Hook It Up And It Doesn't Turn On Switch The Wires Around And It SHOULD Work. Hook The Positive Side To Your Parking Lights Located On Your Turn Signal Wires Going To Your Turn Signal Bulb. And Hook The Negative Wire To A Good Ground On The Chassis. I Will Leave It Up To You To Figure Out Which Is The Turn Signal Wire And The Parking Light Wire. If You Turn On Your Turn Signal And Your LED Strip Flashed Then You Picked The Wrong One. I Can Tell You That The Center Wire On The Turn Signal Is Ground And Not Used. You Can Test The Polarity Of Each Wire Prior To Installing Like I Did. I Will Cover This Later.
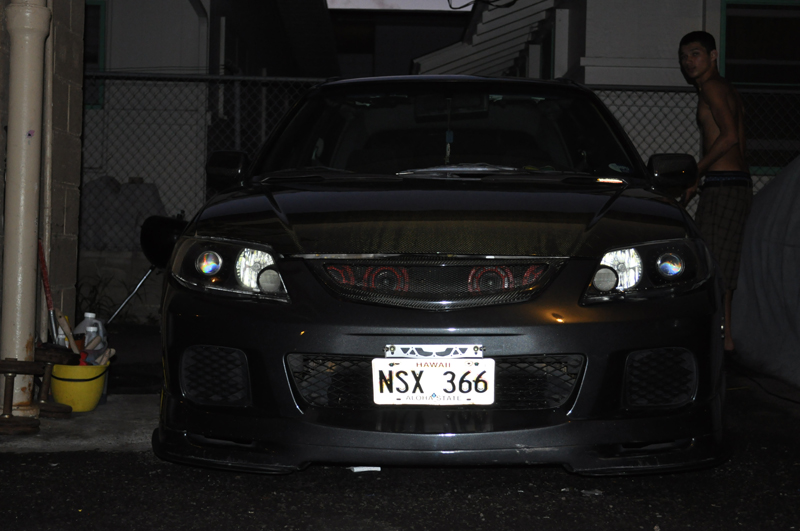
After All Is Said And Done Hopefully Your Lights Look Like Mine Or Better. See Example Below.
Using A Computer Power Supply To Test Lighting System
*NOTE This Part Is Somewhat Dangerous. Do NOT Touch The Power Supply And Projector Housing At The Same Time. I Repeat Do NOT Touch The Power Supply And Projector Housing At The Same Time. You Will Get A Nice Surprising Little Shock. Hehe I Know I Did And Threw My Projector Half Way Across The Room.
I Used A Computer Power Supply To Test My Lighting System Prior To Assembly. I Did This To Make Sure My Cutoff For My Projector Was Horizontal Or At Least Close To It. Also Used The Compter Power Supply To Test The Polarity Of My LED Strips.
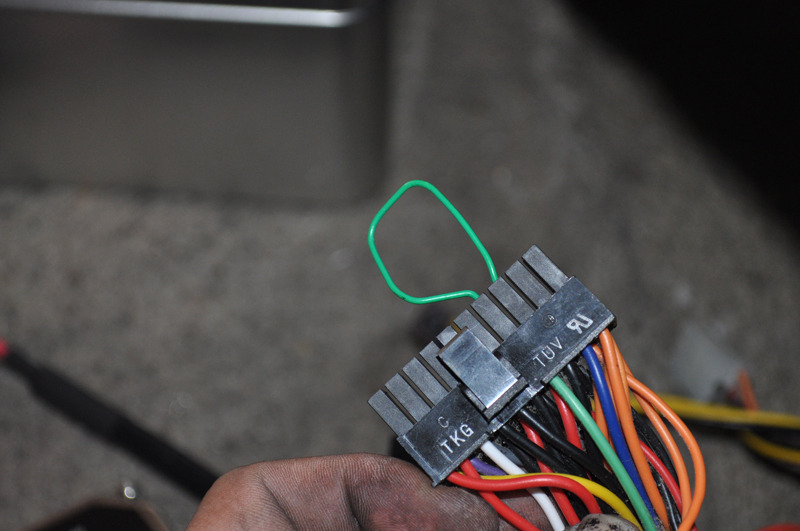
Step #1 Prepare Computer Power Supply) You Will Need A Computer Power Supply That Has At Least 10Amps On The 12volt Wire. Most Computer Power Supplies Will Have A Sticker On It Telling You How Much Amps Are On Each Wire. Find The Main Plug On The Power Supply. It Will Have Either 20pins Or 24pins. The Amount Of Pins Don't Really Matter. In Order To Turn On The Power Supply Without And Actual Computer You Will Have To Jump The Green Wire And Either Black Wire To The Sides Of It With A Paper Clip. After You Can Cover It With Black Tape But Isn't Necessary. I Covered It With Black Tape Just To Keep The Paper Clip In Place. After You Can Just Plug The Power Supply Into The Wall And It Should Turn On. You Will Know It Is On Because The Power Supply Fan Will Spin. See Pics Below.
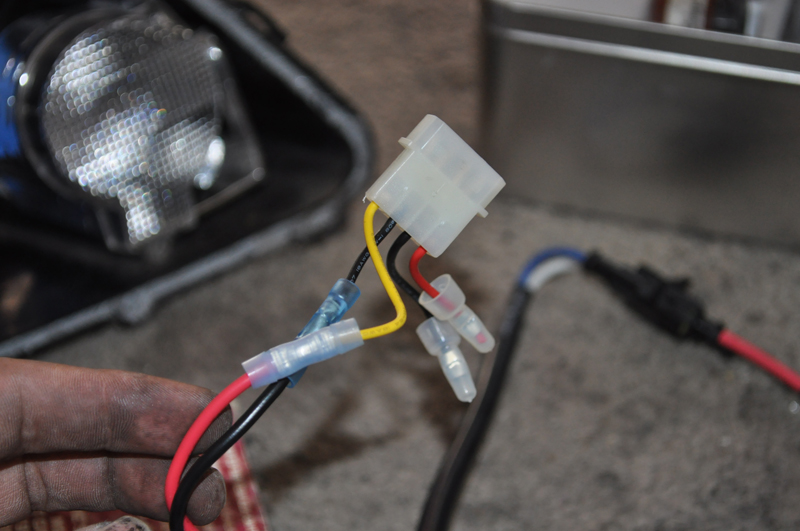
Step #2 Preparing Your Ballast) I Bought A Spare Ballast To Do Bulb Testing For My Projector. I Did This To Test My Cutoff Line After Mounting My Projector Onto My Reflector Bowl. I Also Used The Power Supply To Test My TSX Color Mod Before Completely Assembling My Projectors Together. You Will Need A 4 Pin Female Molex Connector. I Got Mine From A Computer Fan Adapter Connector. Strip The Positive And Negative Wire On The Ballast To Expose Bare Wire. Cut The 4 Pin Female Molex Connector About 2" From The Connector Itself. On The Molex Connector You Will Be Using The Yellow Wire (12v) And Either Black Wire (ground). Strip These Two Wires To Expose Bare Metal. Use Wire Connectors To Connect The Positive Wire From The Ballast To The Yellow Wire On The Molex Connector. Do The Same For The Ground Wire But Instead Of Yellow Connect It To Either Black Wire On The Molex Connector. Cap Off The Extra Black Wire That Is Not Being Used. Also Cap Off The Red Wire That Is Not Being Used. See Pic Below For And Example.
Now You Should Be Able To Power Up Your Ballast And Projector Prior To Installing On The Car.
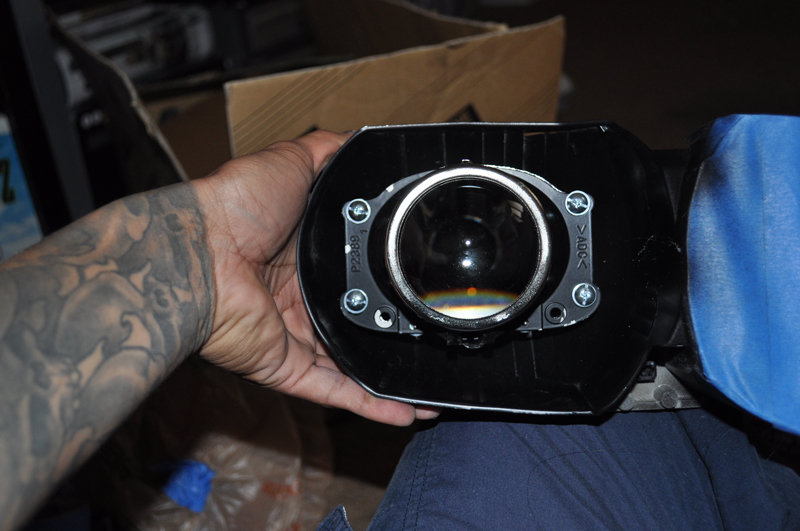
Installing Projector Shrouds
*NOTE You Will Have To Modify Any Shroud To Fit In The Headlamp Housing. This Will Give Your Headlamps A More Cleaner Look. I Opted For E46r Shrouds. But Any Shroud Should Work.
Step #1 Preparing And Installing Projector Shrouds)
*NOTE If You Plan On Keeping The Chrome Color Of The Shroud I Suggest Masking Off The Area Being Cut To Prevent Damage And Scratches. Also Use A Precise Cutting Tool. I Used A Dremel Because I Knew I Was Going To Paint My Shroud Black.
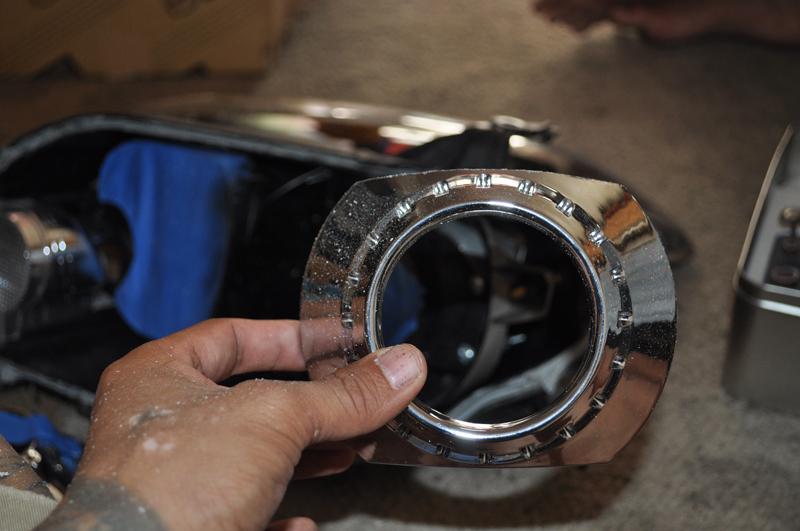
The First Thing I Did Was Attempt To Test Mount The Shroud Over The Projector After It Was Mounted To The Reflector Bowl. You Will Not Be Able To Get It On Because It Will Require Some Cutting Of The Shroud. After Test Fitting I Just Eyeballed Were I Needed To Cut. You Can Go About However You Want To Cut Yours. See Pic Below For An Example.
Step #2 Painting Shroud BlackOptional)
Pretty Self Explanatory. We Already Painted A Few Things So Just Put A Few Nice Coats Over It. But First Deburr The Edges That Were Cut. See Below Pic For An Example.
Step #3 Mounting And Securing Shroud To Projector)
*NOTE RTV Clear Silicon Needs At Least 24Hours To Fully Cure. But You Should Be Able To Put Everything Together Within 30 Minutes. To Mount The Shroud To The Projector I Opted To Use Clear RTV Silicon. This Is Because With My First Retrofit I Opted To Use 3M Double Sided Tape. The Double Sided Tape Worked But Tends To Slip. The Silicon Will Stay Permanently After A Full Cure. I Put A Thick Bead Of Silicon On The Inside Ring Of The Shroud And Mounted It Onto The Projector Until I Was Satisfied That It Was Centered. See Pic Below For And Example.
Step #4 Cleaning Excess Silicon) Pretty Self Explanatory. After Your Silcon Clears And Becomes Firm You Can Start Rubbing Off The Excess From The Front Of The Projector Ring And Projector Glass. I Used Q-Tips And An Exacto Knife For The Tuff To Get To Areas. *NOTE If You Painted Your Shrouds Black Make Sure You Don't Scratch The Paint Off The Shroud. If Not You Have A Sharpie To Cover It Up
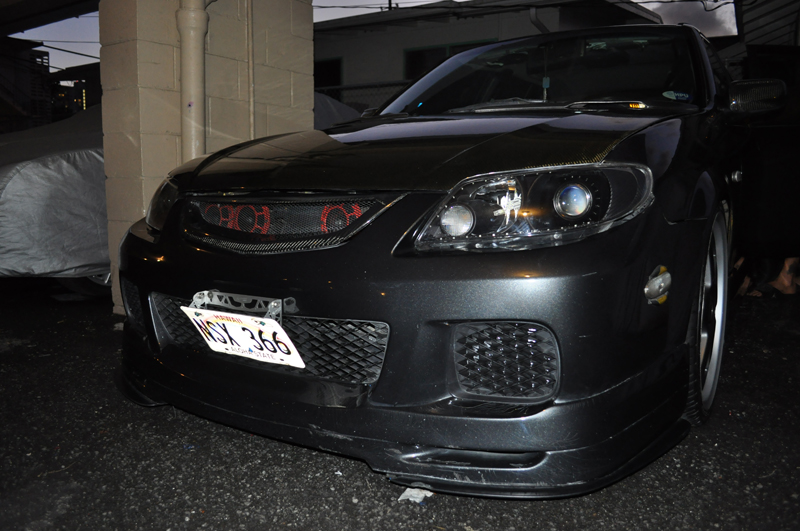
After All Is Said And Done Hopefully Your Lights Look Like Mine Or Better.
Color Modding TSX Projectors
*NOTE You Will Need TSX Projectors That Have A Clear Lens And NOT The Fresnel Lens
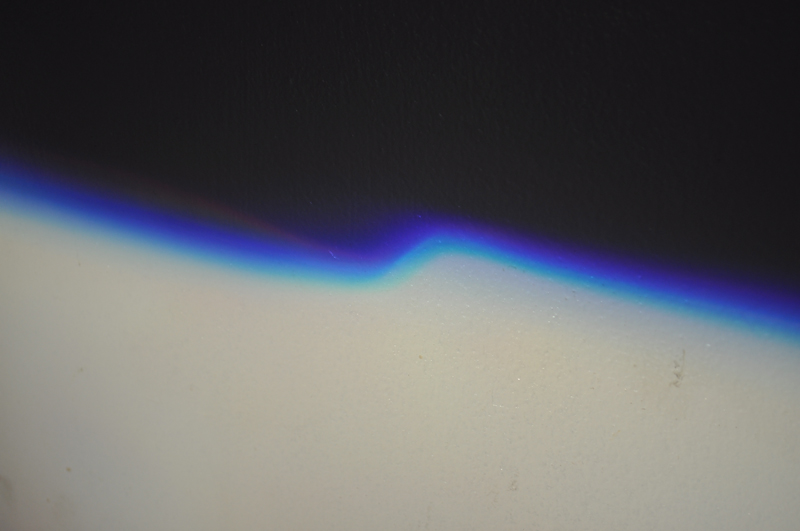
I've Found Three Ways To Color Mod The TSX Projectors By Using Google. Basically Color Modding Has It's Up's And Downs. Upside Is Nice Vivid Colors At The Cutoff Line. Downside Is A Blurrier Cutoff Line. I Did All Three. The Cutoff Line Is What You Are Seeing When Projector Lights Flicker In Front Of You. Also The Color Band Will Spread Wider As You Get Farther Away From Objects.
1) TSX Color Mod Using Washers:
http://www.hidplanet.com/forums/viewtopic.php?t=8731
Although In The Link Above They Only Used 2 Washers Per Nipple. I Found Out That Mine Came Out The Best Using 4 Washer Per Nipple. This Is Why I Got The Computer Power Supply And Tested Out My Color Mod Prior To Finalizing The Projector Assembly. You Can Try A Different Amount Of Washers Each Nipple Or Bolt Till You Get The Desired Effect You Like.
2) TSX Color Mod Painting Cutoff Shield Black And Front Inner Housing Black.
http://www.high-intensity.org/forums/showthread.php?t=619
According To The Link It Helps With The Flare Caused By Light Bouncing Back At The Projector Reflector From The Cutoff Shield. As I Tested It Out It Did Clean Up The Cutoff Line Noticeably. Sorry No Before And After Pics.
3) TSX Color Mod Using A Small Wire To Space The Bulb.
http://www.youtube.com/watch?v=TPXyQFbyl88
This Mod Also Helped Clean Up The Cutoff Line By Reducing Hotspots And Flares. Sorry No Before And After Pics.
Here Are Some Pics Of My Cutoff Line. I'll Try To Get Better Pics Later.
Last edited:
")


