- :
- Mazda Protege Titanium 03.5
After seeing pics of people who had a shiny heat shield over their exhaust manifold, I decided I would like to have the same for myself. After much searching, I found little to no information describing how it could be done. I have to give props to Casopolis, he was the only person I found on the forums who gave enough information to figure out how to do it.
*There is a movie attached at the bottom of this post with several pics that show the process I'm describing
--------------------------------------------------------------------------
Step 1. Getting the right materials:
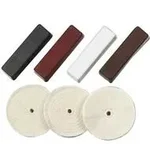
Your going to need some Rubbing Compound (preferably 3M) or some other high to medium abrasive compound that's equivalent. WAL-MART sells a small bottle of 3M's automotive rubbing compound for about 6$. It's in a little grayish black bottle and can be found near the touch up paints area of the automotive section. You are also going to need some way to apply the compound . I don't own a buffer, so I bought I little buffer attachment Black and Decker makes that goes onto my cordless drill. It cost about 5$ and comes with a buffing bonnet, sandpaper (useless) and the disk they mount to. I also bought this from wal-mart and it was in the power tool section. Casopolis used a grinder with a buffing attachment if I recall correctly, that would probably be your best bet route to go if you have a grinder. Anything, be it a cordless drill or grinder, that can apply the compound at a fast rate to the heatshield should be sufficient. Doing the polishing by hand will work, however it will be tedious and the results aren't nearly as good
Checklist:
*High or Medium cut polishing compound
*Means of buffing
--------------------------------------------------------------------------
Step 2. Getting the heatshield off:
Tools needed:
* Flathead screwdriver
* 10 mm socket and socket wrench
First off lets hope you didn't just drive your car to wal-mart to get the things for step 1. If so your going to have to wait for it to cool, I thought I was skilled enought not to wait and the heat shield burned the s*** out of me 3 times. My hand is still burning as I write this.
The first thing to detach is your 02 sensor harness connector located just above where the hotpipe meets the turbo outlet. It's easy to do, just push it back towards the driver seat to get if off the clip, and then push the tab in the middle down while pulling on each end of the harness connector. Once that's out of the way, it time to fully loosen the clamps that secure the hot pipe on both the turbo outlet and IC inlet sides of it. You will ONLY need to remove the hot pipe on the TURBO SIDE at this point( you don't even want to try to get it off the intercooler). It might take you a while of pulling but eventually it will break loose and come off. If you feel like its going to fly off because your pulling on it so hard, go ahead and disconnect your BPV before pulling on it anymore. Once you have the pipe removed from the turbo outlet, pull it up and and twist it towards the front of the car to get it out of the way.
------------------------------------------------------------------
Step 3.
Remove Heat shield. Its attached with four identical 10mm bolts that are clearly visible. Remove all the bolts and put them in a safe place. It will take some force to get the heat shield out from under the Power Steering lines, but it will eventually go. Be sure that you aren't putting much if any force on your 02 sensor as you remove the heat shield and try to avoid scratching it on the PS lines as well. Though it is more trouble and not necessary, removing the 02 sensor will save you some trouble and decrease your odds of damaging the sensor with the heatshield
--------------------------------------------------------------------
Step 4. Time to polish:
Put some rubbing compound on your buffer and go to town on the heatshield. The more you polish it the better it will look. I polished mine for 10-15 minutes and got great results. Remember, rubbing compound breaks down as it's used so it is important that you continually re-apply fresh rubbing compound and remove the old while polishing the heatshield. Once I was happy with my results, I used a damp terry cloth to completly remove all of the excess coumpound before polishing the heatshield with car wax to finish it off
-------------------------------------------------------------------------
Step 5. reattach everything.
--------------------------------------------------------
It took me about 30-45 minutes from start to finish. I had previoulsy tried buffing it by hand but it didn't work well at all. I also tried a dremel tool but it didn't work near as well as the drill buffer( mainly because the buffing disc would tear up quickly or only polish a small area and make unpolished areas stand out.
Good Luck!
...Watch the movie!
*There is a movie attached at the bottom of this post with several pics that show the process I'm describing
--------------------------------------------------------------------------
Step 1. Getting the right materials:
Your going to need some Rubbing Compound (preferably 3M) or some other high to medium abrasive compound that's equivalent. WAL-MART sells a small bottle of 3M's automotive rubbing compound for about 6$. It's in a little grayish black bottle and can be found near the touch up paints area of the automotive section. You are also going to need some way to apply the compound . I don't own a buffer, so I bought I little buffer attachment Black and Decker makes that goes onto my cordless drill. It cost about 5$ and comes with a buffing bonnet, sandpaper (useless) and the disk they mount to. I also bought this from wal-mart and it was in the power tool section. Casopolis used a grinder with a buffing attachment if I recall correctly, that would probably be your best bet route to go if you have a grinder. Anything, be it a cordless drill or grinder, that can apply the compound at a fast rate to the heatshield should be sufficient. Doing the polishing by hand will work, however it will be tedious and the results aren't nearly as good
Checklist:
*High or Medium cut polishing compound
*Means of buffing
--------------------------------------------------------------------------
Step 2. Getting the heatshield off:
Tools needed:
* Flathead screwdriver
* 10 mm socket and socket wrench
First off lets hope you didn't just drive your car to wal-mart to get the things for step 1. If so your going to have to wait for it to cool, I thought I was skilled enought not to wait and the heat shield burned the s*** out of me 3 times. My hand is still burning as I write this.
The first thing to detach is your 02 sensor harness connector located just above where the hotpipe meets the turbo outlet. It's easy to do, just push it back towards the driver seat to get if off the clip, and then push the tab in the middle down while pulling on each end of the harness connector. Once that's out of the way, it time to fully loosen the clamps that secure the hot pipe on both the turbo outlet and IC inlet sides of it. You will ONLY need to remove the hot pipe on the TURBO SIDE at this point( you don't even want to try to get it off the intercooler). It might take you a while of pulling but eventually it will break loose and come off. If you feel like its going to fly off because your pulling on it so hard, go ahead and disconnect your BPV before pulling on it anymore. Once you have the pipe removed from the turbo outlet, pull it up and and twist it towards the front of the car to get it out of the way.
------------------------------------------------------------------
Step 3.
Remove Heat shield. Its attached with four identical 10mm bolts that are clearly visible. Remove all the bolts and put them in a safe place. It will take some force to get the heat shield out from under the Power Steering lines, but it will eventually go. Be sure that you aren't putting much if any force on your 02 sensor as you remove the heat shield and try to avoid scratching it on the PS lines as well. Though it is more trouble and not necessary, removing the 02 sensor will save you some trouble and decrease your odds of damaging the sensor with the heatshield
--------------------------------------------------------------------
Step 4. Time to polish:
Put some rubbing compound on your buffer and go to town on the heatshield. The more you polish it the better it will look. I polished mine for 10-15 minutes and got great results. Remember, rubbing compound breaks down as it's used so it is important that you continually re-apply fresh rubbing compound and remove the old while polishing the heatshield. Once I was happy with my results, I used a damp terry cloth to completly remove all of the excess coumpound before polishing the heatshield with car wax to finish it off
-------------------------------------------------------------------------
Step 5. reattach everything.
--------------------------------------------------------
It took me about 30-45 minutes from start to finish. I had previoulsy tried buffing it by hand but it didn't work well at all. I also tried a dremel tool but it didn't work near as well as the drill buffer( mainly because the buffing disc would tear up quickly or only polish a small area and make unpolished areas stand out.
Good Luck!
...Watch the movie!
Attachments


Last edited: