
You are using an out of date browser. It may not display this or other websites correctly.
You should upgrade or use an alternative browser.
You should upgrade or use an alternative browser.
hood prop kit question
- Thread starter Nos
- Start date
UnNaturalinc
Formerly"HorsepowerFreak"
- :
- '03.5 MSP, '87 RX-7 TII, '80 Chevy Luv, '05 Honda CRF230
Which cylinders are you referring to?
UnNaturalinc
Formerly"HorsepowerFreak"
- :
- '03.5 MSP, '87 RX-7 TII, '80 Chevy Luv, '05 Honda CRF230
You're talking about the hydralic damper/cylinder things, right?

Which ones are you going to use? There is not one standard size they come in. Some cars even have props like that from the factory.
Which ones are you going to use? There is not one standard size they come in. Some cars even have props like that from the factory.
dexters were.. um.. 30lb struts for CF hoods.. not sure how long. Search for Dexters hood prop kit.Nos said:I wanna make my own hood prop kit so if someone wants to mesure how long the cylinders are opened and closed and also measure the plate that is bolted on the hood . thats alot !!
Pier
I have been working on this for a while now. It has been an on- and off kinda project as I have been busy with work. I have the brackets complete and I have several different strut assemblies, but I haven't had a chance to install it yet, so I don't know which strut will work the best. I'll dig them up and measure them as soon as I get a chance and I will post up the details.
R
R
- :
- 2002 BJFW, 2007 BK3P, 1979 SA22C, 2005 BK3P
Nos said:Pm both and none replied , must be a secret
he was banned from this board and cannot recieve PMs. you can PM him over at mazdateam.com forums
Nos said:can you post pics of the brackets you made ? just curious
I'll take pics of the brackets tomorrow and post them on the board.
R
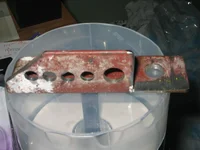
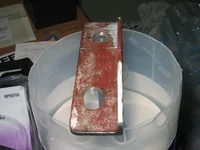
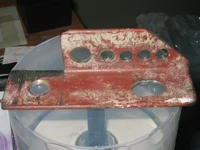
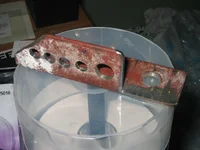
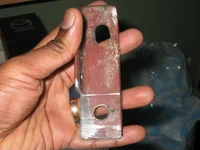
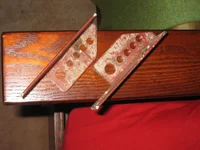
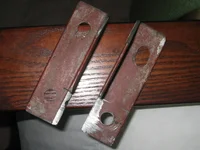
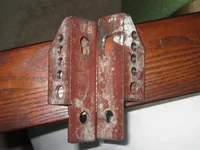
OK. So here are some pics of the brackets. Keep in mind that these are NOT in any way the finished product. These are just mock-ups that I have been using for sizing and templating purposes. Once I have all the dimensions correct, I will fabricate the final pieces.
I fabricated these from a scrap piece of 1.5" angle iron. I tried a number of other things before settling on this including some aluminum plate and some mild steel, none of which were easy to cut or work with, or were strong enough in my estimation to hold the weight of the hood (especially if it were caught by a gust of wind). The angle iron seemed heavy enough to withstand a hurricane without being overly bulky.
The brackets are 5" long by 1.5" wide. Currently, I think that the best way to put them on is with the long face positioned between the hood and its fitting such that the orthogonal face of the bracket faces the front of the vehicle towards the engine bay.
Note that on the hood side of the bracket one hole is round and the other oblong. This occured because I eyeballed the distance between holes initially as I didn't have a ruler available at the time I drilled. When I took them back to the car I found that I had measured short and had to extend the hole a bit. Ultimately, I figure that this actually works better because it gives you some room to manouevre the bracket around once the bolts are, to allow the best fit. These holes are 1/2" size and are ~ 3" apart (centre-centre); the oblong hole is 1.25" from the front edge to its centre, the round hole is 7/8" from the back edge from its centre. Both holes are supposed to be centred down the axis of the bracket, but it is not on one of the brackets.
The bracket face where the hood struts will attach is 1.5" shorter than the hood face. The front portion is bevelled at 45 degrees while the back is straight cut. Both sides were originally bevelled, but the back side contacted the ledge over the fire wall when I closed the hood so I had to cut it short. In the final product I'll just bevel it from the point where the straight cut now ends.
There are several holes on the strut side because originally I didn't know exactly where I would put the struts and I didn't know how long they would be. I wanted to have some options available so that I could move things back and forth if I had to to get things to fit. The 4 smaller holes are 11/32" and are .5" apart (centre-centre). The larger hole is 1/2" and is .75" from the last small hole (centre-centre).
I trialed them once and discovered that I had to cut the back bevel off and I had to make more holes. I haven't had a chance to trial them since because I didn't have anyone to hold the hood for me (trying to do it yourself is a PITA I assure you) and now the weather is too damn cold. If I get a chance to put them on soon I'll then be able to figure out which struts will work.
I have about 4 different pairs of struts of different lengths and different closing pressures. I also have about 4 different kinds of connectors by which to attach the struts to the brackets. I will trial each combination and then go with the ones that are the easiest to mount and look the closest to stock. While I want this to be a ghetto fab product, I want it to look as close to stock as possible. When all is said and done the brackets will be painted body colour so that they look as though they belong.
Any suggestions would be appreciated.
BTW, I was also noting that you can attach all sorts of connectors to these things. This lead me to ponder the possibility of assembling engine dampers from these. Some of them come with very, very high closing pressures so I don't see why you couldn't use them with the proper fittings. Besides I gotta do something with the leftovers...LOL!
R
Attachments
Super Mario
Member
- :
- 150cc Go-kart
I offered to sell you my brackets, but I guess that is not an option for you, so just make them yourself.
Hey, Dexter had a kit too. Do you two know each other? (deadhorseSuper Mario said:I offered to sell you my brackets, but I guess that is not an option for you, so just make them yourself.
Super Mario
Member
- :
- 150cc Go-kart

SM,Super Mario said:I offered to sell you my brackets, but I guess that is not an option for you, so just make them yourself.
There is no problem with buying your brackets, but they are just that...YOUR brackets. By buying your brackets I am taking a short cut to the finished product. In so doing, I am not learning what I could learn if I fabricated my own. I am spending money without gaining any knowledge in the bargain.
Granted, your product is a tried and true finished product, but by this point I have learned that much of what we pay for is knowledge and convenience. I pay someone a price that they have deemed appropriate to cover the costs incurred in producing their product. I would rather learn how to do something myself, whatever the cost, and come away with knowledge that I can apply to other things in the future.
R
New Posts and Comments
- Replies
- 0
- Views
- 27

New Threads and Articles
-

-

-
Icy roads, black ice, and close calls: how are you driving this winter?
- By Redtiger
- Replies: 0