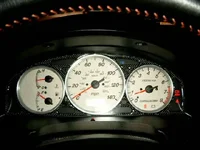
HIGH praise to Dave's (Bodde Motorsports) Brushed Rings!!

Trapshooter said:
:D Very happy with the outcome....Dave and Kelly are great to deal with, and the rings are better than Mazda could ever produce!! I combined mine with a carbon fiber face plate I got on Ebay. I think the two work together well. I highly reccomend them to all P5 owners....

man i really wish you ppl would be original and stop stealing my ideas.. geezus christ. 2nd person to get the brushed and first to have brushed with cf bezel.. :( i hate IDEA THEIFS! DIE YOU BASTARD!

just kidding.

dayum theifs
 

Attachments

  • simg0556.webp
    simg0556.webp
    31.3 KB · Views: 252
I just installed mine last week and paint my needle base to silver. They looks great!!! Thanks a lot Dave. Your service is outstanding!! (See my sig below)
 
I have them long time ago......... but my middle ring is popping out when the weather gets hot.............
 
Hey Dave, just installed mine last week. They are AWESOME. Thanks again.

Daniel
 
acfyu, was it difficult to paint the needles. I've been wanting to do this for a while but was not sure how hard it is. I know people that have taken apart the bezel and needles and then when they put it back together the speedometer was off.
 
I installed mine today.

Damn, what an awesome mod. I like them a lot. I cant keep my eyes on the streets looking @ cluster.... j/k
 
I didn't take apart the needle - I heard that it is very easy to break. Put painter's masking tape below the needle, you can easily slide the tape under it so that it protects the gague face. Because I do plastic modelling so I've some Tamiya masking tape. I use that for the needle. Take a piece of around 2" so that you can fix the needle in place. Do it to all 4 needles.

I use Tamiya acrylic model paint (XF-56 Metallic Gray), and use a 1/8" model brush to brush it on. This one is a flat paint so it dries pretty quick. However don't put too much on at once, just enough to cover the base. Paint all 4 one at a time. I put the 2nd coat right after I finish painting all 4. Wait for 20min. for the paint to dry. Put on the 3rd coat, wait for another 20min. After I put on the 4th coat it totally covers the base nicely. Leave it open for another 10 - 15 min before putting the clear lens back. I do the painting at night so I leave it overnight before I put the whole thing back on.

This way I've no worry on breaking the needle or if the reading is off. I don't have a digital camera, otherwise this might be a how-to? :cool:
 
Ive seen this done on eclipse's but I wanted to know if it possible to change the color of the backlight for the needle. As in is there access to that led(s) from the back of the cluster? I have seen em in blue and they look really nice.
 
yes they are, i have the brushed with a brushed bezel, they look tight. and dave was the coolest guy to deal with.

Now I am starting work next week on the DaveB style aluminum wind splitter...
 

New Threads and Articles

Back