After many years with the stock radio and system I decided to install an aftermarket radio to my 2012 mazda CX-9.
After some research I decided to go with an https://www.amazon.com (commissions earned) unit model. I found good reviews about them and also good customer support. The price was also very attractive on Amazon (about $150).
The second necessary component was how to adapt this radio to my grand touring bosé non-nav car. Since I needed to connect the sound to the existing bose amplifier and also retain the steering wheel controls.
There were some options but I decided to go with this one: PAC RP4-MZ11 I found one on ebay for $100 bucks.
I also got a camera retain harness to be able to preserve and connect the stock reverse camera to the new headunit:https://www.amazon.com (commissions earned), a https://www.amazon.com (commissions earned) antenna cable adapter and a https://www.amazon.com (commissions earned)t.
This was my stock radio:

on the back of the radio we have these connections:

The RP4-MZ11 has an orange rectangular connection that goes directly to the sound and power connector and wires coming from the interface connector (blue box)),wires coming from the vehicle connector (wires coming out of the orange plug and 4 sound connections that end in RCA plugs.

Note: Before unplugging the stock radio, remember to delete all bluetooth paired phones and eject all stored CDS.
Wiring:
The atoto unit has several harnesses and every wire in them is labeled so is easy to make the connections. The RP4 on the other hand has vague instructions and takes a lot of guessing to find out how to connect everytingh. After doing tests with a multimeter and some trial and error, I wired everything like this:

I have attached a pdf with the connections in more detail.
Steering wheel controls:
The RP4-MZ11 has a dial on the side with numbers to select the appropiate radio brand. In my case I selected 7 (pioneer, other) and that worked fine.
Also I connected the headphone plug to the corresponding jack on the atoto unit so I didnt used any of the steering wheel keys wires.
Observations:
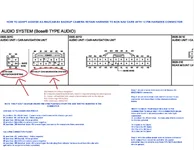
-Cars with Bose Systems only have 2 sound outputs from the stock radio: (FL, FR) and an AMP on signal that turns on the amplifier when the radio is turned on. Those 2 sound outputs got to the amplifier and from there to all the car speakers. Meaning that fader and gain are controlled by the stock radio via canbus signals to the amplifier.
-The RP4-MZ11 mimics the canbus signals to the amplifier and will allow to adjust fader and amp gain levels but only if you have a message display center that can show text.
-The RP4-MZ11 will also allow to adjust the clock and select the information to be displayed in the travel computer (average consum. range, etc). This feature is reason enough to buy this adapter over other options like Maxxis.
-If the car has bose system, an RCA line out converter is required but only for the two front outputs since you cannot connect the rears.
-If the car doesn´t have Bose, the speaker wires can be terminated in RCA jacks to connect all 4 to their corresponding wires on the RP4-MZ11 or splice the wires for each speaker.
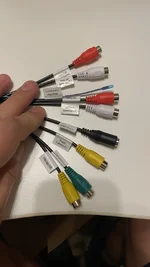
In my case, my atoto unit had a harness that also included the Front and left audio out preamp RCA outputs. So I could plug the RP4-MZ11 grey and white RCAs to them and didn't had to use any line out converters. Those two RCA outputs are not available on all atoto harnesses for some reason:


Rear Camera connections:
I wanted to keep the stock camera, so I got this camera retain adapter but I found that it was not plug and play in my case. The rear camera retain harness has 4 pin rectangular connectors that works for navigation units but didnt match my non nav camera wiring connector, So I had to research and find how to make it work. Fortunately, someone found the pinout for this connector and how to de pin the wires and insert them in the 4 pin male connector from the adapter: For this, you have to repourpose the male plug on the harness adapter so it ends like this: Original camera wiring from car -> male 4 pin connector -> female 4 pin connector -> yellow video out plug -> corresponding video in jack on atoto harness.
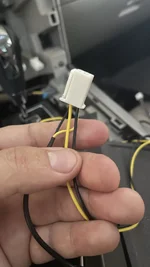
Original rear view camera connector for non nav radios:

De pining the wires to insert them in the 4 pin male connector:


This is how the wires have to be transferred from the original 12pin connector to the 4 pin male connector:

Important: The rear view camera works with a 6v input. So a step down voltage converter is included with the Maxxis adapter. The converter has 3 wires:
12v input (must be spliced to the green/pink reverse output wire so the camera gets power every time the car is in reverse.
6v ouput - This wire must be connected to the yellow power input wire on the adapter.
Ground - this wire has to be spliced to the ground black wire.
Microphone: The radio came with a wired microphone to be placed somewhere on the roof headliner, I routed this microphone to the stock mic location but I fount that it doesn't have good reception there. I will probably move it to another position.
Antenna adapter:
Plug the female gray plug to the antenna wire coming from the car. The adapter has a blue wire for antenna power, but there is not a corresponding pin on the car side harness so, the blue Antenna On coming from the atoto radio harness must be spliced to the blue wire on the vehicle connector side of the RP4-MZ11 adapter.
Installation notes:
-Separate the power and audio and camera wires as far as possible to avoid any electrical interference.
-Position the GPS antenna on the top of the shelf next to the center speaker.
-Route the wifi and bluetooth antenna wires towards the vents so they keep above and not behind the radio.
-When the radio is powered on you will hear no sound because the amplifier is not receiving activation signal. On the radio settings go to: Settings -> Device -> Sound -> Amplifier turn-on, that will send the remote amp signal through the amp on wire.

Steering wheel controls have to be programmed so the radio learns the function for each button, this is very easy. in settings go to SWC program and once there you need to hold the button to be programmed and on the radio you press the corresponding function. Save after every button has been setup.
Review:
The radio is better than I expected, is fast, responsive, the sound is excellent, the same or better than with the stock radio. The atoto unit has wired and wireless carplay which was the main reason for the upgrade and it works great, the phone connects fast and it has also a lot of options for settings, data connections, and apps that can be downloaded and also it has native navigation with google maps and other apps but I think carplay does everythng I need.

I hope this guide can help you to upgrade your radios too.
After some research I decided to go with an https://www.amazon.com (commissions earned) unit model. I found good reviews about them and also good customer support. The price was also very attractive on Amazon (about $150).
The second necessary component was how to adapt this radio to my grand touring bosé non-nav car. Since I needed to connect the sound to the existing bose amplifier and also retain the steering wheel controls.
There were some options but I decided to go with this one: PAC RP4-MZ11 I found one on ebay for $100 bucks.
I also got a camera retain harness to be able to preserve and connect the stock reverse camera to the new headunit:https://www.amazon.com (commissions earned), a https://www.amazon.com (commissions earned) antenna cable adapter and a https://www.amazon.com (commissions earned)t.
This was my stock radio:
on the back of the radio we have these connections:
The RP4-MZ11 has an orange rectangular connection that goes directly to the sound and power connector and wires coming from the interface connector (blue box)),wires coming from the vehicle connector (wires coming out of the orange plug and 4 sound connections that end in RCA plugs.
Note: Before unplugging the stock radio, remember to delete all bluetooth paired phones and eject all stored CDS.
Wiring:
The atoto unit has several harnesses and every wire in them is labeled so is easy to make the connections. The RP4 on the other hand has vague instructions and takes a lot of guessing to find out how to connect everytingh. After doing tests with a multimeter and some trial and error, I wired everything like this:
I have attached a pdf with the connections in more detail.
Steering wheel controls:
The RP4-MZ11 has a dial on the side with numbers to select the appropiate radio brand. In my case I selected 7 (pioneer, other) and that worked fine.
Also I connected the headphone plug to the corresponding jack on the atoto unit so I didnt used any of the steering wheel keys wires.
Observations:
-Cars with Bose Systems only have 2 sound outputs from the stock radio: (FL, FR) and an AMP on signal that turns on the amplifier when the radio is turned on. Those 2 sound outputs got to the amplifier and from there to all the car speakers. Meaning that fader and gain are controlled by the stock radio via canbus signals to the amplifier.
-The RP4-MZ11 mimics the canbus signals to the amplifier and will allow to adjust fader and amp gain levels but only if you have a message display center that can show text.
-The RP4-MZ11 will also allow to adjust the clock and select the information to be displayed in the travel computer (average consum. range, etc). This feature is reason enough to buy this adapter over other options like Maxxis.
-If the car has bose system, an RCA line out converter is required but only for the two front outputs since you cannot connect the rears.
-If the car doesn´t have Bose, the speaker wires can be terminated in RCA jacks to connect all 4 to their corresponding wires on the RP4-MZ11 or splice the wires for each speaker.
In my case, my atoto unit had a harness that also included the Front and left audio out preamp RCA outputs. So I could plug the RP4-MZ11 grey and white RCAs to them and didn't had to use any line out converters. Those two RCA outputs are not available on all atoto harnesses for some reason:
Rear Camera connections:
I wanted to keep the stock camera, so I got this camera retain adapter but I found that it was not plug and play in my case. The rear camera retain harness has 4 pin rectangular connectors that works for navigation units but didnt match my non nav camera wiring connector, So I had to research and find how to make it work. Fortunately, someone found the pinout for this connector and how to de pin the wires and insert them in the 4 pin male connector from the adapter: For this, you have to repourpose the male plug on the harness adapter so it ends like this: Original camera wiring from car -> male 4 pin connector -> female 4 pin connector -> yellow video out plug -> corresponding video in jack on atoto harness.
Original rear view camera connector for non nav radios:
De pining the wires to insert them in the 4 pin male connector:
This is how the wires have to be transferred from the original 12pin connector to the 4 pin male connector:
Important: The rear view camera works with a 6v input. So a step down voltage converter is included with the Maxxis adapter. The converter has 3 wires:
12v input (must be spliced to the green/pink reverse output wire so the camera gets power every time the car is in reverse.
6v ouput - This wire must be connected to the yellow power input wire on the adapter.
Ground - this wire has to be spliced to the ground black wire.
Microphone: The radio came with a wired microphone to be placed somewhere on the roof headliner, I routed this microphone to the stock mic location but I fount that it doesn't have good reception there. I will probably move it to another position.
Antenna adapter:
Plug the female gray plug to the antenna wire coming from the car. The adapter has a blue wire for antenna power, but there is not a corresponding pin on the car side harness so, the blue Antenna On coming from the atoto radio harness must be spliced to the blue wire on the vehicle connector side of the RP4-MZ11 adapter.
Installation notes:
-Separate the power and audio and camera wires as far as possible to avoid any electrical interference.
-Position the GPS antenna on the top of the shelf next to the center speaker.
-Route the wifi and bluetooth antenna wires towards the vents so they keep above and not behind the radio.
-When the radio is powered on you will hear no sound because the amplifier is not receiving activation signal. On the radio settings go to: Settings -> Device -> Sound -> Amplifier turn-on, that will send the remote amp signal through the amp on wire.
Steering wheel controls have to be programmed so the radio learns the function for each button, this is very easy. in settings go to SWC program and once there you need to hold the button to be programmed and on the radio you press the corresponding function. Save after every button has been setup.
Review:
The radio is better than I expected, is fast, responsive, the sound is excellent, the same or better than with the stock radio. The atoto unit has wired and wireless carplay which was the main reason for the upgrade and it works great, the phone connects fast and it has also a lot of options for settings, data connections, and apps that can be downloaded and also it has native navigation with google maps and other apps but I think carplay does everythng I need.
I hope this guide can help you to upgrade your radios too.