'90 1.6L to '99 1.8L Swap (500 Mile Review 4/30/07)

kcbhiw

What "Lifestyle"?
Contributor
:
64 Valves, 16 Cylinders, 7.2L, 622 HP
Since I've spent so much time building the GRM Challenger, necessity obligates me to add a bit more power to the CSP Miater. The 140k mile 1.6L has put up a fight, and a strong one indeed, but it just can't hang with the ranks of 1.8L Miatas that play along in CSP. She currently puts down over 100hp to the ground with a bone stock engine and a somewhat roughly tuned Megasquirt (currently working on a How To for that ;) ), but I digress.

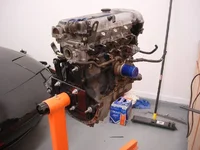
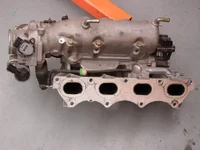
Inward steps the 1999 1.8L that I picked up today for $400 (120k miles with a new water pump, timing belt, etc). A hell of a deal if you ask me. Furthermore, a perfect catalytic converter was included for an extra $20 (stupid emissions). I've been urning to install one of these engines into the car for a couple of years. Furthermore, I have another '99 engine in the basement that awaits a rebuild (to tolerance and spec), but I haven't had the time to undertake that process. So when I came across this deal, I jumped on it. This engine will tide me over until I can fully rebuild the "spare" engine that currently remains parked downstairs.

As usual, business has me traveling for the next few weeks with an auto-x or two in between, so it'll be mid-April before this is installed. As with my previous build threads, I'll be posting plenty of pictures for those that are interested. :)

Without further ado, so begins the engine swap process :D
 

Attachments

  • DSCN4828.JPG
    DSCN4828.JPG
    102.9 KB · Views: 4,185
  • DSCN4830.JPG
    DSCN4830.JPG
    115.1 KB · Views: 3,516
  • DSCN4831.JPG
    DSCN4831.JPG
    104.2 KB · Views: 3,585
Last edited:
But if you get a stand-alone you wouldn't have the "fun" of having a 1.8 swap with the 1.6 ECU like me. My favorite game is "WHERE WILL IT IDLE TODAY?"
 
Last edited by a moderator:
pluto316 said:
But if you get a stand-alone you wouldn't have the "fun" of having a 1.8 swap with the 1.6 ECU like me. My favorite game is "WHERE WILL IT IDLE TODAY?"

I'll take the standalone over the OE ECU. I have no idle issues, heh.
 
khaosman said:
Nice! Look forward to see where this goes...
My guess is under the hood of the white CSP Miata. I could be wrong tho (killit)

EDIT: Hey! That's my beer! :p
 
aMaff said:
My guess is under the hood of the white CSP Miata. I could be wrong tho (killit)

EDIT: Hey! That's my beer! :p

Oh you are drinking Sol too? (cheers)

I wanna see some ITBs, since this a SP car!
 
Good luck on the next project.

Let me know if you come across any decent 1.6L engines floating around.
My computer science teacher's miata needs an engine swap/rebuild (bad compression).
 
khaosman said:
I wanna see some ITBs, since this a SP car!

That's next winter's project (yes)

Prodigy said:
Good luck on the next project.

Let me know if you come across any decent 1.6L engines floating around.
My computer science teacher's miata needs an engine swap/rebuild (bad compression).

"metalman" on the SA boards always has one or two lying around. The ones I have here stay on as spares. Who is your teacher getting to do the swap/repair?
 
Possibly the GACC crew...
I figured that I could tackle the project as there isn't a real time constraint.

Thanks.
 
Progress!

It's about time for an update, I say! So here it is.

Detailed in this post:
-Block-Off Plates
-Crankshaft Pully Modification
-CAS Installation
-Rear Water Sensors
-Oil Pressure Sender

Skipping the formalities, I started with a few block off plates. Using a bit of scrap 304 stainless steel, I made a few plates to eliminate the EGR valve, EGR tube, and the '99 camshaft position sensor. Cutting this stuff is a pain by hand. One of these days, I'll have a plasma cutter, but I digress:

Block-off Plate Set:
Block_Plates.JPG


Cam Sensor Plate:
Block_CS_In.JPG


EGR Plates:
Block_EGR_In.JPG


----------------------------

The next area of attention was the accessory pully. The 1.8L alternator employs a ribbed belt whereas the 1.6L uses a V-belt. Since I will be using the 1.6L alternator, I needed to swap. Furthermore, I use neither power steering nor air conditioning. Therefore, I prefer to not have the extra portion of the pully that operates these belts.

To overcome this, I am using a pully from an old Mazda 323. The varient of the B-series engine used in this car(as well as other B-series powered cars), uses a 2-piece pully where the outter (A/C and P/S) pully can removed if so desired. I must add, that this is purely cosmetic as both the one-piece pully and the 323 pully weigh nearly the same.

This presented a problem in my case as the pully didn't seat properly on the crank cog. The remedy was a spacer plate made from, you guessed it, 304 stainless steel (heh, I have a bunch laying around).

Top: 1.8L Pully Set (OE)
Bottom: 1.6L Pully Set (Modified)
Pully_Compare.JPG


Another comparison:
Left: 1.6L Pully Set (Modified)
Right: 1.8L Pully Set (OE)
Pully_Compare2.JPG


Indicated by the very light line/ring and pointer, one can see where the pully was seating on the timing cog:
Pully_Set_Rub.JPG


As an alternative to having the pully machined, I fabricated a spacer from 14 gauge 304 SS. It's a perfect fit.
Pully_Spacer.JPG


...and the spacer set in place:
Pully_Spacer_Set.JPG


----------------------------

Since this engine will be installed into a '90 and I neither want to severly modify the wiring harness nor implement any custom wiring, the 1.6L CAS will be used.

The 1.8L head has everything ready to accept the CAS as this portion of the head was not changed from the '94+ models. One simply has to remove the blocking plate and braket. The camshaft even has the receiver to accept the CAS!

Note however, that the CAS wires will have to be lengthened for the connector to reach the new location (more to come on this when the engine is installed).

This plate and bracket need to be removed:
CAS_Blank.JPG


This is what you'll find behind it:
CAS_Receiver.JPG


And the CAS simply bolts into place:
CAS.JPG


Another angle of the installed CAS:
CAS2.JPG


-------------------------------

The rear water temperature sensors must be swapped as well. The water neck is essentially the same between the 1.6L and 1.8L. However, the thermosensor will have to be swapped as the connectors are different.

Another smaller sensor (I forget the name of it) will need to be installed as well. A hex-keyed plug will have to be removed to swap this sensor from the 1.6L. The wire that connects to this sensor will also need to be lengthened.

Remove this plug:
Temp_Plug.JPG


And install this sensor:
Temp_Sens.JPG


----------------------------------

The 1.6L powered cars had the benefit of a "real" analog oil pressure gauge whereas the 1.8L powered cars did not. Instead, a simple pressure switch was used. To allow the analog gauge to work with the 1.8L engine, simply swap the sensors.

Remove the existing oil pressure switch:
OP_sw.JPG


...and install the analog pressure sender:
OP_ana.JPG


------------------------

That's it for this update. Subsequent updates will include modification of the coil pack bracket, porting of the intake manifold, and ultimately the engine swap itself!

For grins, here stands the engine in its current state, cleaned up a bit:
eng_front.JPG
 
Last edited:
Coil Pack Installation

The 1.6L coil pack varies in several ways to that of the 1.8's. First and foremost is how the two coils are constructed in that the 1.8's coils contain an integral ignitor (transistor) whereas the 1.6's is external. Secondly, the mounting bracket is quite different where only the lower mounting point is shared in reference to the bracket. Even though I'm using standalone engine managment, I'm opting to use the stock 1.6L harness with zero modifications.

That said, to mount the coil pack in the OE location, I'm forced to either purchase a pre-made bracket from Flyin' Miata or fabricate one myself. Of course, I've chosen the scenic route :).

I started with the 1.6L bracket and cut off each side. The 1.6L mounting "ears" are horizontal while the 1.8's are vertical.
CP_Brac_Orig1.JPG


CP_Brac_Orig2.JPG


Bracket with ears removed. Dry erase markers and a countertop make a sweet scratch pad :) .
CP_Brack_Const.JPG


Cut bracket mounted to the engine to enable measuring and fitment of forthecoming "enhancements":
CP_Brack_Const1.JPG


Using a bit of angled steel, I began constructing the new mounting ears. A blowtorch, hammer, welder, and grinder make this part a lot easier.
CP_Brack_Const2.JPG


One of the two ears completed.
CP_Brack_Const3.JPG


The second mounting ear is constructed in a similar fashion taking into account the measured differences.

Skipping the welding, fitting, cleaning, grinding, and painting process, the final product looks like this:
CP_Brak_Fin1.JPG


CP_Brak_Fin2.JPG


CP_Brak_Fin3.JPG


-----------------

Aside from a throttle linkage bracket (more to come on that), this is the last custom modification required to fit the 1.8L to the 1.6L chassis and wiring. Following this weekend's autocross and the week's business travel, I will commence removal of the the 1.6 and begin fitting the new engine. I'm very excited and hate that I have to delay this further.

Remaing areas of focus include cleaning and blueprinting the fuel injectors, machining/lightening the 1.6L flywheel, and procuring a 1.6L clutch assembly. The 1.8L clutch components could be implemented, but I'm opting for the lighter 1.6L counterparts.


Last but not least in this post is the long 4-2-1 stainless steel header that will be mated to the engine. It looks a bit rough, but it has endured 2 moves, and lots of sitting. What looks like rust is actually a bunch of funk that has collected over 2+ years of sitting, heh. I might clean it up a bit.

Header.JPG
 
Sorry for the leave of absence...been having to play catch up.
This thread rocks.
 
Moving on...

Progess continues in the build with modification of the alternator mounting. Normally, one can use the 1.8's alternator by swapping the pully from a serpentine belt to that of the 1.6's V-belt. However, considering I neither have a 1.8L alternator, nor want to purchase one, I decided to make the original one work with the 1.8.

The 1.8L engine has the mounting bosses in place and tapped ready to accept the 1.6's mounting bracket. However, in the case of the '99 engine, the water pump employs a mounting tab for the alternator that interferes with the installation of the 1.6L alternator bracket. One could cut this tab off and the bracket would fit fine. I decided against this for the primary reason being the legalities of classification in which I compete. Instead, I modified the alternator bracket to meet my needs (and can later change to the 1.8L alternator if I so please).


Here is the point of contention where the water pump interferes with the bracket:
altbrak1.JPG


Notching the bracket provides ample clearance around the water pump.
altbrak2.JPG


Notching the bracket significantly reduces its structural integrity. Therefore, I reversed the peice that I cut out, and welded it into place (appologies for the photo quality).
altbrak3.JPG


Painted and in place, it fits perfectly. Note, however, that one must install the intake manifold before installing this alternator bracket. There is a slight misalginment in the clearance provided for one of the bolts securing the manifold. Installing the manifold first will eliminate any problems.
altbrak4.JPG


-------------------------------------

The '99 1.8L uses a return-less fuel rail. A return type fuel rail from an earlier 1.8L will not work as the ports for the injectors do not align properly. However, one can use the '99 fuel rail with the 1.6L fuel pressure regulator. Unfortunately, the return line will have to be routed above the manifold due to the positioning of the regulator. However, this will not cause any problems.

Original configuration of the '99 fuel rail without return:
fr1.JPG


Comparison of the '99 FPR and the '1.6 FPR:
fr2.JPG


The 1.6L FPR installed on the '99 1.8L fuel rail:
fr3.JPG


The fuel rail, intake manifold, and alternator bracket (in that order) will be installed after the engine is placed into the car (for ease of engine installation).

---------------------------

The 1.8L (all) mount brackets are significanlty different from those of the 1.6L. The actual [rubber] mounts are identical between the two engines. Everything behind the engine remains in it's original position and configuration, however.

(top) 1.8L engine brackets
(bottom) 1.6L engine brackets
mounts1.JPG


(top) 1.8L engine brackets
(bottom) 1.6L engine brackets
mounts2.JPG


Exploded view of 1.8L engine mounts:
mounts_explode.JPG


...and everything assembled and ready to go:
mounts_assem.JPG


-------------------------------

Since my '99's injectors had been sitting for a few years, and I wanted to eliminate any doubt about their condition, I sent them to www.witchhunter.com to be flow tested and cleaned. It's a good thing I did as the return report showed that one flowed nearly zero while the others were slightly lacking from spec. The injectors were cleaned and the pintals, o-rings, and spacers were all replaced. At $17 per injector, I couldn't go wrong. Currently, all 4 injectors test out at a flow rating of 254cc @ 43.5 PSI (standard measuring pressure).
 
If I didn't know better, I'd say it looks like you know what you were doing ;)

Good job, and good writeup. (2thumbs)
 
Looking back through those pics, it always amazed me how heavy duty they made coil pack bracket... That thing can hold up a truck.
 
MiaTurbo said:
Looking back through those pics, it always amazed me how heavy duty they made coil pack bracket... That thing can hold up a truck.

The coil pack bracket is indeed well constructed from Mazda. The alternator bracket is even beefier. The main portion is about 1/8" thick.
 
Nearing the end!

With most of the work completed on the 1.8, it's time to get down to the grunt work of the swap and make this project come together.

Before I begin, however, I needed to modify the header to accept my wide band EGO in addtion to the narrow band. This really doesn't pertain to the swap, but I'll throw it in for fun.
bung.JPG


------------------------------------

On to the swap! I began disassembly of the Miater when she was still hot. I drove home from work, pulled into the garage, popped the hood, and began taking things apart.
16_lastin.JPG


...and promptly removed the engine. The donor lies in wait (evil) .
16_pull.JPG


The not-so-tired 1.6L is removed.
16_out.JPG


-----------------------------

With the 1.6L engine removed, I separated the transmission, removed the flywheel and clutch parts. Since I'll be reusing the flywheel (lighter version comes later), I had to have it surfaced before I reassbled everything to the 1.8L. I will be using a 3rd gen 1.8L Protege pressure plate as I was able to land a new one at a lesser cost than the Miata's (second hand). Dimensionally, they are the same, but I have yet to know if it'll work. I'm banking on the only difference between the two being the diaphram pressure (and I hope the Protege's is higher). I am reusing the clutch disk as the measured amount reveals plenty of service life remaining.

clutch_parts.JPG


And the clutch parts assembled and ready to go:
clutch_inst.JPG


----------------------------------

With everything assembled, it's time to get down to the crux of the situation. The 1.8L is finally ready to go in!

18_ready.JPG


Insert part A into part B....
18_insert.JPG


Without surprise, it fits (note the water neck).
18_inst.JPG


Beginning of the accessory installation!
18_access.JPG


Short of a few things, she's ready to fire. Final pics will come this week. Remaining installation includes the catalytic converter, O2 sensors, and a custom intake.
 
Last edited:
kcbhiw said:
The coil pack bracket is indeed well constructed from Mazda. The alternator bracket is even beefier. The main portion is about 1/8" thick.


You think thats tough? the "plastic" cover below the steering column rattled loose and started bouncing off my knees this week.

Yeah, that things made of steel, and I'm going to fashion a chain to it, wear it around my neck, and use it to stop bullets if anyone happens to try and shoot at me.


Oh, and looking at those pics of the motor being pulled/replaced... makes me think of when i replaced the clutch on my black miata... with jack stands and lots of uncomfortable climbing underneath...

It looks almost easier to just pull everything to do it.... At least you can get to all the bolts...
 
Back