- :
- Canada
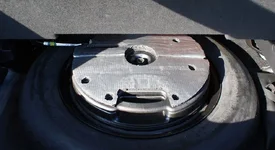
This is a DIY guide that details how to reduce the "muddy" bass from the Bose subwoofer mounted in the spare tire. This fix has been done by many others on this forum (originally jgriffter, followed by PTguy, jmeitz, Zoom49, greggmischenko, and others). I recently did the same mod, and I just thought I'd document and organize it to show how easy it is to do.
This process was photographed by myself, using my cellphone camera, my old DSLR and my 2018 Mazda CX-9 Signature as the "demo" vehicle. While the instructions are written by me, many references will be made to the various posts from the users named above. This DIY is provided as a learning aid and reference guide. I assume no responsibility for any warranties this process may void, or damages you may inflict on yourself or your vehicle.
What you'll need:
- 21mm socket or wrench (or the tire iron from the emergency jack kit)
- 1/4" socket
- Sound deadener
- Poly fill (pillow stuffing)
- Box cutter, scissors or Xacto knife
From jgriffter's original thread:
For the sound deadener and poly fill, PTguy recommends Parts Express.
I personally used three sheets of 10mm thick, 20x12" deadener from eBay, but if I had to do it again I would spend a bit more and buy the deadener from Parts Express. The adhesive on the eBay deadener isn't very strong, and the thickness makes it a bit harder to work with. For poly fill, I pulled some out of an extra guest pillow I had lying around. Since the guest pillow wasn't used much, the poly fill in it was not compressed, which was perfect.
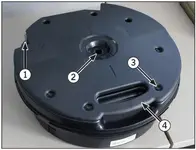
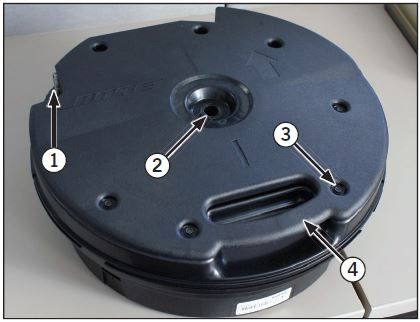
1. Remove the subwoofer from the car by unplugging the harness (1) and loosening and removing the 21mm bolt (2) that mounts the sub and spare wheel to the car.
2. Remove the 7 1/4" screws (3) on the top cover (4) and set them aside.
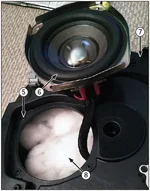
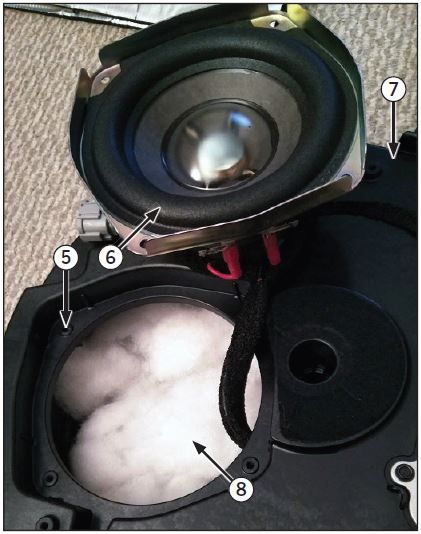
3. Remove the 4 1/4" screws (5) securing the speaker (6) to the housing (7).
4. Fill the housing with poly fill (8). It doesn't need to be packed in, just lightly fill it. Screw the speaker back into the housing.
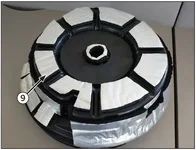
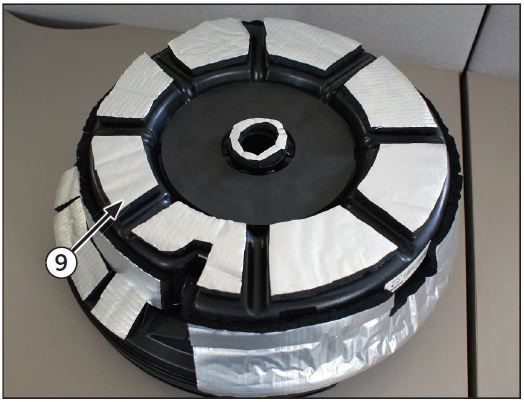
5. Apply sound deadener (9) to the outside of the housing. I forgot to take a photo, but I also applied deadener to the flat surfaces around the speaker.
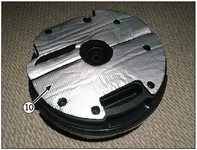
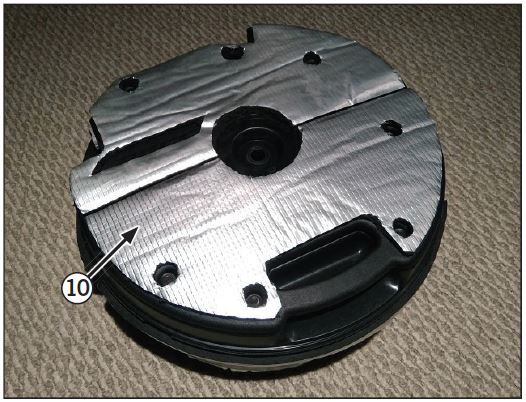
6. Apply sound deadener to the top of the cover (1O), then screw the cover back onto the housing.
7. Reinstall the subwoofer. Don't forget to plug the harness back in.
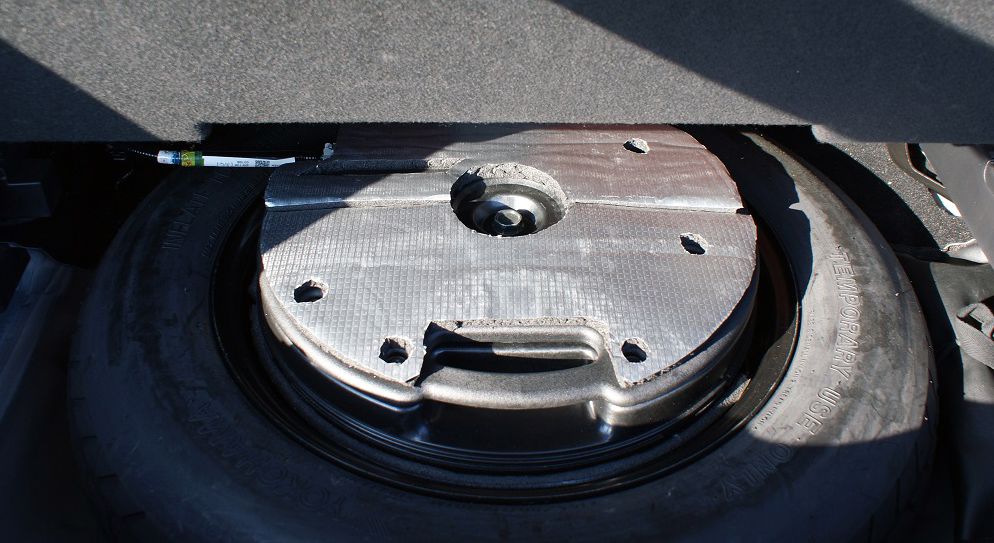
Here's the finished product.
Here's jgriffter's thoughts after adding poly fill and sound deadener:
This is basically the same experience I have after doing this mod myself. The bass is noticeably tighter and cleaner after this mod. I listen to almost everything, but it's mostly rap/hip hop, rock and some electronica. I noticed that because the bass hits cleaner and tighter, it doesn't drown out the mids, and the music sounds more uniform and "right".
This process was photographed by myself, using my cellphone camera, my old DSLR and my 2018 Mazda CX-9 Signature as the "demo" vehicle. While the instructions are written by me, many references will be made to the various posts from the users named above. This DIY is provided as a learning aid and reference guide. I assume no responsibility for any warranties this process may void, or damages you may inflict on yourself or your vehicle.
What you'll need:
- 21mm socket or wrench (or the tire iron from the emergency jack kit)
- 1/4" socket
- Sound deadener
- Poly fill (pillow stuffing)
- Box cutter, scissors or Xacto knife
From jgriffter's original thread:
I think the main problem is resonance from the housing. Access the sub and put your hand on the housing while it plays. There should be NO vibration from the housing. We want all the sound to be from the speaker cone pushing sound waves through the air to our eardrums. We do not want the speaker housing pushing sound waves to us--that's distortion.
I think you're 100% right about the housing. Most of the factory sub housings tend to be made from a cheaper plastic and don't have enough rigidity.
For the sound deadener and poly fill, PTguy recommends Parts Express.
I personally used three sheets of 10mm thick, 20x12" deadener from eBay, but if I had to do it again I would spend a bit more and buy the deadener from Parts Express. The adhesive on the eBay deadener isn't very strong, and the thickness makes it a bit harder to work with. For poly fill, I pulled some out of an extra guest pillow I had lying around. Since the guest pillow wasn't used much, the poly fill in it was not compressed, which was perfect.
1. Remove the subwoofer from the car by unplugging the harness (1) and loosening and removing the 21mm bolt (2) that mounts the sub and spare wheel to the car.
2. Remove the 7 1/4" screws (3) on the top cover (4) and set them aside.
3. Remove the 4 1/4" screws (5) securing the speaker (6) to the housing (7).
4. Fill the housing with poly fill (8). It doesn't need to be packed in, just lightly fill it. Screw the speaker back into the housing.
5. Apply sound deadener (9) to the outside of the housing. I forgot to take a photo, but I also applied deadener to the flat surfaces around the speaker.
6. Apply sound deadener to the top of the cover (1O), then screw the cover back onto the housing.
7. Reinstall the subwoofer. Don't forget to plug the harness back in.
Here's the finished product.
Here's jgriffter's thoughts after adding poly fill and sound deadener:
So how did it work out? Very well. The deadener took most of the boominess and false bass out of the sub. The sub has a sharper attack and the bass notes are much clearer. Instead of just hearing the thud of the bass, you actually hear the note and the bass strings as well. Low volume music has bass with notes that you can differentiate. The mids cleared up as well since they are not being drowned out by the boomy bass.
This is basically the same experience I have after doing this mod myself. The bass is noticeably tighter and cleaner after this mod. I listen to almost everything, but it's mostly rap/hip hop, rock and some electronica. I noticed that because the bass hits cleaner and tighter, it doesn't drown out the mids, and the music sounds more uniform and "right".

