What have you done to your P5 today?

Yep, yep and yep! I had actually been driving around most of the morning but I took the P5 around the block just to make sure it was up to temperature. As per the FSM, pulled the fuel relay, opened the gas cap, started the car and ran it until it died, cranked it a few extra times for good measure, pulled the plugs and then tested each cylinder twice in a row (crank each cylinder about 5 times with the throttle fully depressed). This is the second time a compression test has yielded ~200 psi across all four. Time to do a leakdown next, just need to source a tester and an air tank.

a leakdown test should only confirm that you do NOT have a problem in the engine. Getting 200 PSI across the board is a great result. It's possible you've got one of those mythical factory freak motors. I'd start looking elsewhere (read: turbo).

Generally, you run a compression test, find 1 cyinlinder really low, then a leakdown test tells you where the problem is (rings, intake / exhaust valves, etc). I'd say the numbers for the engine look great.
 
I'd start looking elsewhere (read: turbo).
You know, everyone keeps telling me this, and I'm sure it makes sense to them but it just doesn't to me given when and how it smokes. I don't get smoke (well not blue smoke) at WOT or at anytime in boost that I can see. However, and even though it hasn't smoked in a while, before it would smoke a little when getting back on throttle. Not flooring it back on, but say, slowing down from 70 mph to 60 mph and then lightly getting back on the pedal to maintain that speed. It's there that it used to smoke. Even got some puffs at startup a few times but lately it hasn't done anything. I believe it's a result of the warmer temperatures (80+ everyday) so I'm certain I'll see more smoke later this year.

Can a compression test result indicate bad valves/seals?
 
Can a compression test result indicate bad valves/seals?
It will indicate anything that a leakdown test will, it just won't specify where the problem lies. If you're losing compression because a valve's not sealing properly, then yes. A bad valve oil seal that won't manifest itself with the valve closed? Hell, not even a leakdown test will show that.
 
Hmm, I don't know what to say though. I have no oil in my IC pipes, my spark plugs all still look fine but the oil has to be coming from somewhere. The catch can isn't fully at all so it's not blowby or the PCV malfunctioning (still rattles, and I have a heavier duty check valve in front of it). I guess the turbo could be blowing oil out the exhaust housing although I haven't really heard of that happening. As for the leakdown test, last year when similar problems manifested (and just as mysteriously disappeared for 5 months) I was repeated told by someone (I think we all remember Nick from MPi) that I really should be having a leakdown test done.
 
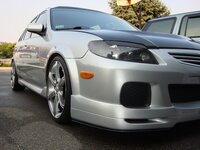
clayed, polished, and waxed the P5...It made such a huge difference. The clay itself showed how contaminated the paint was. definitely worth it.

Protege5New001.jpg


Protege5New003.jpg
 
Last edited:
2nd Day - Ridding the Car of DPO (Dreaded Previous Owner)

Today it was on to more of the same as Friday. Going through and figuring out and addressing the niggling things that the DPO left.

Hmmm A/C doesn't work?!?! Fuse in the inside box is good, fuse under the hood is MISSING!. Put a fuse in, and voila A/C again.

The previous owner had installed a head unit, but didn't install the 3.5mm remote jack auxiliary hook up. Left it and the removal tools in the glove compartment though, so this is next. Put the tools in and hey, WTF. The unit is just slid into the mount kit and can be pulled out by hand! Pull the unit out, and pull the mount kit out, as I want the mount kit in with the pocket above the unit, instead of below. While I have everything apart, the cigarette lighter socket isn't working, so I check this out. No voltage on the leads to the socket, probably another bad fuse. Figure out where the aux hook up plugs in and where I want to mount the plug. Clean the area up, mount the plug and thread the wire to the back of the unit. Figure out a way to mount the head unit in the mount kit, plug everything back in and put the mount kit back in.

Open the interior fuse box and pull one of the "other" fuses. It's blown. Replace it and the lighter socket works.

Go to the back of the car. There's been a bit of rattling/jingling coming from back there over bumps. Pull the jack out to see if it could somehow be part of the problem. It's wet!

Original Jack.jpg

So rusted even after I hit it with a torch and pipe wrench, I can't get it to budge. Add this to the salvage yard list.

Dry up the jack well, do some research on the forum. Pull the spare tire, wet here too, and pull the rear tray so I can get into the well on the driver's side. Wet here too. Dry everything out, remove the tailights to seal the mount holes. Both tailights are installed with two nuts, as opposed to the three that they should have. A little silicone an extra nut for each tailight and hopefully there will be no more water in the trunk.

Notice the remnants of a sticker on the outside of one of the back windows. Razor blade scraping and it is gone.

Tomorrow it goes up on a rack and gets its sway bar bushings taken care of and I figure out what is rattling/jingling in the back. I'll also make a trip to the salvage yard, as I need the rear door vent glass, which was purportedly broken by the previous owner after he locked his keys in the car....
 
clayed, polished, and waxed the P5...It made such a huge difference. The clay itself showed how contaminated the paint was. definitely worth it.

http://img.photobucket.com/albums/v333/viscous/Protege5New001.jpg[/IMG]

http://img.photobucket.com/albums/v333/viscous/Protege5New003.jpg[/IMG]

what kind of rims are those? they look like mine except they have one more spoke
they look really good, those pictures make me want to buy a msp front lip
 
I noticed my old P5 is still sitting on the used car lto with a bright yellow sold sticker on it! I miss the extra weight in the rear of the P5 vs my sedan.


Edit: Hopefully I will be able to figure out who the new owner is and hit it up with them, and direct them to the site. They removed my simota sticker on the driver side rear window.
 
I realized lately that my car's finish has been shot to s***. I think this is due to me using this really harsh bug and tar remover at the high pressure DIY car wash more than a few times in the first couple of years I owned the car. No matter what I do, the car stays looking dull as hell.

That's why I decided to do a few days worth of research and came up with this as one of the many things I found.

http://youtube.com/watch?v=C6PyXbrNbsE

The guys on the meguiar's forums also know what they're talking about and after reading up on techniques, products, and all that other good stuff, I've decided to do basically the same procedure as found in that youtube video minus the sanding. I will probably be doing this at the end of August and I hope to have some good results. All of the materials including the buffers, pads, compounds, etc. should set me back about 300-400 dollars but that is simply due to the fact that I want to make sure I buy quality stuff and make sure to do this right. I will hopefully be doing a step by step breakdown of the process, with pictures included in a separate thread. Wish me luck.
 
washed and ready for another week of battle!
 

Attachments

  • todays pic 1.jpg
    todays pic 1.jpg
    389.4 KB · Views: 247
  • todays pic 2.jpg
    todays pic 2.jpg
    463.6 KB · Views: 257
I realized lately that my car's finish has been shot to s***. I think this is due to me using this really harsh bug and tar remover at the high pressure DIY car wash more than a few times in the first couple of years I owned the car. No matter what I do, the car stays looking dull as hell.

That's why I decided to do a few days worth of research and came up with this as one of the many things I found.

http://youtube.com/watch?v=C6PyXbrNbsE

The guys on the meguiar's forums also know what they're talking about and after reading up on techniques, products, and all that other good stuff, I've decided to do basically the same procedure as found in that youtube video minus the sanding. I will probably be doing this at the end of August and I hope to have some good results. All of the materials including the buffers, pads, compounds, etc. should set me back about 300-400 dollars but that is simply due to the fact that I want to make sure I buy quality stuff and make sure to do this right. I will hopefully be doing a step by step breakdown of the process, with pictures included in a separate thread. Wish me luck.

Thats a very good video you found. Thats really the only way you can fix dead paint. If you already have the high speed buffer, you shouldnt pay any more than $200 max. I just started doing this recently to my P5. I work on it a little at a time(last week was the doghouse). My paint wasnt faded all that bad but I could tell that it could glow better than it was. I bought 3 new 3M foam compounding pads, two 3M foam polishing pads, 1 quart of 3m finesse-it foam pad glaze, 1 gallon of 3M compound, a new backing pad for my buffer and two 3M Trizact 3000 grit foam sanding pads for $187. The front end right now looks as though it was freshly painted minus the rock chips.

Keep in mind without some type of sanding it is going to make buffing out minor scratches that much harder. Believe it or not, sanding a dated finish will actually speed up the process a bit. Sanding as done in the video(1200-2000 grit) is risky as you could possibly sand thru on edges if youre not careful and it knocks down(flattens)the factory orange peel. With the 3000 grit foam pads it will just remove the first couple of micron sized layers leaving your "factory peel" intact. Also any paint that was recently applied will buff alot easier than paint that has been sitting in the sun for a few years.

Before you do any of this though, go buy a clay stick from Meguiars and go over your whole car with it. It will remove any contaminants and make it perfect for buffing.

I should probably just write up a tut instead of all this babbling..lol!!
 
wow thanks alot man. I actually don't have the buffer so that is where that extra money is going to come in :(. I actually have a couple of questions so I will send you a PM instead of babbling here lol
 
P0171 (I hate this code!) again after the install of the Perrin fuel rail - still trying to figure out what the cause is. First step is to remove the Perrin and put the stock back on and see if the same thing happens again (unlikely, I hope). I have several theories mostly related to something I might have done wrong. Hopefully I can run this beautiful piece without having a constant CEL and funny idle at some point...
 
Not a P5 but eh what the hell! I used to own a P5 so does that count?


http://viewmorepics.myspace.com/ind...iewPicture&friendID=177212690&albumId=1638659

haha those pix look like "A Day in a life of a MSP"

"first i went to the beach, by myself... then i got lost on my way to the mall and ended up in the forest... so i hid by a nearby tree and scared little Hondas that pass by... after 5 hours of that i found a dock and watched the sun go down... then i went home... good day"

yep and I took a few night shots

DSCF0950.JPG


DSCF0953.JPG


DSCF0958.JPG
 
Dude you got a serious dust bunny problem... oh wait that's a dog :D

Nice pics btw.

Anyway, I realized today that the clunk in my front passenger side is back. I am about 99.98% sure that it is the strut mount and that's why I just sent Ken a PM inquiring about the parts needed to replace the mount. I hope to God that the damn clunk goes away since I will probably be changing out the endlinks as well if they are impossible to get off again.
 
Back