SMOKED TAILS & SIDEMARKERS...PICS POSTED!!!(FINALLY)

tgv121281

Member
:
AEM C.A.I.
Finally got around to doing these this weekend...looks even better in person, and espescially hot at night...let me know if u need anything...I got a bodyshop to give me precise directions and tips so they are done right...i was able to do this at home and fairly easily...just takes a while for drying time...only thing left to do is a nice VERY LIGHT wet sand and maybe another coat of clear...but I'm happy w/ then as is for now....here's the pics...AND YES all the lights shine through w/ no problem..I made VERY dark, and it only slightly affected the light going through..but unless you owned this car and saw the way it went through before the paing, you wouldnt notice...I've shown a dozen people and no one's commented on it being any dimmer than original..

WHat do ya think??
 

Attachments

  • MAZDA-SIDEMARKER1.webp
    MAZDA-SIDEMARKER1.webp
    22.9 KB · Views: 951
  • MAZDA-SIDEMARKER2.webp
    MAZDA-SIDEMARKER2.webp
    23.4 KB · Views: 562
  • MAZDA-TAIL LIGHT3.webp
    MAZDA-TAIL LIGHT3.webp
    33.4 KB · Views: 922
  • MAZDA-TAIL LIGHT4.webp
    MAZDA-TAIL LIGHT4.webp
    27.5 KB · Views: 1,080
  • MAZDA-TAIL LIGHT5.webp
    MAZDA-TAIL LIGHT5.webp
    25.6 KB · Views: 674
Some More Pics

Threw in some more, and a before pic
 

Attachments

  • MAZDA-TAIL LIGHT7.webp
    MAZDA-TAIL LIGHT7.webp
    18.4 KB · Views: 407
  • MAZDA-TAIL LIGHT6.webp
    MAZDA-TAIL LIGHT6.webp
    18.1 KB · Views: 396
  • MAZDA-TAIL LIGHT5.webp
    MAZDA-TAIL LIGHT5.webp
    25.6 KB · Views: 418
  • MAZDA-TAIL LIGHT2.webp
    MAZDA-TAIL LIGHT2.webp
    1.8 KB · Views: 2,706
  • MAZDA-REAR2.webp
    MAZDA-REAR2.webp
    29.9 KB · Views: 469
That looks awesome man. Where did you get the stuff to do the nightshades? How many coats of the stuff did you put on? How many coats of clear coat?
 
Sorry about the qual pics man....I'll keep that in mind fo rthe future (burp)

I went to carper4mance.com and bought the nightshades....I messed it up 1st time around(by being an idiot and taping off the car, and trying to paint them while ON the friggin car--dont ask why), so I needed 2 cans....my opinion, if you want dark like these, get 2 cans....if your looking for a little lighter..1 can will do...

I put 6coats of nightshades, and 3 clear coats....If you want details, let me know..I went to extremes to get it right the 2nd time...

Thanks for the positive feedback!
 
well i can only do a 3 how to or else I'd be lying....gimme some time and I'll post full details here...anyone else interested let me know, otherwise I'll just email anarch
 
Simple, pop open your hatch..on the actual door you'll see 2 small panels that pop out right behind the back up lights....pop these out and you'll find 2 or 3 bolts for each back up light(they are connected to beige plastic pieces that hold it in place)...take those off, remove the bulb from assembly by turning and pulling, and then remove the assembly....

For the taillights....open the door for the jack and remove the jack, then you'll have to cut up your knuckles and use a deep socket to remove 2 or 3 bolts that hold the taillight in, remove the bulb(same as above) and remove assembly....For the OTHER side(the passenger), there is a Small cutout of the inner lining RIGHT UNDER THE trunk bulb...remove this and do the same as the other side...(VERY TIGHT..have patience....its hard to fit a rachet in there...so try to connect a long socket to a srewdriver type tool(like a screwrachetdriver--lol, they are in normal kits--just not sure the name)...and use some elbow grease..be patient or you'll damage something or drop the socket....

Painting:
1st, I wet sanded all of the lights....then (DONT paint outside)....I took some wire, tied it to the track for my garage door(ceiling), and hung some clamps up....then I used the clamps to hold the lights up(one at a time), and I sprayed from 1 1/2 feet away..(DONT OVER SPRAY)..very lightly...took a blow dryer and made sure it was totally dry, and then LIGHTLY(very, very lightly) wet sanded again....then repeated the process..

Like I mentioned i did this step a total of 9times for each piece for the back(6night, 3 clear)....

the side markers did not require this much work......simply pop them out...get something like a flathead screwdriver, and wrap it in a napkin or tissue and BE CAREFUL not to scratch or break the light...start from sticking it under the left side and push to the right slightly...then pull out while still holding the screw driver in place....(just be gentle and you'll see what I mean for removal...--basically only one side of it has a clip and its on the left..so push the clip to the right and pull out w/ your hand)....The bulb is inside the plastic part, but you have to remove the harness by pushing in a small clip and pulling it off.....PAINTING--sand one time, 3 coats of black, 2coats of clear and your good to go...


This may sound very hard but its not....if its confusing or anythin gjust ask more specific questions and I'll try and respond as specific as possible.....
 
so u paint outside?? I had to take the f*#king lens cover off to take the yellow lens off!!!! I should have just painted....
 

Attachments

  • 3-taillight, left.webp
    3-taillight, left.webp
    24.3 KB · Views: 439
  • 3-taillight, right.webp
    3-taillight, right.webp
    31.3 KB · Views: 487
Yep, just paint the whole thing....my car is black, so I didnt mind having the black on the inside b/c it matched the body...but I love the smoked look...
 
You mentioned that you did this 'wrong' the first time (by leaving them on your car). Did you remove the tint that was already on the lense before you started the second time, or did you just go over top? If you did remove it, what did you use to remove the tint that was already on there? I kind of screwed up my sidemarkers, and I'd like to clean them up and start again...
 
Wow that looks awesome. I have a P5 and I wouldn't mind doing it. What sandpaper do you use? How do you know that you've got it down right?When it comes to body work I suck at it, give me and engine or tranny I'l work wonders. Be as specific as you can on how do it man, thanks.
 
Sorry it took so long to respond.....

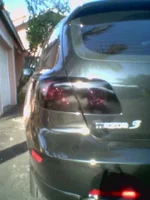
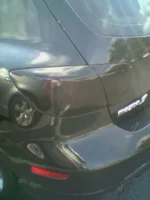
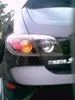
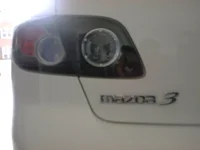
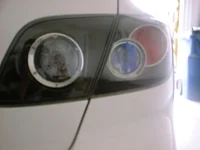
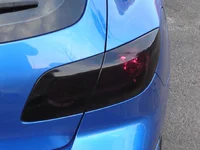
After I messed them up I detached them from the car and WET SANDED the tint/paint off...then started over from scratch. Detach the piece, remove the bulb/wiring, and tape off the hole so nothing gets inside. Then Go under a faucet (just a slow running water to keep the area wet while you sand). I used 400grain sandpaper to get the stuff off. WARNING-once you sand it, the finish will be very dull(this wont go away-its ok to paint over it like this, but if you want it back to OEM look, you're gonna have to buy something to get the finish back), just make sure its all even before you paint and dont go crazy w/ the sanding...just use your hand and sand it till it comes off, then move on to the next area. All the time keepin git under water. For painting....the ideal thing to do is to hang them somehwere indoors(ie-I tied clamps to fishing wire and hung them from the garage door track on the ceiling, then I used the clamp to hold the light) and do MANY coats, LIGHTLY...dont try to do it in 1 or 2 coats and cover everything b/c it'll drip. Also, I recommend at leat 1 or 2 coats of clear coat....you wont even notice the gloss and it'll help protect the tint from scratching...for a "shiny" finish...apply alot more clear coat.

As for how to do it, or when do you know its done right...thats a tough one. If you read down you'll see some details....IMO you gotta just observe what you're doing till your content. Like I said, find a way to hang them up.....and keep the spray at least 12"-18" away from the lights...spray light coats...dont worry about spraying the whole thing each time...it will all blend after a few coats.....use a hairdryer(from far awar) to dry the paint, and repeat until you like the how dark it is....HINT-when you think you've done enough, take it outside in the light to make sure its dark enough for you....As long as you dont spray them too much in 1shot...you really cant go wrong b/c it wont drip...so all you have to do is continue the process until its dark enough...then clear coat it till its nice and complete, dry the same way, and then reinstall.....I'd use the blowdryer to dry the final coat, and then wait a couple of hours before installing it or you might smudge it....

Not sure if I covered what you wanted to know, but if you need more, dont hesitate to post, IM, or email me......

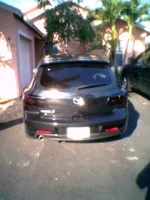
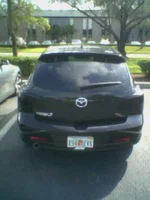
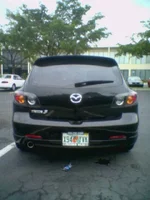
Good luck! PS_I've been getting compliments on these left and right! I guess the MIA favors the smoke!
 
That was exactly what I needed. Now all I have to do is wait for the cans to come in. Thanks man, I appreciate it.
 
Hey rush24, you're lights look pretty shiny....did you put clear coat on them? And if so how many coats?

Or is it just the camera? B?C it looks shinier than mine and I used a few coats of clear but its still more of a matte finish, rather the glossy that I prefer...TIA!

PS-looks great on your car! Mine makes it look all blacked out, but the contrast is awesome!!! If anyone has it done on a white or silver I'd love to see-must look great too!

PPS-mp5racing, no problem...anything else you need let me know-I'll be more than happy to share the info! And make sure you post pics when done!
 
Back