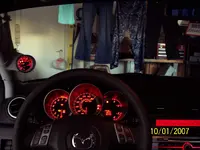
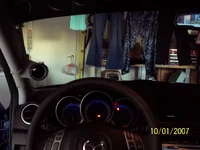
Anybody do this yet? I have my single pod from '*************.com' and a gauge from prosport, the white/amber. The pod comes black plastic, so I started by going over it lightly with 400 grain sandpaper, then I washed it off (dust). After drying it got two even, thin coats of white primer for plastic (model shop, any). Then later in the day I coated it similarly with 'light gray', I can post later what the exact brand and color code was, it's model store paint, again. It's a perfect match for the grey a-pillar plastic. The prosport gauge lights up at night amber to match the interiors. Tomorrow night I'm going to a buddy's house and we're going to get it all installed - I'll post pics, either 'how-to' or at /least/ a finished product image. Just wondering if anyone else has done it? I was going to try and wire through the hood pull, as I've read that's a good place.
You are using an out of date browser. It may not display this or other websites correctly.
You should upgrade or use an alternative browser.
You should upgrade or use an alternative browser.
Single pod a-pillar boost gauge install
- Thread starter BluMicaR
- Start date
Info coming later this evening with pictures on how to do this. My gauge is in - it's in the a-pillar single pod, wires down the door jamb to a tap into wires under the drivers kick panel, by the dead pedal. Sender wire is through the hood pull, and power under hood for sender wired into fuse box. Looks very nice and invisible install.
Looking forward to the pix. Thanks in advance for posting.
Nullmod
I'm a slow bastard; I chose, instead, to be with my girlfriend last night and do some installations that way versus taking digital photos... (rei)
I will take photos tonight and post a basic how-to telling you all which wire to tap where and how to get into panels and such for the above mod. I love my gauge - Prosport amber/white boost gauge matches exactly our amber interior lights, and the paint I used on the pod match exactly the gray a-pillar plastic. Very happy with my gauge.
(ricer)
Livin' my life a quarter mile at a time... lmao
Ho-kayyyy, comments? I was having computer TROUBLE last night at home - work computer works just fine though! Hehe. Trickiest part of the install was getting the a-pillar off and on, there's a plunger clip at the top that pops out, and is 'in place' pushed in. When you take the pillar cover off it's fine, it pulls it out, but when you put it back on you have to slide the head of that plunger clip/post into this just-as-big-as-the-head slit under the top of the plastic cover. The plunger keeps getting pushed in very easily so you have to get needlenose and pop the ****** back out again. Then start all over - Rotus helped me immensely in the instructional area, as far as how to take stuff apart and such. His tips, however, as far as, "Stand outside the car and look down into your window while you clip the plunger's head into the plastic cover," would work FANTASTIC had I not had about an 8" strip of limo tint atop my front window, effectively making light's journey into my required area impossible. So I did it blindly, and it sucked - but you get the 'hang' of it, believe it or not. Overall, personally, I'm much happier with this install than if I'd had it atop the steering column, beside it as I've seen one person do, or above my stereo on the dash. Also, it's low enough that I'm not interfering with the airbags at all - you'll see them in there just to about halfway down if you pop the a-pillar cover off. If anyone wants to do this and wants info/tips, give me a holler/pm. You can get single pillar pods at:
*************.com - I talked to Rob there, he's a good guy, they're fast, but not so much about the 'communication'
glowshiftdirect.com - the order from crossover came in a box from glowshift, with a sticker, so I know it's a glowshift part
Glowshift is cheaper, but I had a good experience with crossover, so if you order, you know crossover is 'vouched' for - can't say the same myself for glowshift. Good luck, happy trails!
Can you post the color code for the paint cause my pod is on the way
thanks
I'll do it tonight, code and brand. I used a white primer, also, which I will list. You'll additionally want to pick up some 400 grain sand paper and rough up the surface of both the pod and the screw-head covers before painting. On your covers, you won't use a primer - it makes the paint too thick and when you pop them on or off it will peel or chip off. I speak from experience.
For painting, do quick, light coats. If the first coat doesn't cover or isn't 'whole' (ie you still see black when applying primer) don't worry about it. Better 2-4 coats instead of one thick one, also let it dry about an hour in front of a fan each coat. I waited overnight to do my gray coat on top of the primer, but probably didn't have to. Don't forget to do the tiny 2mm ends of your plastic pod, you'll be seeing the open-pod side every day and the end of the plastic not gray would get annoying if you are as OC about your car as I am.
You'll be going to a hobby store to get your paint, can pick up sandpaper there too. What gauge are you ordering? I can tell you very specifically how to wire if you've gotten a Prosport amber/white gauge, but either way the ignition power wire is the orange wire with a yellow stripe and recurring double silver dots. Okay, I need more coffee. (coffee)
What kinda gauge is that? I love that it matches. Very nice mod dude. I want to do the three in the center and if i could find Oil temp/boost/and AFR that was in red i would be a very happy camper.
It's a Prosport "52mm Amber Performance Gauge". I got electrical over mechanical because I didn't want to run more tubing through my firewall - not lauding one or the other here gauge flamers - I just wanted to run one sender wire through the wall instead of a sender wire and a vacuum tube. You can find the amber selection here:
http://www.prosportgauges.com/amber.php
They have all the gauges you mentioned, just have to find a triple pod now, I know crossover has triple gauge a-pillar pods, and double - somebody has the dash top b/c I've seen them.
As to what color gray I used to paint my pod. After painting it with a Testors spray can of white primer, I then used:
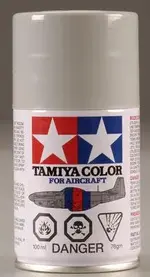
Tamiya Color For Aircraft: AS-2 Light Gray (IJN)
It's in a 100ml net volume can with two star stencils on the front in red and blue. Check this out, hehe:

That's the exact can, if you could see the code at the top you'd see 'AS-2', here's where I linked it from:
http://www.hobbylinc.com/htm/tam/tam86502.htm
Oh, and the pants are ladies' silk pajama pant bottoms, medium, from Kohl's last fall in a blue on dark blue paisley.
Oh, and the pants are ladies' silk pajama pant bottoms, medium, from Kohl's last fall in a blue on dark blue paisley.
haha thanks!
Damn those are good prices! I hate that they only take paypal, suppose i need to go ahead an join the 21 century an get myself an account.It's a Prosport "52mm Amber Performance Gauge".
http://www.prosportgauges.com/amber.php
They have all the gauges you mentioned, just have to find a triple pod now, I know crossover has triple gauge a-pillar pods, and double - somebody has the dash top b/c I've seen them.
There IS a 3-pod available for the center dash, I've seen a couple different options - poke/search around here.
There is no dimmer for the prosport gauge, I'm not sure if you can wire it into the dimmer knob or not... You may want to ask someone more knowledgeable like Rotus8.
I had zero problesm with the side curtain airbags, they are further up in the a-pillar. If you pop it out as I've described here you'll see them in there - so long as you put your pod lower than their lowest point you will be just fine.
madeye moody
Member
- :
- 2007 MS3 GT Cosmic Blue Mica
Hey I think it looks great but I'm concerned about the airbag deployment.
If I could see how the panel will deploy out and insure I'm not killing a passenger with it then I'm game.
There IS a 3-pod available for the center dash, I've seen a couple different options - poke/search around here.
There is no dimmer for the prosport gauge, I'm not sure if you can wire it into the dimmer knob or not... You may want to ask someone more knowledgeable like Rotus8.
I had zero problesm with the side curtain airbags, they are further up in the a-pillar. If you pop it out as I've described here you'll see them in there - so long as you put your pod lower than their lowest point you will be just fine.
I have not been able to find that damn thing! I want a three pod so badly i cant stand it!
As far as the dimmer switch goes you just solder a resistor into the ground wire split the ground off so its....
////////////---------Switch----------ground
---------<
////////////-----------resistor--------ground
Sweet diagram i know.
the load is split between the gauges and the resistor, there for the lights dim. That works IF the back light has its own power source, which im sure some how it does, you might just have to open the gauge up. If its a vacuum line it should be good to go with just the power wire.
Last edited:
New Posts and Comments
- Replies
- 2
- Views
- 100
New Threads and Articles
-
-
-
Is AWD module program. necessary after diff. replacement?
- By bez_ucha
- Replies: 2


