
You are using an out of date browser. It may not display this or other websites correctly.
You should upgrade or use an alternative browser.
You should upgrade or use an alternative browser.
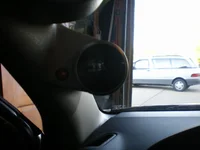
Single pod a-pillar boost gauge install
- Thread starter BluMicaR
- Start date
I have not been able to find that damn thing! I want a three pod so badly i cant stand it!
As far as the dimmer switch goes you just solder a resistor into the ground wire split the ground off so its....
////////////---------Switch----------ground
---------<
////////////-----------resistor--------ground
Sweet diagram i know.
the load is split between the gauges and the resistor, there for the lights dim. That works IF the back light has its own power source, which im sure some how it does, you might just have to open the gauge up. If its a vacuum line it should be good to go with just the power wire.
First as to the airbags this is a lot of work up over not much, just like worrying about hydro-lock too much. As long as the pillar area where the bags are is left alone, it'll be okay - they pop out of the top and a slit on the side by expelling the plunger you have to hook the pillar into/off of when they go. As long as you have mounted beneath the bags, which you can clearly see when you're under the pillar, everything is copacetic.
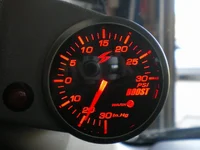
I thought there was a way to hit the dimmer, and that's what I suspected it might entail, and that is WAY more than I want to get into - at night it isn't /quite/ as bright as the interiors all the way up. I'm just fine with that - what I am going to do is go to Best Buy and see if there is any computer monitor anti-glare screen I could cut into a little circle just right for the front of my gauge because it's REALLY hard to see during the day even with the glare collar on. Unless anybody has a suggestion other than that to reduce my glare? It won't even go away with polarized sunglasses, so that is a LOT of glare.
Look around (search) for the triple pods, I've seen the pillar ones on *************.com and I think they'd be on glowshiftdirect.com as well. I have seen two different types on the board about a month or two ago, in people's posts, so they shouldn't be /too/ hard to find. Look up 'gauge' or 'pod' or possibly 'dash'.
I took a while to do this because I have never done anything of the sort, I've put cold airs in a few cars, and done engine stuff, but I was being incredibly careful, and only had an hour a night and I didn't want to rush ANY part of it. Last thing I wanted was an airbag in my face from being too rough or to screw up wiring or worst of all, somehow marr my interior be it fabric or plastic scratched or broken. I think now I'd take about 2.5 hours to do it, knowing what I do, and the worst part would still be feeding the sender wire through the hood pull - I'm 6'4" 320lbs, big dude, wasit is 42 it's not fat so much as everything is scaled up... My fingers and hands don't like being nimble in little areas, and my back DAMN sure doesn't like leaning into the car under the steering wheel and pulling wires through tiny holes. (eekdance) Hehe.
You guys think its worth removing the A-Pillar or to just use some very short self tappers and go at it like that? Oh and anyone figure out if you can wire these into the dimmer yet?
See my previous post. I would pick up a multimeter, and see what the radio dimmer line is putting out. Does it provide a ground or voltage? If so how much? Either way i would just pick up a relay at radio shack on the cheap and use the radio dimmer wire to actuate the relay to the ground/resistor circuit. Sounds so much harder than it is. Myself i dont dim my cluster so i dont want to dim my gauges.
Prosport Gauges
Member
Damn those are good prices! I hate that they only take paypal, suppose i need to go ahead an join the 21 century an get myself an account.
We take cc by phone or check/money orders by mail too.
Prosport Gauges
Member
Also-Clear Lens Series & Digital Series coming out next month.
silverspeed03
Boost Junky
- :
- 2008 MS3
Was there a +12V wire down there by the ignition wire you tapped too? Which one is it?
I finally found a silverish dye to match the stock pillar after 2 months of searching. I also added low luster clear to it. Here's the part #'s for anyone interested:
SEM Plastic/Leather Prep Cleaner: SEM 38353
SEM Color Coat: 15083 Silver
SEM Color Coat: 13023 Low Luster Clear
I finally found a silverish dye to match the stock pillar after 2 months of searching. I also added low luster clear to it. Here's the part #'s for anyone interested:
SEM Plastic/Leather Prep Cleaner: SEM 38353
SEM Color Coat: 15083 Silver
SEM Color Coat: 13023 Low Luster Clear
Code:
http://www.levineautoparts.com/semvinandpla.htmlProsport Gauges
Member
Dimming
With regards to dimming the gauges:
No they are not dimmable-as we use surface mount led's to light the gauge and they have a very small operating range between being off and on. So the range to dim them is about 2 volts-nothing really.
With regards to dimming the gauges:
No they are not dimmable-as we use surface mount led's to light the gauge and they have a very small operating range between being off and on. So the range to dim them is about 2 volts-nothing really.
Was there a +12V wire down there by the ignition wire you tapped too? Which one is it?
I finally found a silverish dye to match the stock pillar after 2 months of searching. I also added low luster clear to it. Here's the part #'s for anyone interested:
SEM Plastic/Leather Prep Cleaner: SEM 38353
SEM Color Coat: 15083 Silver
SEM Color Coat: 13023 Low Luster Clear
Code:http://www.levineautoparts.com/semvinandpla.html
I just installed mine yesterday. I patched mine to the ACC wire for power. Unless you have the premium series, you don't need the constant power connection as you have nothing to hold in memory.
However, if anyone knows which wire in the bundly by the foot rest is constant 12v, please let us know. I will be switching to the premium series in a few months.
Ive got the premiums... Thanks
If thats the case then you have to run a 12v for the Boost Gauge in the engine compartment (assuming you have a electrical boost gauge). Worst case you can pull a power wire through the hood release and connect both 12v wires together in a single run and tie it off on the postivie post on the battery.
However, there has to be a contanct 12v in that bundle somewhere you would think.
However, there has to be a contanct 12v in that bundle somewhere you would think.
So haltech how close of a match did you find? Does it look factory, or is there still a pretty obvious difference in color?
Its hard to say. Its pretty damn close though. The other 6-7 cans of dye i have dont match for s***. Either too dark or too light. This seems to work but the color changed a bit when i shot it with the clear. It dries like a dye too, so it isnt shiney nor does it have any kind of rubbery feel to it. I couldnt get any auto body shop to get me a dye in the factory color. Ive painted this thing 8 times and should have had the gauges in long ago, but i wanted it to match as close as possible. I can live with these results.
Ill find the constant +12V, just figured someone found it already. I wont pull a + into the car from the battery since theres 1 or 2 +12vs in there somewhere. You guys did the hard part finding the ACC. Thanks.
I have gotten a lot of compliments on the paint I selected even at the dealership, bought it at a modelling shop. Finding that ACC wire wasn't so much fun; poking damned wires with a voltometer for an hour, those wires are little and squirmy...
New Posts and Comments

- Replies
- 30
- Views
- 25K
- Replies
- 16
- Views
- 9K
- Replies
- 4K
- Views
- 1M
- Replies
- 8
- Views
- 8K
