Sandleather headrest DVD player

sanjiaqua

Member
:
Mazda CX9
Hey Guys...

I'm looking for an "inexpensive life saver", in sandleather color for my CX9.
The one's which absolutely match the car/ color, cost over 1400 bucks (audiovox, visualogic etc) and i'm not willing to spend this much.

The one's availabe on ONFAIR do not match the sandleather interiors of my car....

Any suggestions ?

Thanks
Sanji
 
I would be interested as well. I have the sand interior and originally was planning on the On Fair models which now it looks like I will have to re-think this a bit. How far off was the color?
 
Touring9...the charcoal headsets might get toooo contrasting with the overall sand effect. Something in the family might still do....
Aron, thanks for the link.
sbmrinaldi, i haven't seen these in person, as yet.
I probably would either visit Costco or Best buy. They have some of these.. would give a fair idea as to how far are the tan colored ones from the sand interiors of CX9.

Thanks
 
Hello. I'm new to the forums - but just completed my headrest installation project and got most of my helpful information here.

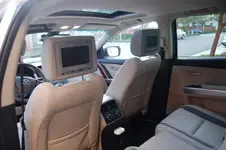
I too have the Sand Leather interior in my 2009 GT CX9 and searched far and wide to find a matching color. I ended up purchasing the OnFair dual DVD headrests in Grey and I'm very happy with the selection even though it is not a perfect match. I paid $234 for the pair of 7" screens on Ebay and service was great. In daily sunlight, it's difficult to see the color difference between the headrests and seats. In a flash photo the color difference is more pronounced. On a recent lunch trip with colleagues - none of them noticed the color difference. And for a $1300 difference - I'm extremely happy.

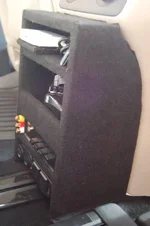
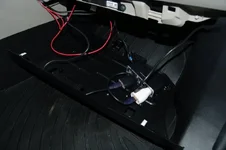
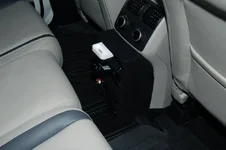
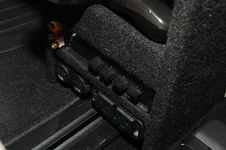
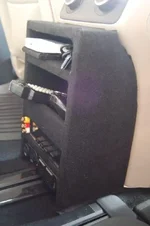
I've documented my install which included a custom floor console in the back which houses an iPod/iPhone video dock/charger, a storage compartment for the remote controls, a video switcher, dual 12V accessory power outlets and a 200Watt power inverter for plugging in laptops and USB devices. My family is all set for our frequent road trips.

I've posted a photo of the console and can likely answer other questions if anyone has any.
 

Attachments

  • DSC_0208 2.webp
    DSC_0208 2.webp
    22 KB · Views: 771
Hello. I'm new to the forums - but just completed my headrest installation project and got most of my helpful information here.

I too have the Sand Leather interior in my 2009 GT CX9 and searched far and wide to find a matching color. I ended up purchasing the OnFair dual DVD headrests in Grey and I'm very happy with the selection even though it is not a perfect match. I paid $234 for the pair of 7" screens on Ebay and service was great. In daily sunlight, it's difficult to see the color difference between the headrests and seats. In a flash photo the color difference is more pronounced. On a recent lunch trip with colleagues - none of them noticed the color difference. And for a $1300 difference - I'm extremely happy.

I've documented my install which included a custom floor console in the back which houses an iPod/iPhone video dock/charger, a storage compartment for the remote controls, a video switcher, dual 12V accessory power outlets and a 200Watt power inverter for plugging in laptops and USB devices. My family is all set for our frequent road trips.

I've posted a photo of the console and can likely answer other questions if anyone has any.

Very nice install. Do you have more pics/wiring diagrams? What do the different buttons do?

I assume you lose the ability for someone to sit in that middle seat? There's not that much footroom for that seat to begin with. Or can the passenger's legs just straddle the console?
 
We only have one child and rarely have more than two in the backseat. I envision a passenger in the center seat would straddle the console.

Console:
Top - slideout apple ipod universal dock with av cable (connected to video switcher)
Second section - Storage space for remotes and game controllers
Third section - non powered radio shack 4-source av switcher
Bottom - Dual 12v accessory outlets (hard wired to fuse panel/ground) and Wagan 200W power inverter w/powered USB port

Wiring:
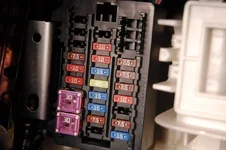
I've attached photos of the fuse panel. Located behind the glovebox - easy to access. I tapped the following fuse locations:
Side Mirrors (comes on with accessory switch)
Front 12V Accessory Outlet (accessory switch)
Sunroof (I think) (Seems powered all the time)

I ran power as follows:
- Dual DVD Video Screens direct to Fuse Tap & Ground in back of console (side mirror)
- Front Triple accessory plug (behind dashboard) to power all hardwire USB cables (2) direct to Fuse Tap (front 12V accessory) and ground near fuse block.
Rear Dual accessory plug and inverter direct to Fuse Tap (sunroof) and ground in back of console

I used 14G stranded copper wire for each run and used the recommended fuses throughout which were nothing more than 10Amp fuses.

I've run all wires easily from fuse panel and tucked them (along with USB cable for Ipod dock) under the edge of the console trim between center console and passenger seat. This was easy to do and it's tight enough to hold them there.

I'll work on attaching some photos shortly for:
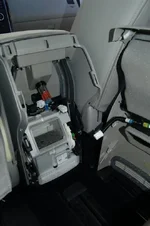
Rear console panel removed
Headrest in place
Fuse Block w/out Taps
And a few others.

This was a fun project. All in my investment was $420 and about 4 hours of time total. My son loves 'em

Have fun!
 
Here's the first batch of photos.
 

Attachments

  • DSC_0003.webp
    DSC_0003.webp
    41.3 KB · Views: 897
  • DSC_0180.webp
    DSC_0180.webp
    49 KB · Views: 813
  • DSC_0188.webp
    DSC_0188.webp
    25 KB · Views: 817
  • DSC_0192.webp
    DSC_0192.webp
    43.1 KB · Views: 779
  • DSC_0193.webp
    DSC_0193.webp
    55.7 KB · Views: 771
Here's some more. Enjoy.
 

Attachments

  • DSC_0194.webp
    DSC_0194.webp
    21.7 KB · Views: 705
  • DSC_0197.webp
    DSC_0197.webp
    30.7 KB · Views: 668
  • DSC_0199.webp
    DSC_0199.webp
    32.6 KB · Views: 681
  • DSC_0202.webp
    DSC_0202.webp
    77.8 KB · Views: 703
  • DSC_0207.webp
    DSC_0207.webp
    22.5 KB · Views: 677
Thanks and Help

Ickflorida,

Thanks for the informative threads. I am about to install the same players and had a couple of quick questions. When you explained the wiring, which part was for the players only? Where did your route the wires? Center console all the way up to the use panel? Do you remember where you started on removing the back panel of the center console.

Appreciate the help!

Finman


We only have one child and rarely have more than two in the backseat. I envision a passenger in the center seat would straddle the console.

Console:
Top - slideout apple ipod universal dock with av cable (connected to video switcher)
Second section - Storage space for remotes and game controllers
Third section - non powered radio shack 4-source av switcher
Bottom - Dual 12v accessory outlets (hard wired to fuse panel/ground) and Wagan 200W power inverter w/powered USB port

Wiring:
I've attached photos of the fuse panel. Located behind the glovebox - easy to access. I tapped the following fuse locations:
Side Mirrors (comes on with accessory switch)
Front 12V Accessory Outlet (accessory switch)
Sunroof (I think) (Seems powered all the time)

I ran power as follows:
- Dual DVD Video Screens direct to Fuse Tap & Ground in back of console (side mirror)
- Front Triple accessory plug (behind dashboard) to power all hardwire USB cables (2) direct to Fuse Tap (front 12V accessory) and ground near fuse block.
Rear Dual accessory plug and inverter direct to Fuse Tap (sunroof) and ground in back of console

I used 14G stranded copper wire for each run and used the recommended fuses throughout which were nothing more than 10Amp fuses.

I've run all wires easily from fuse panel and tucked them (along with USB cable for Ipod dock) under the edge of the console trim between center console and passenger seat. This was easy to do and it's tight enough to hold them there.

I'll work on attaching some photos shortly for:
Rear console panel removed
Headrest in place
Fuse Block w/out Taps
And a few others.

This was a fun project. All in my investment was $420 and about 4 hours of time total. My son loves 'em

Have fun!
 
Hello Finman. Yes - I did all the positive leads to the fuse panel behind the glovebox. I only used the bare metal console frame in the rear as a ground. I joined both positive leads for the headrest videos to one single lead to the front and used the front 12V outlet panel tap (switched). Note: The side mirror panel location is also switched. According to the documentation, the headrests only draw a few amps each so either should work fine.

For routing the wiring I ran the leads from the fuse panel to the center and then simply laid them between the passenger seat and console until the project was finished. When I was sure - I simply tucked them up under the plastic console trim between the seat and console. Remember - I ran two leads and a USB cable (which powers the ipod dock) so it was fairly easy to get them to stay under the trim.

The rear console wasn't hard at all. I worked the edges gently until I was able to pull it out. There are 8-10 clips around the edge which lock it into place. It was actually trickier to get it back in than it was out. Keep in mind, there is wiring connectors which connect to the back of the rear heat/air controls so you'll want to unplug those before you pull it too far - but there's plenty of room to do that.

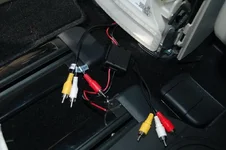
Most of the wiring to each headrest was run about 6-8" forward from the back of the seat down under the track to the center console. It was actually fairly easy to do so. you can move things around fairly easy if you desire to do it differently.

Just finished a road trip to northern CA and we had a great time with them.

let me know if you have any other questions.
 
Thanks

ickflorida,

I really appreciate the help. I got in tonight and was about to dive into the project and thought I would check the post to see if you replied back with some words of wisdom. Well timed!

Thanks Again,

Finman
 
(thumb)if you put the middle seat down, will it interfere with your sweet looking console? nice work.
 
Thanks - Hadn't thought about it conflicting with the seat going down. Just went and checked and seat folds forward with no problem and even slides all the way forward without touching the console. Works perfect. The rear seat headrests touch the back of the front seat before the console.

Thanks for the heads up. Check!
 
Thanks Florida (and others) for all the helpful pics and advice.

After getting a quote of about $200 from a local shop to install the headrest DVDs, I'm considering attempting it myself and have a few questions regarding the install.

First, how difficult is it to get the wiring from the headrests down the seatbacks? It looks like the seatbacks have to be removed? How is that done?

Second, is there any trick to getting the wiring from the fusebox out of the glove compartment area to the console (to be hidden)? Are there already "gaps" or other means to get the wire out of the glove compartment?

Again, thanks for the helpful advice.
 
It's been a while since checking back here. I'll try to answer your questions.

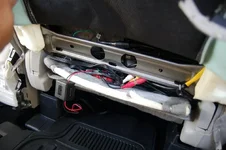
Seatbacks: Easy. Mazda CX9 has zippered rear corners on the front seats. Unzip the corners of the seats and then work the plastic lock-bar off the steel frame along the bottom. This will open up the back of the seats. Now, the wires on the headrest end are already threaded through the metal supports. Feed them down through the holes in the top of the seat and reach up into the back to pull the wires down. Done! I left the seat backs open and loose until i had everything in place - then used the space in the back of the seats to coil up the extra length of wire. I didn't want to cut it - just in case I decided to take it with me when i sell the car (sometime in the future).

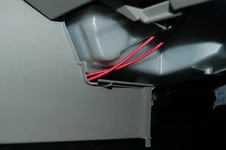
Wire Routing: The fuse panel (in photos) is located behind the glove box. Remove the back of the glove box to reveal access to the panel. From there - the wires are easy to enter the center console channel right under the dashboard and follow all the way back. For me - I simply laid the wires between the center console and seat until I was done. Then just tucked the wires up underneath the console side. Really not complicated at all. I used tie wraps under the dash and at the rear of the console to make sure wires couldn't get loose and drop down. So far... no problems.

Before you install - get a flashlight and on a sunny day - spend some time in the car and think through your installation. Get in behind the glove box, look at the fuse panel, follow your wire route, look for attachment points, gaps and channels. Get comfortable with the car. I did this a couple of times and took notes. I think it helped me tremendously during installation. i spent my time installing and making wire connections and not figuring out how to get the wires there. I'm really happy with the installation. And my wife, who's really picky, likes them too.

Oh... and the color variance has never been an issue or recognizable difference to anyone I've had in the car. It certainly wasn't worth the xtra $1000 for true matching headrests. And... remember... everything I did can be taken out with no permanent impacts, holes or damage to the car or stock headrests.

Good luck.
 
Back