polished manifold project

twistiert

Member
:
Mazdaspeed ,Protege
Hey whats up guys just took sum pics of the work I did today on my 626 manifold. I've been using the green roloc disks from napa so far to star taking the grain off. If anyone could give me ideas to get in between the runners would be appreicated.
 

Attachments

  • manifold1.webp
    manifold1.webp
    25.3 KB · Views: 230
  • manifold2.webp
    manifold2.webp
    27.9 KB · Views: 174
  • manifold3.webp
    manifold3.webp
    27.1 KB · Views: 177
I knwo theres a different kinda disks looking things that have a point on it that u can get, but dont ask me where haha, I have no clue.
 
I agree with the different discs. I used some on mine but my dad had a polishing kit that came with all kinds of different bits. I'm not sure who carries them either but it was just a bit that attached to a dremmel. It was almost like it was wrapped in sandpaper. It was kind of a pain to grind and polish some areas on the mani.
 
dremel will be your friend for tight spots like that....check out a fastnal store...they can order just/ if not carry just about any bit available....i know i used the hell out of the dremel when i cleaned the intake mani and bracket on a truck that i painted up
 
more pics of todays progress smoothed the seams out. im done till i get a dremel this weekend
 

Attachments

  • manifold4.webp
    manifold4.webp
    21.3 KB · Views: 201
  • manifold5.webp
    manifold5.webp
    16.9 KB · Views: 171
so ive been attemping this over the last couple of days using a dremel and some bits from home depot

so far the manifold is wining :(
 
lol it takes time and I did alot of sanding in between the runners by hand which sucks but whatever now I just have to polish it then it will be good to go
 
lookin' good! i was going to do that, but had time constraints...

those bolting spots that stick up on the 1st, 2nd, and 4th runner, you should grind them off, you don't need them, it would look a lot better, since looks is what your going for...

i grinded or rather took a long time to file off the ones on the 2nd runner, but i also high heat painted mine a nice flat black.

i can post a pic tonight if you'd like for a refernce?
 
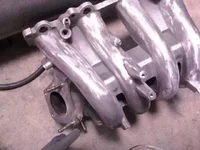
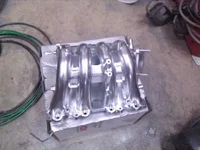
alright, sorry it took me some time, but this is what i was thinking:

manifold2.jpg


where those circles are, are the bolt on parts that you will not need, so you can cut them off if you'd like! (i'll get to the arrow later)

manifold4.jpg

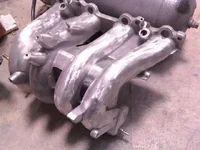
the part that you are holding there, you don't need either, with the 626 mani, it just bolts right to the head without any need of support bracing.


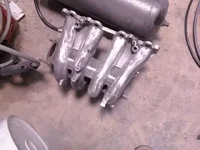
this is what mine looks like, the black looks a lot better when it's out of the car vs, installed, but it's high-temp so i'd like to think that it actually helps a little! ...yes i put in the thermal spacer as well.

IMG_0018.jpg


i'm just going to ziptie together those solenoids...
IMG_0026.jpg


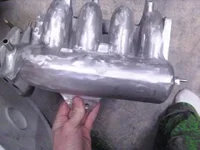
and this is another view, clean, i like it, now... regarding the arrow in the first pic, you seem to be missing a vac port, just an fyi, if you need to get a t-fitting or something... look in the bottom of my pic here:
IMG_0027.jpg


so that's my mani so far...well i don't really plan i doing anything else... so i guess that it's final, lol... but if you want it all shiny and chrome and clean looking i'd remove those spots i circled.
 
Thats funny you did that....SO did I.
No need to keep things that are out of place and not used.

P5%20Powdercoating%20006.jpg
 
that's because i got the idea from YOU!!! lol

...obviously, i'd like to have mine just as shiny...but i wanted to keep it lower budget myself...

and there's a lot of extra stuff that can be ground down/off, i'm sure big power tools work a much better than me using a hack saw, file and a dremmel...lol

i was going to grind off more...but didn't have the time, patients, or any arm muscle left... :P
 
just remember to shave off all the old gasket material from everything before putting new ones on, we didn't do that on my TB and i had a nice vac leak that sounded like a BOV every time i shifted...
 
i gave up on mine

i used a dremmel on a bunch of things and smoothed things out, but cant make the surface smooth.

im going to wet sand it a lil bit and give it a lot of coats of paint

pics soon
 
i just ended up painting it i used black engine paint as a base and then used duplicolor instant chrome I knew it wouldnt be chrome sense all those paints are just a gloss silver but it didnt turn out to bad
 

Attachments

  • 0330091208.webp
    0330091208.webp
    37.3 KB · Views: 154
Last edited:
You could have saved yourself a lot of trouble and just painted it in the first place...LOL!

But yeah...It doesnt look bad in pics.
 
thank you yea i was pretty impressed on how it came out im installing it tom. so ill take more pics then
 

New Threads and Articles

Back