Paint DG Engine Brackets ???

Should I paint the DG engine brackets


  • Total voters
    14

Subghetto

Member
:
2008 Nissan Rouge; Former 2002 Mazda Protege 5 owner
Well I'am still debating wether or not to put on my MSP engine cover the only thing holding me back are the dg engine brackets they are pretty scratched up and have like some black scratches on them and I was wondering should I even bother painting them or just put on the valve cover. Are they even seen?? when you look at the engine bay or do you guys think it's a waste.

And if you guys think I should paint them what kind of paint should I use since they are like metal??
 
why would u paint it if the valve cover-cover sits on the brackets?
 
L8R said:
why would u paint it if the valve cover-cover sits on the brackets?

LOL I did'nt know, so you can't see the brackets? ok cool no paint it is.
 
Last edited:
enigM@ said:
pointless to paint, put that baby on

Yeah I decided to put it on but I have one question do I have to torque the bolts to a specific spec when I put on the valve cover or just tighten them until they are tight?
 
for my cover, i just tighten until i feel tension and stop. you shouldnt have any problems
 
209032.gif
 
Alright guys I popped my hood today and I'am dumbfounded I have no idea how to put this damn thing on I found the how to here:

http://www.msprotege.com/forum/showthread.php?t=13870&highlight=engine+brackets

but the instructions via pics no longer work/exist. I'am having trouble knowing how to put it on it seems that it is quiet easy if you have a MSP but I have a 2002 P5 anyone have any insight on exactly how I should go about putting this bad boy on. I looked at my valve cover and all I see is a mess of wires all over the place. I guest I'am just venting I'll try later again later it's hard when there is snow everywhere and it's cold outside. Thanks.
 
dammit, i just posted and it deleted it!

but, on the valve cover towards the rear, u need to remove a bolt holding the wire loom (the big black one) to the valve cover. you remove the bolt, move the loom out of the way, put the bracket in the spot u removed the bolt from, and reinstall the bolt.

i also found this:
icon1.gif
INSTALLATION: HOW-TO
<HR style="COLOR: #d1d1e1" SIZE=1><!-- / icon and title --><!-- message -->I don't have a digital camera :( so no pictures yet but i'll try to snap off a few on friday with my brother's camera on friday.

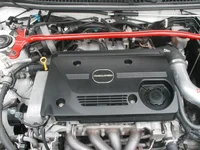
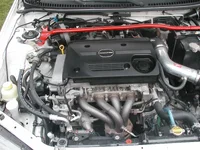
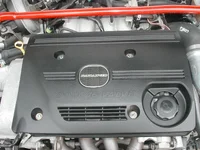
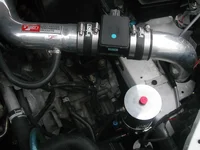
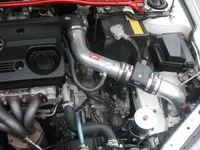
Since no instructions came with the cover :confused: 
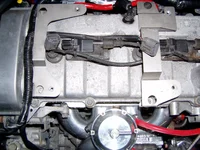
it took me a while to figure out where to install the brackets. Then I attached the brackets to the cover and this way was able to see where they go. The brackets are different. The more intricate one goes closer to the driver side of the car and the simpler one with uneven arms goes on the passenger side of the engine. The driver side one attaches to the bolts that hold the head down, look at the bolt right under the oil cap and it would be the bolt to the left of that one and the bolt that is in the back of the engine. The back bolt is harder to get to and even harder to tighten back down. Surprisingly though the bolts were barely tightened. one light twist and they were off the head. When you bolt the brackets down, remember that the arms that extend from the brackets (where the clips are) are gonna be looking towards the driver side otherwise the cables would get in the way of the bracket.

The passenger side bracket attaches to the post on the head where a big fat black cable is attached to. This is the cable just left of the timing chain. Lightly pull straight up and the plastics things that hold the cable down will release. Attach the other bracket to the two posts with the two smaller bolts supplied. The longer arm on the bracket is going to be closer to the back of the engine and again the arms must extend right of the bracket (towards the driver side of the car). Bolt everything down and bolt down the cover to the holes in the arms of the brackets. You are done :D
Hopefully this helps when you guys install yours.

good luck! if u need pics, pm me
peace
 
bazooka joe said:
heres a pic

Thanks L8R and bazooka joe I feel more confident I will go ahead and give it another try thanks again guys for the help especially with the pic now I now what it's suppose to look like LOL.
 
L8R said:
how did it go?

(bump)


It went great thanks for the help guys I'am going to try to get pics by the end of the week since currently school is kicking my ass and I rarely get time off also not having a digi cam makes it hard but once I get my hands on one I will be sure to post.
 
haha thats good to hear. i know what u mean about school too... fun eh? haha

peace
 
MSP engine cover pics!

Well thank you guys for all your help the install was sort of a b**** I wish we had msp valve covers/mp3 covers it would have been so much eaiser I lost one washer but other than that the install was perfect when I stop being lazy I'll go pick one up at autozone just to finish it off. But my engine bay look so much better def a worthwhile mod.
 

Attachments

  • P1010045.webp
    P1010045.webp
    191.9 KB · Views: 165
  • P1010046.webp
    P1010046.webp
    195.6 KB · Views: 312
  • P1010047.webp
    P1010047.webp
    219.3 KB · Views: 322
  • P1010048.webp
    P1010048.webp
    93.2 KB · Views: 173
  • P1010049.webp
    P1010049.webp
    151.8 KB · Views: 326

New Threads and Articles

Back