Kurtanius21
Member
I don't know how to upload pictures from my computor to specific places on the post, so all the photos are at the bottom.
At nearly eight years old, my Mazda's youthful days are a long ways behind that ever-increasing odometer reading. I've carved every corner. Every limit
I've reached. Who could forget the whopping 9.8 0-60 times? It's provided great fun with sporty character. It's a fun and aging car. It could use
some new life. It deserves it. That's why I bought various POR-15 products.
I was introduced to POR-15 on this website (Mazda 24/7) in a forum topic concerning the rust problems our car has. There I learned POR-15 is a
well known rust preventative paint. Google search rust-preventative paint and sure enough POR-15 pops up. POR-15 is supposably a paint that cures with the aid of moisture. Unlike other paints, humidity speeds the hardening process. It also is "hard as a rock" when cured, making it resistant to chipping. Not only that, but it is also flexible, So the company claims. There is not a solvent in the world that dissolves it they say. Well I got interested
and wanted to try this out myself.
Now I purchased the POR-15 Caliper Painting kit. It comes in five colors: Blue, Red, Yellow, silver, and Black. The contents are as follows.
4 Oz. silver POR-15
8 Oz. caliper paint
4 Oz. caliper prep
1 quart caliper cleaner
2 foam brushes
2 pair latex gloves
masking tape
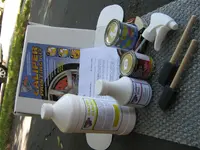
I ordered blue and recieved it in five days. Naturally I got to work right away. The instructions for the kit was a one sided page with six steps. painting
the calipers seemed very simple but that impression didn't last long. I ordered an aditional package of POR-15 which came with a comprehensive POR-15 guide and FAQ. The four page manual highlighted conditions and many POR-15 qualities. Soon I found myself watching Humidity percent, buying a dozen foam brushes, gloves, and getting concerned with duration cured before adding a topcoat. This is where the caliper kit falls behind. The instructions included really don't supply appropriate POR-15 application procedure. Without the seperate package, I'd not understand excessive hunidity in the environment is a very bad thing nor would I even know that POR-15 vapors are harmful. But this review is aimed at POR-15, not the kit necessarily.
To begin the preparation for the POR-15, a thorough cleaning must be done. The supplied Caliper Cleaner is a rebranded Marine Clean degreaser. The Marine clean is a water based degreaser, which is noncorrosive. First, dilute it in water according to the mess degree and spray away. It did well enough to remove brake dust and trace amounts of rust (Despite the cleaned caliper I repeated the process to insure cleanliness). The caliper bare metal was exposed and let dry. Next the Caliper Prep needed to eat into the caliper. The Caliper Prep is also a rebranded product- Metal-Ready. Metal-Ready is an acidic solution with some kind of zinc component. The acid eats into the metal without corroding it to build a foothold for POR-15 paint. The Zinc coating creates "The ideal surface" for adhesion. I'm not sure why, but the FAQ says this. The Metal-Ready soaks the metal for 20 minutes then needs to be removed with water. Once the caliper is dry, we're ready for POR-15.
Por-15 is quite the tricky paint to use. Without prior experience, I made a cruicial mistake and learned few handy techniques. I opened the can
and immediately poured it into a styrophoam bowl. With seram wrap I closed the can with leftover paint. Now with the can set aside, I took a look at this
infamous POR-15 silver paint. It was very strange. It looked like swamp soup. Upon stirring it however, its silver color appeared. So I grasped my foam
brush and began painting. Little did I know the severe importance of stirring. When I first contacted the caliper, a clear goo oozed out the brush.
Faint silver particles dotted the goo like glitter. I didn't think much of it at the time, but it lead to a "faded" POR-15" coat. My mistake:
stirring wasn't done obsessively. If stirring is not done, you'll get a lackluster coat POR-15.
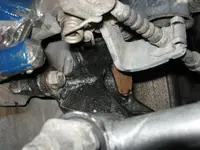
Oblivious to this mistake I continued on.
Being very careful to avoid getting paint into delicate areas, I slid the foam brush carefully along the caliper. The paint began to drip towards the rotor,
caliper piston boots, and bleeder screw. It was then I realized the Foam brush's great use. Not only does it provide a smooth, markless stroke, it also
can absorb stubborn drops that threaten important components. With scissors, The foam brush also can be shaped into smaller sizes to reach for those tight spots. I cannot emphasize the convenience of the foam brush. Buy them.
After a three hour waiting period, I saw first hand wonderful personality of pOR-15. It leveled out wonderfully. In three hours the paint had
hardened to about motor mount rubber material. It was smooth and I felt confident this paint would survive the harsh jungle streets. I was very pleased with the progress. It wasn't until I got to the caliper paint I was discouraged.
It is possible I waited too long before applying the caliper paint. The manual does once mention "When your POR-15 coating is just dry to the touch,
with slight finger drag... apply the first coat [caliper paint]." I did not understand clearly what finger drag meant. At one point the paint "glued"
to a finger but 20 minutes later it was dry as rock. Perhaps meticulous paint curing observation is required, but as far as my experience, the caliper
paint did not satisfy. The first coat did not level well at all. Paint brushes remained. A thick layer was required to hide the metalic POR-15, which
spawned dripping. After the second coat, the product codes the calipers once held were illegible.
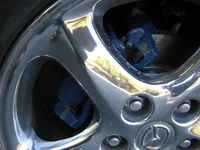
But all joy was not lost, I had yet to see POR-15 on a solo job.
I had the priveledge to handle POR-15 many times since summer began. Although to use POR-15 outside of the caliper kit, I had to purchase the paint, which is already quite expensive, Metal-ready, Marine Clean, and the Solvent. POR-15 has a hefty pricetag opposed to competitors, like Rust Bullet
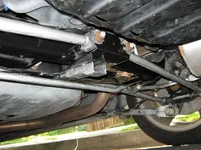
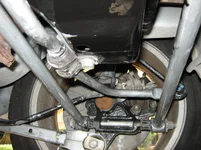
which does not require expensive prep products. Now that I had POR-15, I set out to paint the undercarriage. The rear sway bars and crossmember went
very well, despite my clumsiness. POR-15 spread smoothly over the sway bar. With proper stirring, the paint was gorgeous. Not only that, but
the black POR-15 had even better leveling characteristics than Silver. You can see the very clear surface of the newly painted crossmember. I'm very
satisfied with the effort. All metal surfaces painted have a very soild coat. The Caliper paint job has not chipped, cracked, or peeled for three weeks.
I'm confident it will hold strong after three years.
Would I recommend POR-15? Highly. Do I know how it compares to competitors like Rust Bullet, Rust Encapsulator, and Zero Rust? I do not.
POR-15 Review
Pros: Beautiful finish. Very tough coat.
Cons: Expensive to apply properly. Requires much labor. Steep learning curve.
At nearly eight years old, my Mazda's youthful days are a long ways behind that ever-increasing odometer reading. I've carved every corner. Every limit
I've reached. Who could forget the whopping 9.8 0-60 times? It's provided great fun with sporty character. It's a fun and aging car. It could use
some new life. It deserves it. That's why I bought various POR-15 products.
I was introduced to POR-15 on this website (Mazda 24/7) in a forum topic concerning the rust problems our car has. There I learned POR-15 is a
well known rust preventative paint. Google search rust-preventative paint and sure enough POR-15 pops up. POR-15 is supposably a paint that cures with the aid of moisture. Unlike other paints, humidity speeds the hardening process. It also is "hard as a rock" when cured, making it resistant to chipping. Not only that, but it is also flexible, So the company claims. There is not a solvent in the world that dissolves it they say. Well I got interested
and wanted to try this out myself.
Now I purchased the POR-15 Caliper Painting kit. It comes in five colors: Blue, Red, Yellow, silver, and Black. The contents are as follows.
4 Oz. silver POR-15
8 Oz. caliper paint
4 Oz. caliper prep
1 quart caliper cleaner
2 foam brushes
2 pair latex gloves
masking tape

I ordered blue and recieved it in five days. Naturally I got to work right away. The instructions for the kit was a one sided page with six steps. painting
the calipers seemed very simple but that impression didn't last long. I ordered an aditional package of POR-15 which came with a comprehensive POR-15 guide and FAQ. The four page manual highlighted conditions and many POR-15 qualities. Soon I found myself watching Humidity percent, buying a dozen foam brushes, gloves, and getting concerned with duration cured before adding a topcoat. This is where the caliper kit falls behind. The instructions included really don't supply appropriate POR-15 application procedure. Without the seperate package, I'd not understand excessive hunidity in the environment is a very bad thing nor would I even know that POR-15 vapors are harmful. But this review is aimed at POR-15, not the kit necessarily.
To begin the preparation for the POR-15, a thorough cleaning must be done. The supplied Caliper Cleaner is a rebranded Marine Clean degreaser. The Marine clean is a water based degreaser, which is noncorrosive. First, dilute it in water according to the mess degree and spray away. It did well enough to remove brake dust and trace amounts of rust (Despite the cleaned caliper I repeated the process to insure cleanliness). The caliper bare metal was exposed and let dry. Next the Caliper Prep needed to eat into the caliper. The Caliper Prep is also a rebranded product- Metal-Ready. Metal-Ready is an acidic solution with some kind of zinc component. The acid eats into the metal without corroding it to build a foothold for POR-15 paint. The Zinc coating creates "The ideal surface" for adhesion. I'm not sure why, but the FAQ says this. The Metal-Ready soaks the metal for 20 minutes then needs to be removed with water. Once the caliper is dry, we're ready for POR-15.
Por-15 is quite the tricky paint to use. Without prior experience, I made a cruicial mistake and learned few handy techniques. I opened the can
and immediately poured it into a styrophoam bowl. With seram wrap I closed the can with leftover paint. Now with the can set aside, I took a look at this
infamous POR-15 silver paint. It was very strange. It looked like swamp soup. Upon stirring it however, its silver color appeared. So I grasped my foam
brush and began painting. Little did I know the severe importance of stirring. When I first contacted the caliper, a clear goo oozed out the brush.
Faint silver particles dotted the goo like glitter. I didn't think much of it at the time, but it lead to a "faded" POR-15" coat. My mistake:
stirring wasn't done obsessively. If stirring is not done, you'll get a lackluster coat POR-15.

Oblivious to this mistake I continued on.
Being very careful to avoid getting paint into delicate areas, I slid the foam brush carefully along the caliper. The paint began to drip towards the rotor,
caliper piston boots, and bleeder screw. It was then I realized the Foam brush's great use. Not only does it provide a smooth, markless stroke, it also
can absorb stubborn drops that threaten important components. With scissors, The foam brush also can be shaped into smaller sizes to reach for those tight spots. I cannot emphasize the convenience of the foam brush. Buy them.
After a three hour waiting period, I saw first hand wonderful personality of pOR-15. It leveled out wonderfully. In three hours the paint had
hardened to about motor mount rubber material. It was smooth and I felt confident this paint would survive the harsh jungle streets. I was very pleased with the progress. It wasn't until I got to the caliper paint I was discouraged.
It is possible I waited too long before applying the caliper paint. The manual does once mention "When your POR-15 coating is just dry to the touch,
with slight finger drag... apply the first coat [caliper paint]." I did not understand clearly what finger drag meant. At one point the paint "glued"
to a finger but 20 minutes later it was dry as rock. Perhaps meticulous paint curing observation is required, but as far as my experience, the caliper
paint did not satisfy. The first coat did not level well at all. Paint brushes remained. A thick layer was required to hide the metalic POR-15, which
spawned dripping. After the second coat, the product codes the calipers once held were illegible.

But all joy was not lost, I had yet to see POR-15 on a solo job.
I had the priveledge to handle POR-15 many times since summer began. Although to use POR-15 outside of the caliper kit, I had to purchase the paint, which is already quite expensive, Metal-ready, Marine Clean, and the Solvent. POR-15 has a hefty pricetag opposed to competitors, like Rust Bullet
which does not require expensive prep products. Now that I had POR-15, I set out to paint the undercarriage. The rear sway bars and crossmember went
very well, despite my clumsiness. POR-15 spread smoothly over the sway bar. With proper stirring, the paint was gorgeous. Not only that, but
the black POR-15 had even better leveling characteristics than Silver. You can see the very clear surface of the newly painted crossmember. I'm very
satisfied with the effort. All metal surfaces painted have a very soild coat. The Caliper paint job has not chipped, cracked, or peeled for three weeks.
I'm confident it will hold strong after three years.


Would I recommend POR-15? Highly. Do I know how it compares to competitors like Rust Bullet, Rust Encapsulator, and Zero Rust? I do not.
POR-15 Review
Pros: Beautiful finish. Very tough coat.
Cons: Expensive to apply properly. Requires much labor. Steep learning curve.
Last edited:
