
Hello everyone! This is more of an informative post detailing my findings over the past year. I just want the information to be out there should anyone have to go through the same thing as me. Just as a warning, this will be quite text and pic heavy!
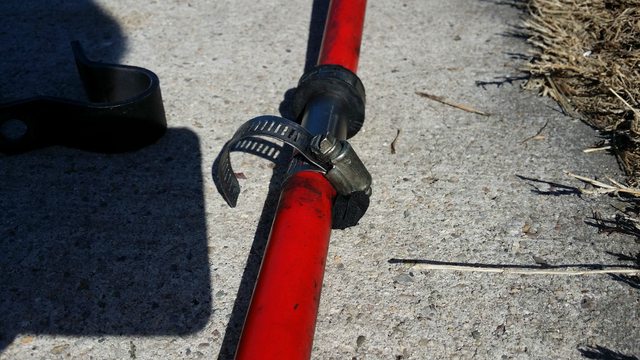
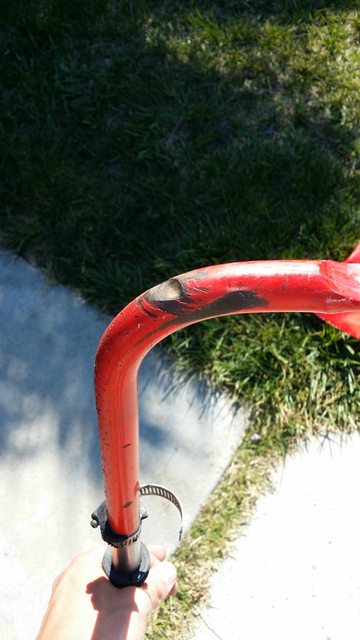
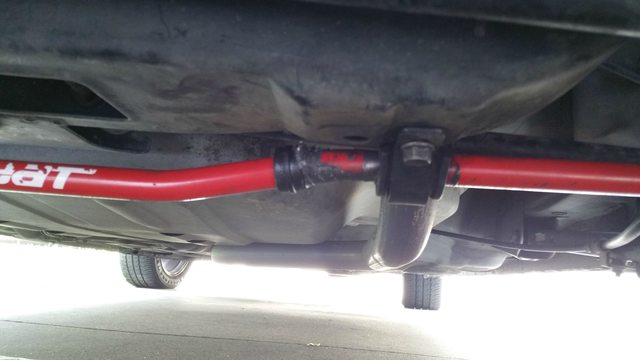
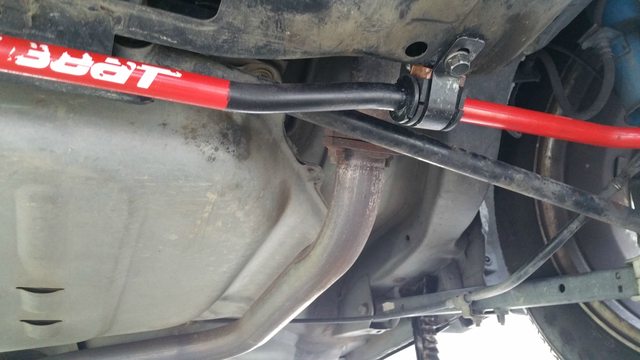
When I bought my Protege5 the previous owner had installed the Mazdaspeed Protege rear sway bar. My first thought was "sweet, free mods!" After getting acquainted with the car the rear began to squeak quite a bit. This ended up being from the bushings not being greased properly. Getting under the car I noticed the bar didn't quite look like it was installed from the factory. I realized it isn't the original rear sway, but I thought it being from another Protege would lead to a nicer install. Essentially what I saw were two bushings with a huge gap in between the the bushing itself and the subframe of the car, hose clamps holding on pieces of rubber to center the sway bar, and a large gash from where the bar had made contact with suspension components.

I was attending a track day fairly soon and wanted to make sure I was going to get the best performance out of my rear bar. After quite a bit of research (that I will summarize later in the post) I figured my cheapest/best solution was to buy the universal brackets/bushings from energy suspension. https://www.amazon.com/dp/ (commissions earned) Based on my research you can not buy the brackets with the zerk fittings because they are not the size and do not come in 20mm. You have to bend each flange 45 degrees to fit correctly on the existing mounting holes. You also have to widen the wholes in the brackets to fit the bolts through. The problem with these brackets is that the bushing sticks out further than the bracket. What ends up happening is when you bolt the bracket on to the subframe it begins to pinch the bushing, making the sway bar resistant to movement. It also meant I had to constantly grease the bushings every few weeks to keep them from squeaking.
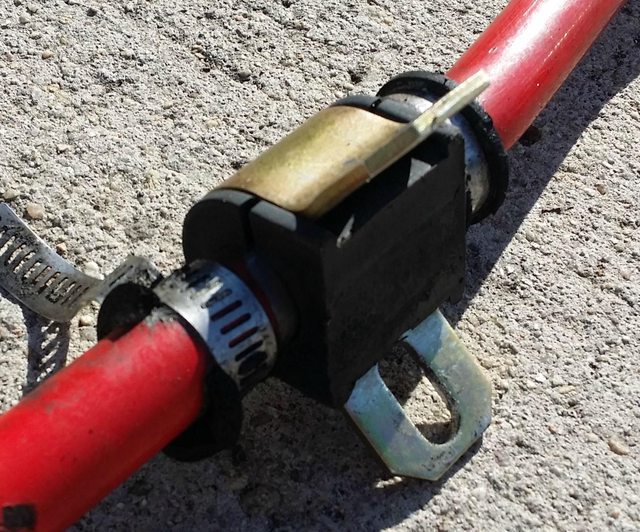
I put some washers inbetween the subframe and the bracket to help minimize the "pinching" effect, however when you do that it doesn't leave much for the bolts to thread on to. Leading me to my next issue. Nuts kept coming loose on the bracket, which would eventually lead to the disfigurement of the bracket. The bracket itself isn't incredibly strong as it is made to bend for fitment reasons. Below are the MSP brackets compared to the Energy. I'm sure you can tell which one took the beating. It is also important to see the size difference between the two.
After this had happened 3 times I had had enough of the Energy brackets. This last time it managed to screw up the lateral locks, and break the weld on one of the subframe bolts. I knew the MSP brackets were practically indestructible and wouldn't give me these problems, so I decided to go back to them. In this process I needed to redo the lateral locks. This was a time consuming process that I hope you can all learn from!
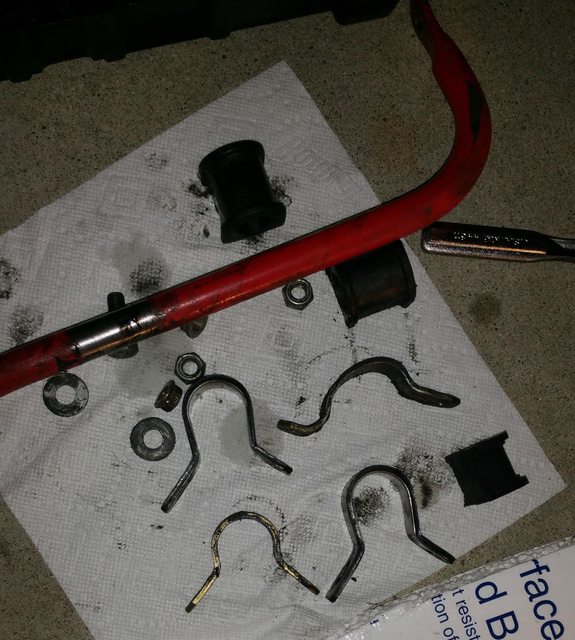
The bar came with bushingshttps://www.ebay.com (commissions earned) with oetiker clamps. I attempted to reuse the bushings and replace the oetiker clamps with zip ties. (JDM YO!) Didn't work at all, the zip ties aren't strong enough to hold the lateral lock bushings. I was going to try a hose clamp, but every one I found was too wide for the bushing. I could have also just done another oetiker clamp, but it requires special tooling that I do not have. I was desperate to find a solution that wouldn't require me spending https://www.amazon.com/dp/ (commissions earned). Mainly because I wanted to DIY something of my own out of boredom.
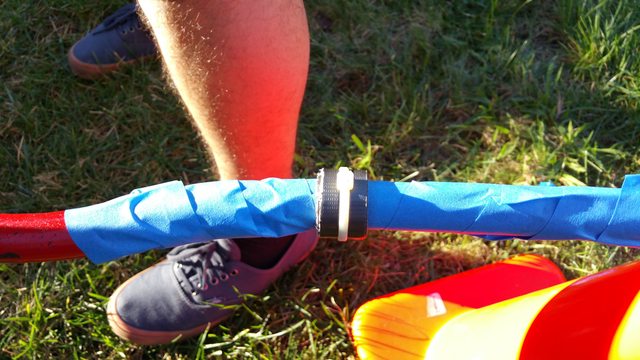
My first attempt was using duct tape and a zip tie to create a makeshift bushing. I read on a forum that someone just used electrical tape to create new lateral locks. I bought the heaviest duty duct tape I could find at home depot and went forward with my plan. This is how it looked right before I plastidipped it to look like a real bushing.
To be honest I genuinely thought it was going to work. However a day in the mountains with some super sticky tires mounted proved me otherwise.
The tape and moved a few inches and had begun to unravel. My next plan was to JB Weld washers to the sway bar. I cut them in half with a dremel in order to fit them on the bar.
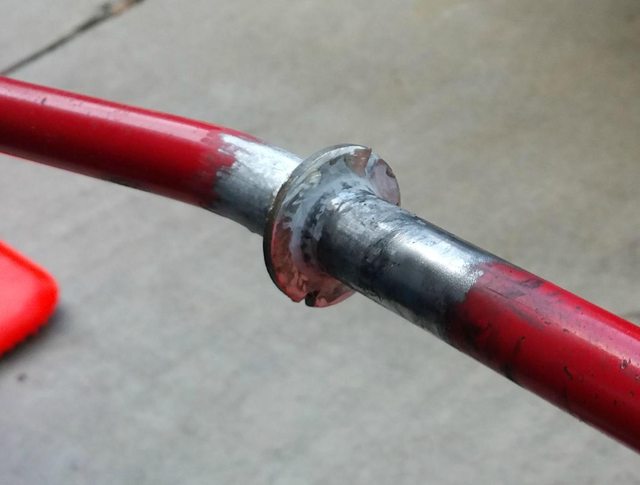
I used the original JB Weld formula since it was all I had lying around. If you attempt this I would strongly suggest using the fast bonding type. The washers were constantly shifting under their own weight for the first 5 hours of drying time. Give it 24 hours, though and this stuff is rock solid. I ended up sanding the excess and then plastidipping the washer and parts of the bar where i got a little carried away with paint sanding.
Just as a reference I used 3/4 inch washers. I fully expect this fix to hold for the life of the bar!
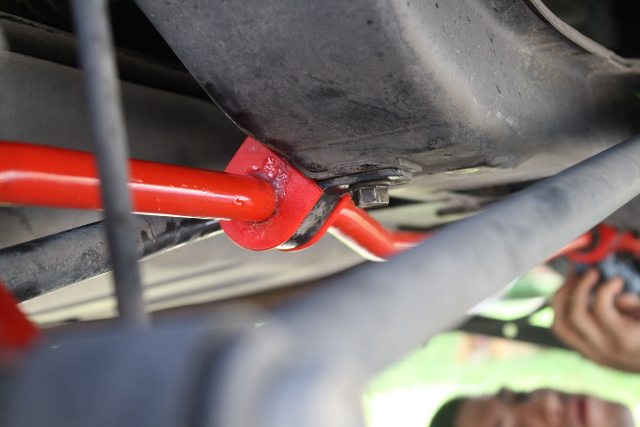
Those with a keen eye may have noticed the wooden block in between the bushing and the subframe of the car. Now is where I will get into all of the research on how to do a proper installation of the rear MSP sway bar on a P5. That gap is caused by the aftermarket Energy Suspension bushings not being long enough. That is why I put a wood block in between. Otherwise, you will get a bit of clunking while going over bumps. Here is a photo from AWR showing what the size of the bushing should be.
Here is a link for the AWR poly bushings shown above, and here is a link to the OEM MSP bushing from Racing Beat. Both will fill the gap when using the MSP brackets.
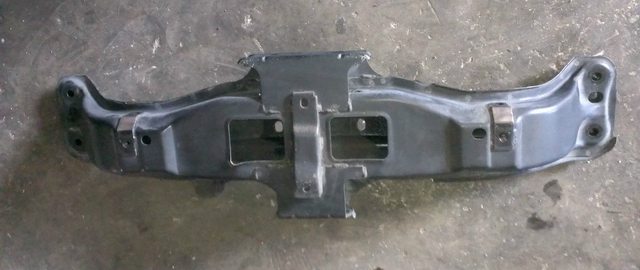
Those of you with a super keen eye may noticed that subframe has a small reinforcement around the mounting holes compared to the P5 subframe. The MSP's came like this from the factory! Mazda beefed it up a bit to handle the stiffer 20mm sway bar. The MSP version also has two bolt holes, rather than on hole and one stud sticking out. I think this is because the stud coming out of the P5's subframe doesn't have enough thread to support the thicker MSP brackets. In my experience you are fine as long as you use a self locking nut. Here is a great photo of the MSP rear subframe and where it has been reinforced.
It is also recommended to have the MSP shocks because they have heavy duty end link mounting tabs. My car just so happened to have MSP suspension on it when I bought it, so I can't speak from experience. From what I have read some guys have been okay with stock P5 suspension, while others have broke the tabs. For reference I am using MSP spec rear end links.
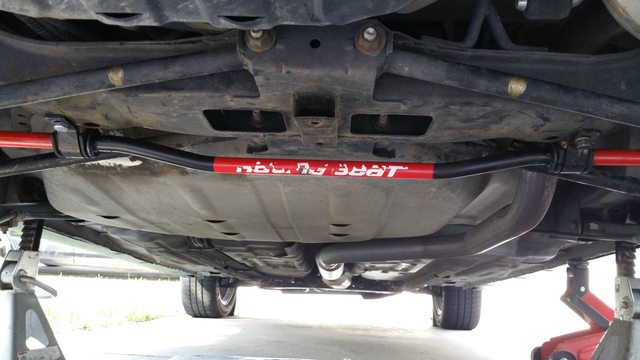
As of right now this setup does not clunk and has no squeaking noises. I do expect the squeak to come back at some point, just because the grease will wear out, but I see no reason why a clunk should expose itself with the poly urethane bushings. If I do, i just may have to update this post with all the different "clunk fix" and mounting solutions available.
I hope this post helps provide people with some more insight on installing the MSP rear sway, and clears up a lot of confusion I know I had while trying to figure out my solution.
When I bought my Protege5 the previous owner had installed the Mazdaspeed Protege rear sway bar. My first thought was "sweet, free mods!" After getting acquainted with the car the rear began to squeak quite a bit. This ended up being from the bushings not being greased properly. Getting under the car I noticed the bar didn't quite look like it was installed from the factory. I realized it isn't the original rear sway, but I thought it being from another Protege would lead to a nicer install. Essentially what I saw were two bushings with a huge gap in between the the bushing itself and the subframe of the car, hose clamps holding on pieces of rubber to center the sway bar, and a large gash from where the bar had made contact with suspension components.
I was attending a track day fairly soon and wanted to make sure I was going to get the best performance out of my rear bar. After quite a bit of research (that I will summarize later in the post) I figured my cheapest/best solution was to buy the universal brackets/bushings from energy suspension. https://www.amazon.com/dp/ (commissions earned) Based on my research you can not buy the brackets with the zerk fittings because they are not the size and do not come in 20mm. You have to bend each flange 45 degrees to fit correctly on the existing mounting holes. You also have to widen the wholes in the brackets to fit the bolts through. The problem with these brackets is that the bushing sticks out further than the bracket. What ends up happening is when you bolt the bracket on to the subframe it begins to pinch the bushing, making the sway bar resistant to movement. It also meant I had to constantly grease the bushings every few weeks to keep them from squeaking.
I put some washers inbetween the subframe and the bracket to help minimize the "pinching" effect, however when you do that it doesn't leave much for the bolts to thread on to. Leading me to my next issue. Nuts kept coming loose on the bracket, which would eventually lead to the disfigurement of the bracket. The bracket itself isn't incredibly strong as it is made to bend for fitment reasons. Below are the MSP brackets compared to the Energy. I'm sure you can tell which one took the beating. It is also important to see the size difference between the two.
After this had happened 3 times I had had enough of the Energy brackets. This last time it managed to screw up the lateral locks, and break the weld on one of the subframe bolts. I knew the MSP brackets were practically indestructible and wouldn't give me these problems, so I decided to go back to them. In this process I needed to redo the lateral locks. This was a time consuming process that I hope you can all learn from!
The bar came with bushingshttps://www.ebay.com (commissions earned) with oetiker clamps. I attempted to reuse the bushings and replace the oetiker clamps with zip ties. (JDM YO!) Didn't work at all, the zip ties aren't strong enough to hold the lateral lock bushings. I was going to try a hose clamp, but every one I found was too wide for the bushing. I could have also just done another oetiker clamp, but it requires special tooling that I do not have. I was desperate to find a solution that wouldn't require me spending https://www.amazon.com/dp/ (commissions earned). Mainly because I wanted to DIY something of my own out of boredom.
My first attempt was using duct tape and a zip tie to create a makeshift bushing. I read on a forum that someone just used electrical tape to create new lateral locks. I bought the heaviest duty duct tape I could find at home depot and went forward with my plan. This is how it looked right before I plastidipped it to look like a real bushing.
To be honest I genuinely thought it was going to work. However a day in the mountains with some super sticky tires mounted proved me otherwise.
The tape and moved a few inches and had begun to unravel. My next plan was to JB Weld washers to the sway bar. I cut them in half with a dremel in order to fit them on the bar.
I used the original JB Weld formula since it was all I had lying around. If you attempt this I would strongly suggest using the fast bonding type. The washers were constantly shifting under their own weight for the first 5 hours of drying time. Give it 24 hours, though and this stuff is rock solid. I ended up sanding the excess and then plastidipping the washer and parts of the bar where i got a little carried away with paint sanding.
Just as a reference I used 3/4 inch washers. I fully expect this fix to hold for the life of the bar!
Those with a keen eye may have noticed the wooden block in between the bushing and the subframe of the car. Now is where I will get into all of the research on how to do a proper installation of the rear MSP sway bar on a P5. That gap is caused by the aftermarket Energy Suspension bushings not being long enough. That is why I put a wood block in between. Otherwise, you will get a bit of clunking while going over bumps. Here is a photo from AWR showing what the size of the bushing should be.
Here is a link for the AWR poly bushings shown above, and here is a link to the OEM MSP bushing from Racing Beat. Both will fill the gap when using the MSP brackets.
Those of you with a super keen eye may noticed that subframe has a small reinforcement around the mounting holes compared to the P5 subframe. The MSP's came like this from the factory! Mazda beefed it up a bit to handle the stiffer 20mm sway bar. The MSP version also has two bolt holes, rather than on hole and one stud sticking out. I think this is because the stud coming out of the P5's subframe doesn't have enough thread to support the thicker MSP brackets. In my experience you are fine as long as you use a self locking nut. Here is a great photo of the MSP rear subframe and where it has been reinforced.
It is also recommended to have the MSP shocks because they have heavy duty end link mounting tabs. My car just so happened to have MSP suspension on it when I bought it, so I can't speak from experience. From what I have read some guys have been okay with stock P5 suspension, while others have broke the tabs. For reference I am using MSP spec rear end links.
As of right now this setup does not clunk and has no squeaking noises. I do expect the squeak to come back at some point, just because the grease will wear out, but I see no reason why a clunk should expose itself with the poly urethane bushings. If I do, i just may have to update this post with all the different "clunk fix" and mounting solutions available.
I hope this post helps provide people with some more insight on installing the MSP rear sway, and clears up a lot of confusion I know I had while trying to figure out my solution.
