spaceman12
Member
- :
- 2017 Mazda6
The original 2016 Mazda6 guide can be found on mazda6club. I wanted to post in that forum as that is where I originally came across that guide but they have posting limitations for new users. Anyways, this guide is more of an addition to that one so I will reference that guide many times. I was able to do this on a 2017 Mazda6 Touring but this process requires some modification. Also I’d like to say first that my pictures aren’t great and there aren*t that many near the end of the process as I wasn’t sure it was going to work.
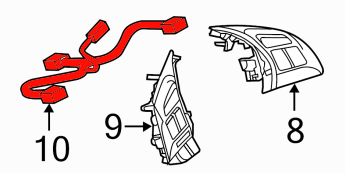
Parts I purchased:
The following are the same as 2016 Guide:
The rear cover was the tough one. I ended up purchasing an incorrectly described 2017 part, the 2016 part, and finally the following Mazda3 2018 rear cover.
There are quite a few differences. For completeness I will briefly mention all the steps even if they’re similar to the 2016. I will emphasize when a step differs. A previous poster mentioned he did this to a 2018 Mazda 6 so I will elaborate on the points he mentioned. To take off the steering wheel there are holes on the sides of the steering wheel instead of the back. So you don’t have to turn your steering wheel all the way to see the holes. Here is the left side hole for example:
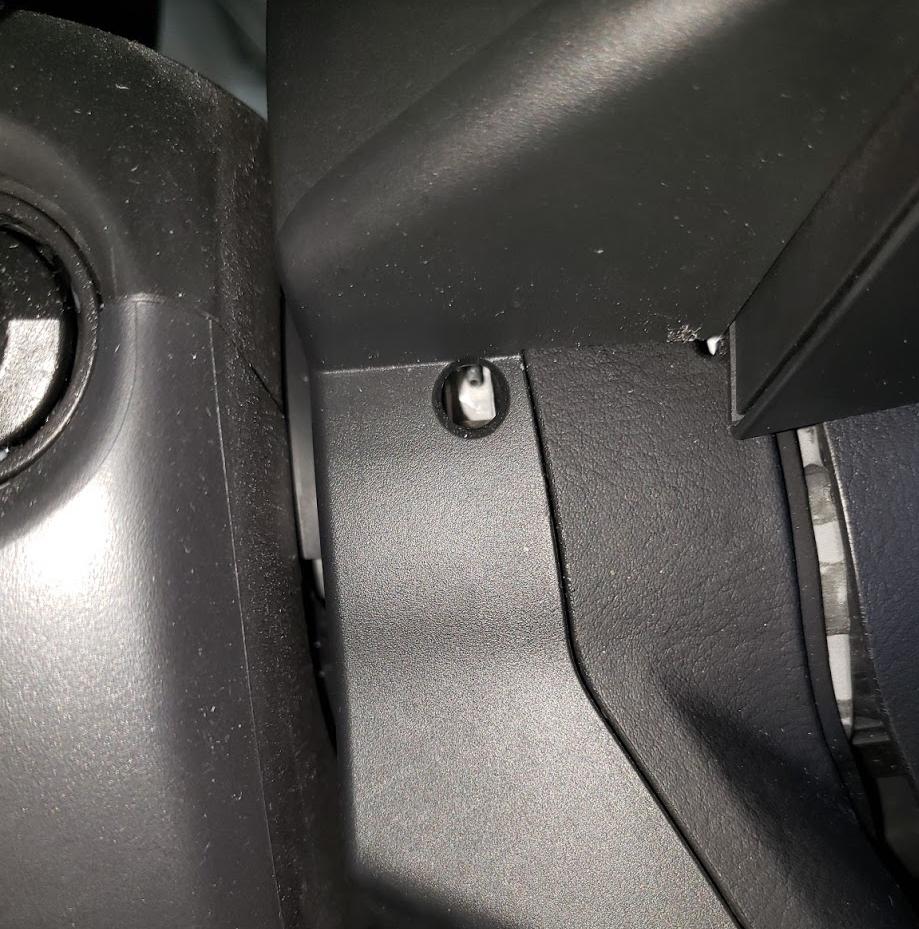
There are 2 other holes on the right side and near the bottom. Now, you see inside the hole there is a little black tube sticking out? I used a flat head screw driver and pushed the side of the tube until I heard a click. The airbag visibly will come out a bit. Do this for the other 2 as well.
Next, removing the airbag is the same as the 2016:
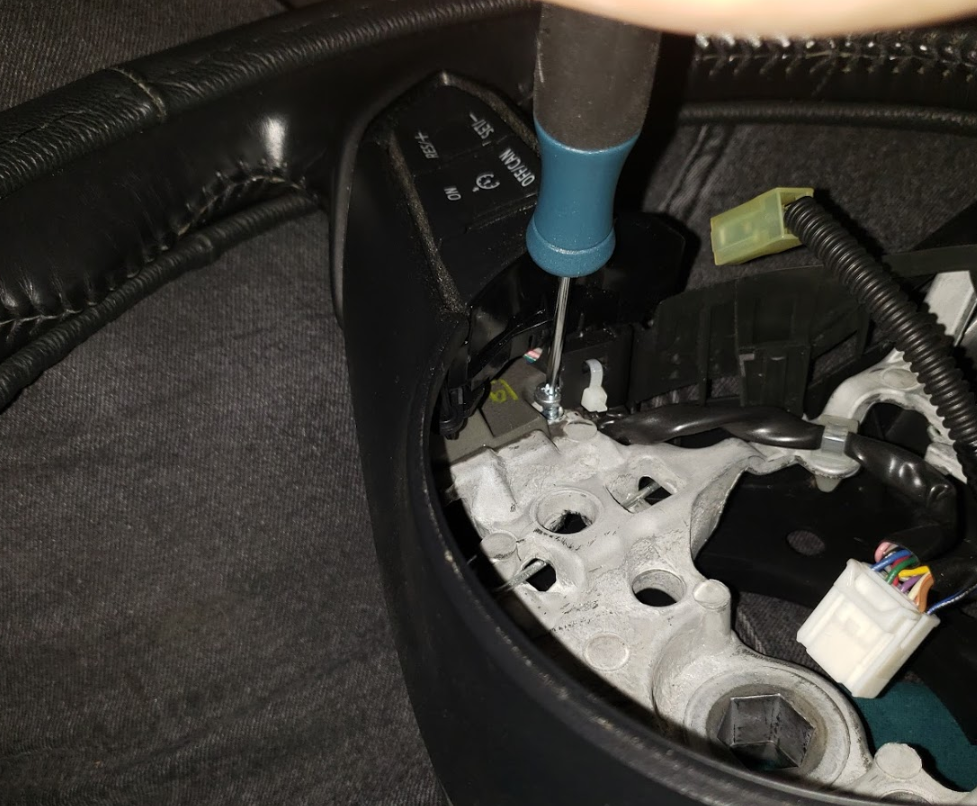
Then disconnect the white tab and remove the nut to take off the steering wheel. Let’s take a closer look at the steering wheel:
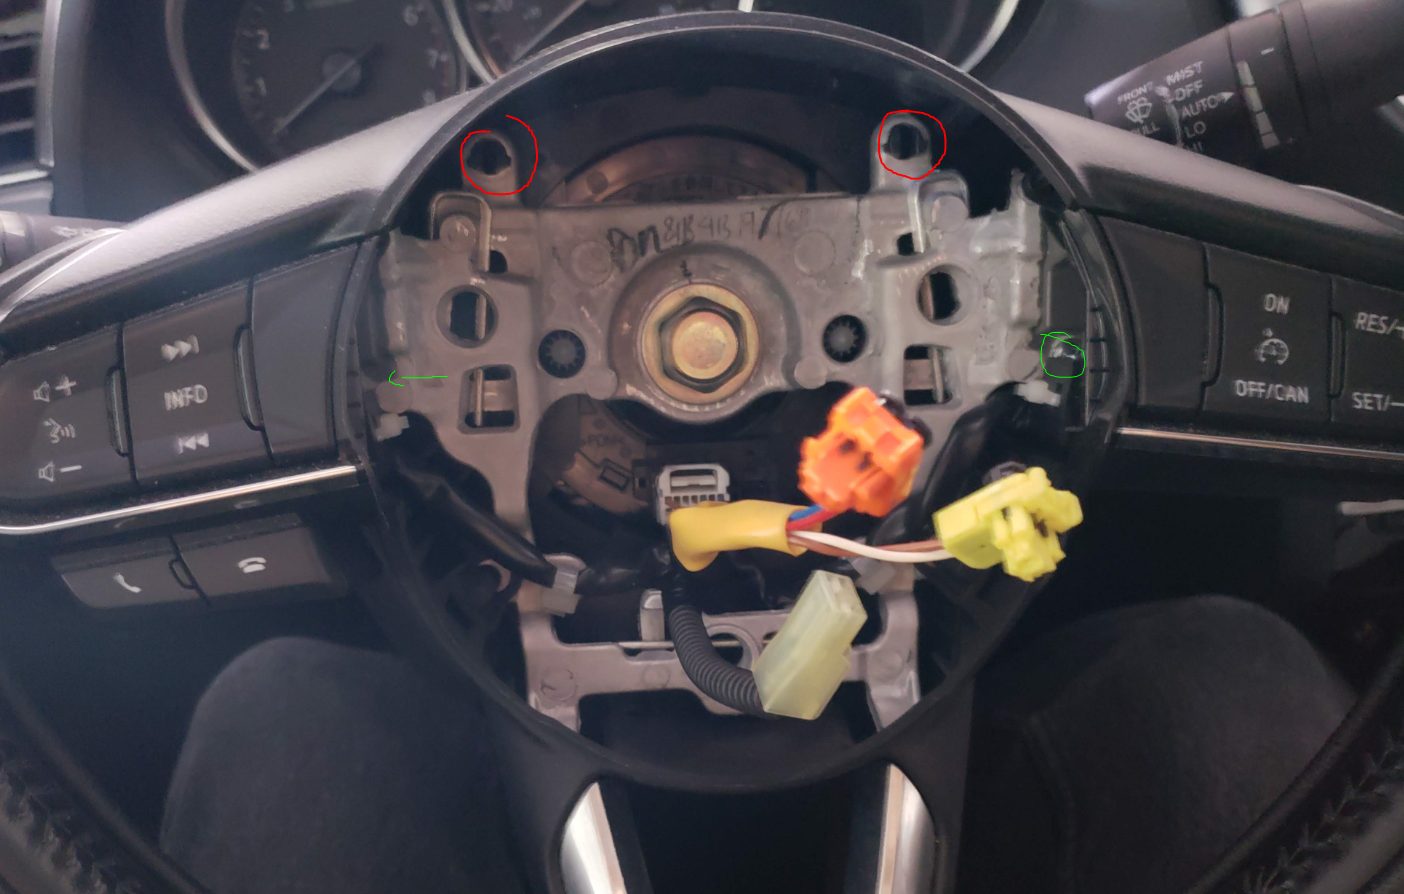
To take the rear cover off, the first thing to remove are the screws indicated in green. This is different from the 2016. They are kind of hard to get at so I used a small phillips screw driver. The screws seem to be put in quite loose so even though my screw driver was smaller than what’s intended for the screw, it untightened fairly easily.
The top red circles (2nd photo above from here) are the clips that you can press together and push out pretty much the same as the original guide.
So the noted difference here is that the 2017 rear cover has 2 clips + 2 screws, the 2016 cover has just the 4 clips, and the 2018 M3 cover has 4 tabs (not clips). There was a poster in the 2016 Guide thread talking about the 2018 Mazda 6 mentioned he needed to cut the 4 tabs to put his cover on. I’m assuming that means he got a 2016 cover for his car. I also bought a 2016 cover and it did NOT fit. It is not even the same shape for the 2017 steering wheel so I’m not sure how he got it on as there should definitely be some noticeable gaps. I’d recommend buying the 2018 Mazda3 rear cover. Way cheaper and fits perfectly from what I saw. Now that the rear cover is off, lets do the necessary modifications to the 2018 cover.
Remember the first step where we needed to take off the air bag? The 2018 3 rear cover does not have those holes so we need to drill them in case we want to take off the airbag again. I marked the holes in silver sharpie and drilled them to approximate size. No need to be exact; even bigger holes would be more convenient for future airbag removal. Next, we need to cut some tabs and structures inside the rear cover.
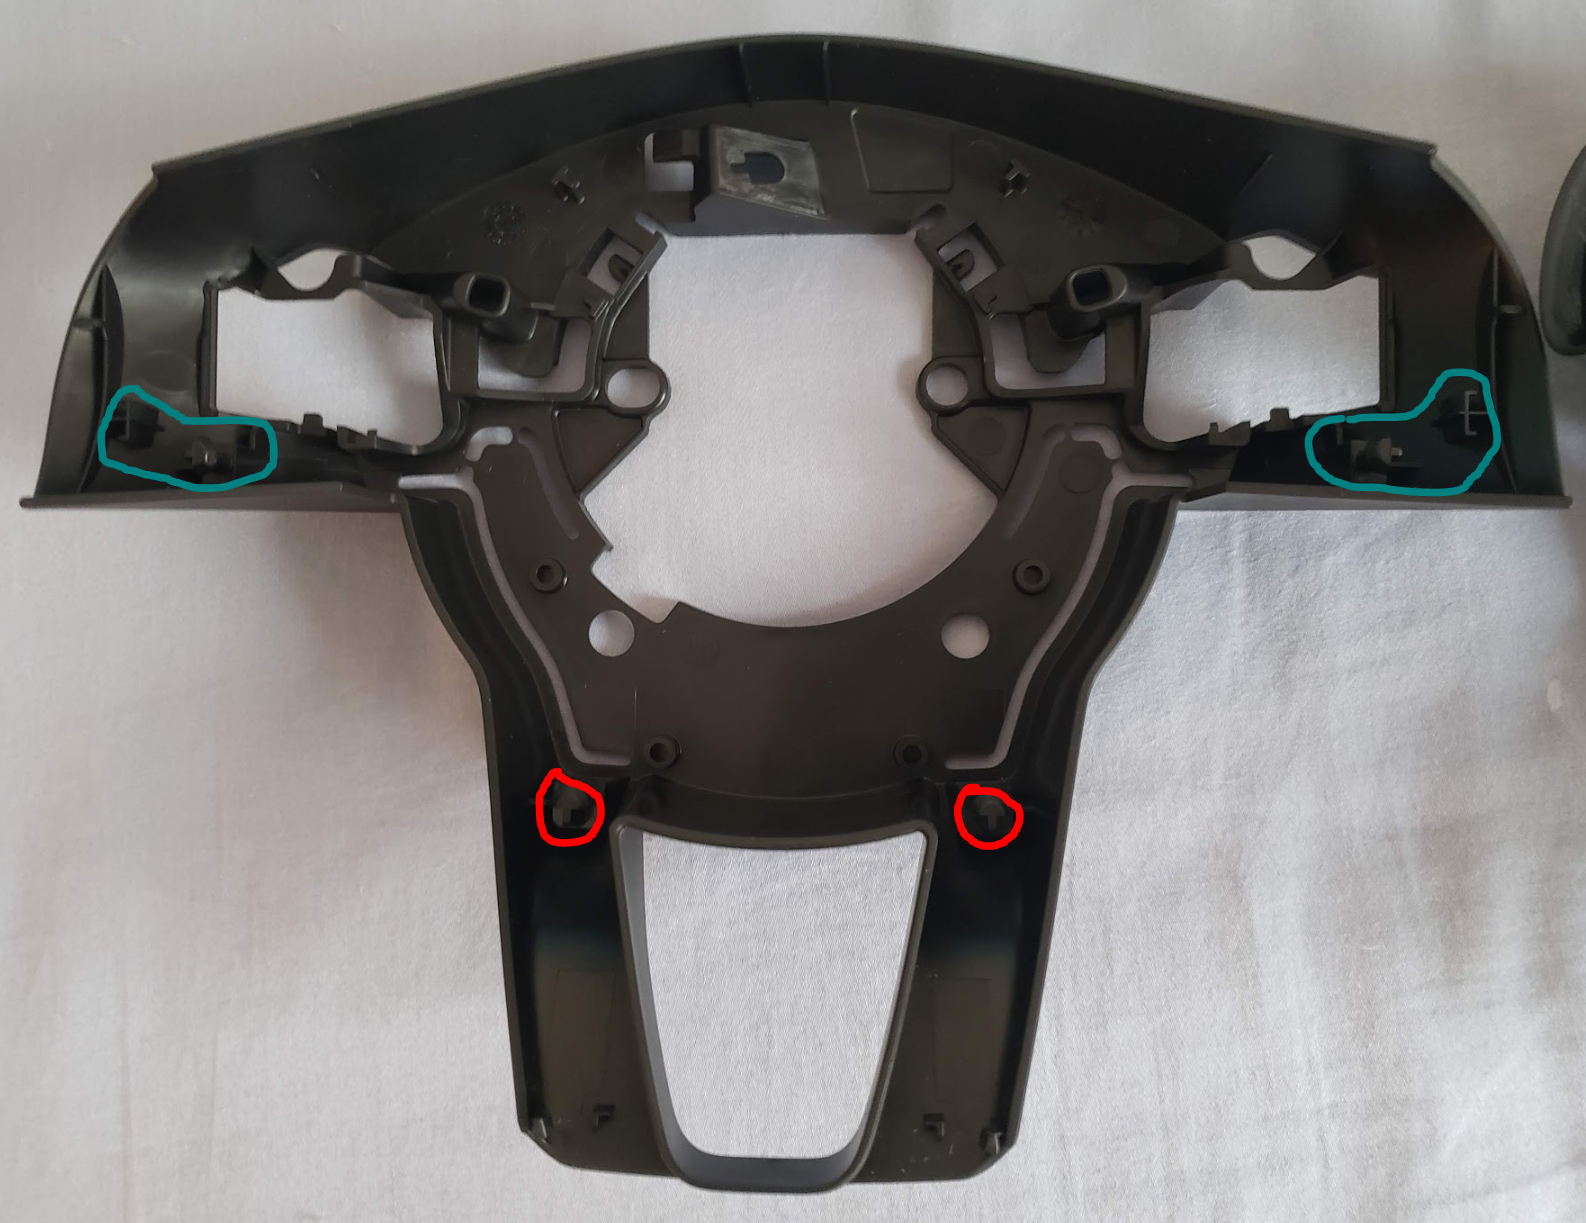
There are two tabs circled in red that need to be cut until the square base they sit on. The structures circled in teal include some other tabs and structures. Everything circled there I cut flush. All of these seemed to prevent the rear cover from fitting when you try to put it on.
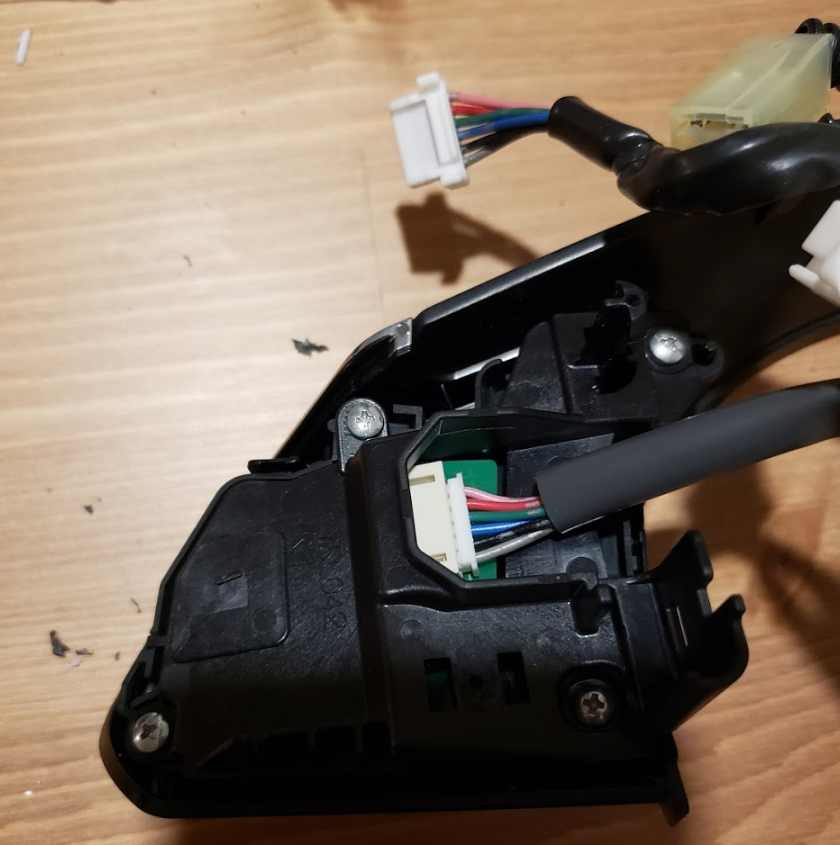
Next, accessing and removing the original wiring. In the 2016 guide you had to break two black tabs and take off some sort of internal rear cover that housed these plugs. In the 2017 car, there are 2 tabs but one is in a slightly different location. Also the plugs are connected to the back of the front control buttons.
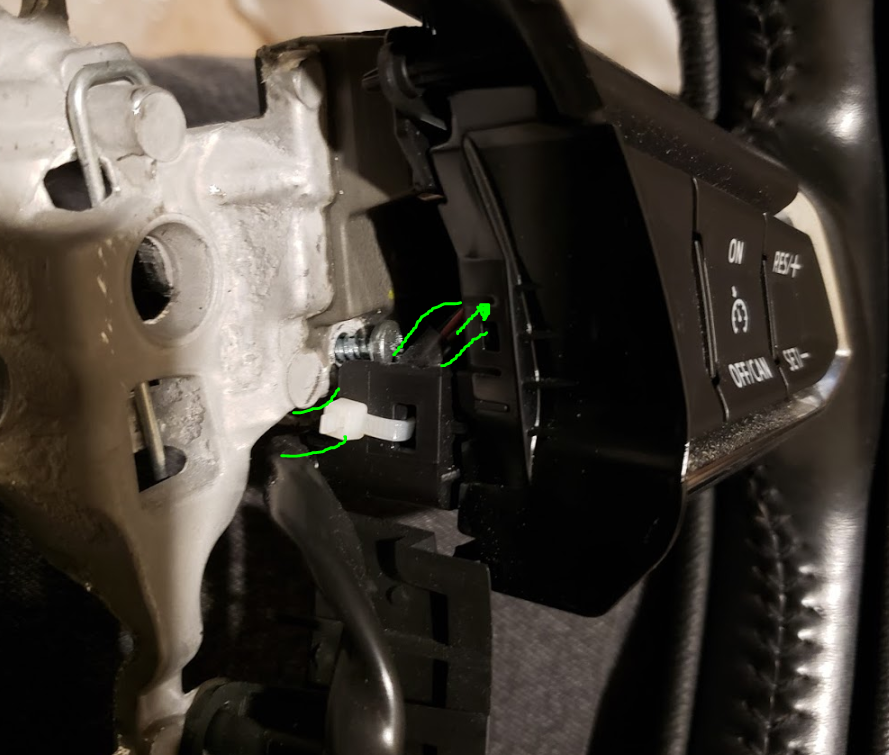
In the above picture I’m highlighting where the wiring goes. Breaking the tabs on the steering wheel will release the steering wheel controls just like the 2016 guide.
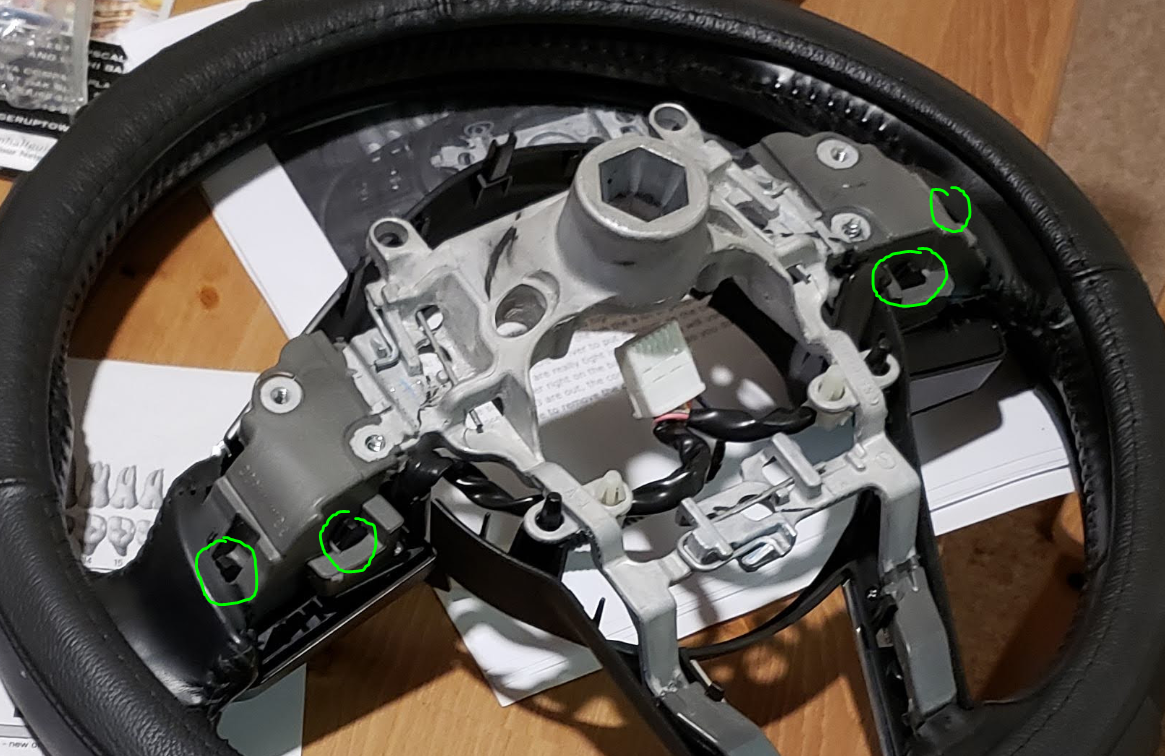
The two tabs on each side are located in the green circles above. One of them is slightly covered by the steering wheel fabric material but you can still get to it.
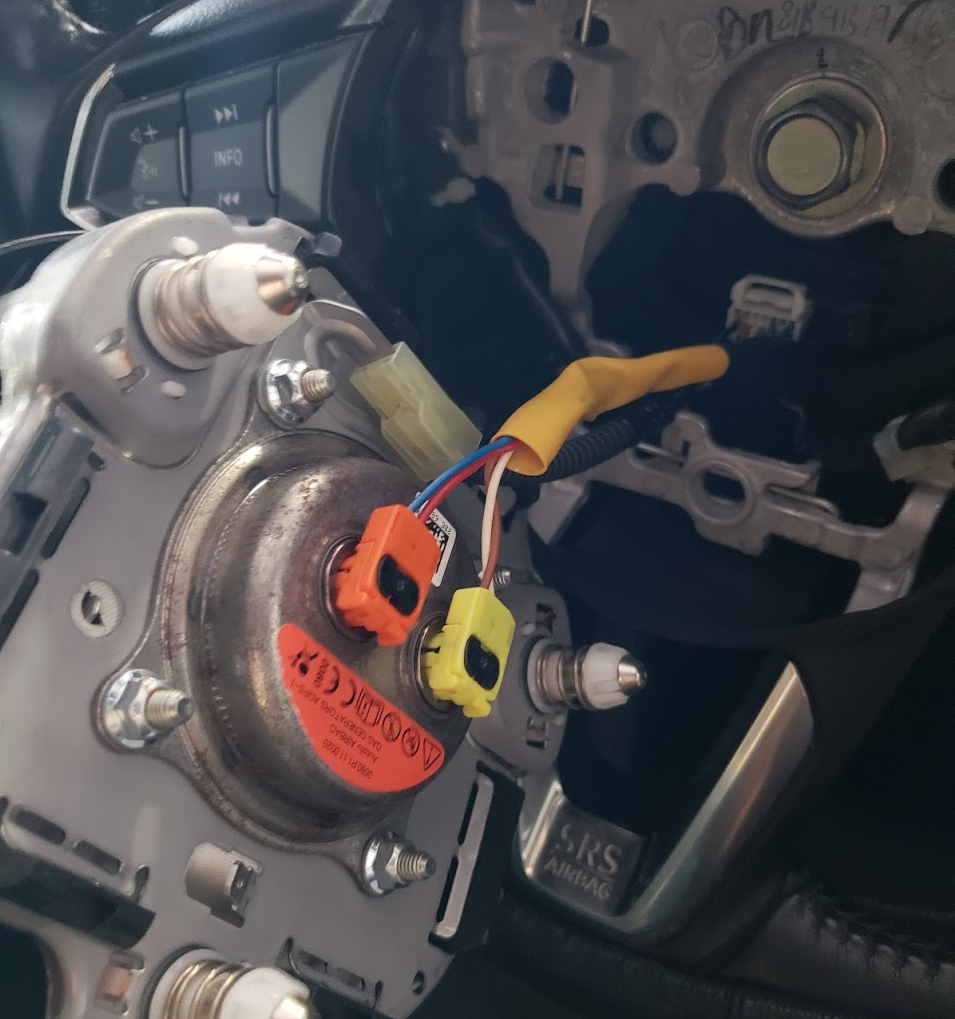
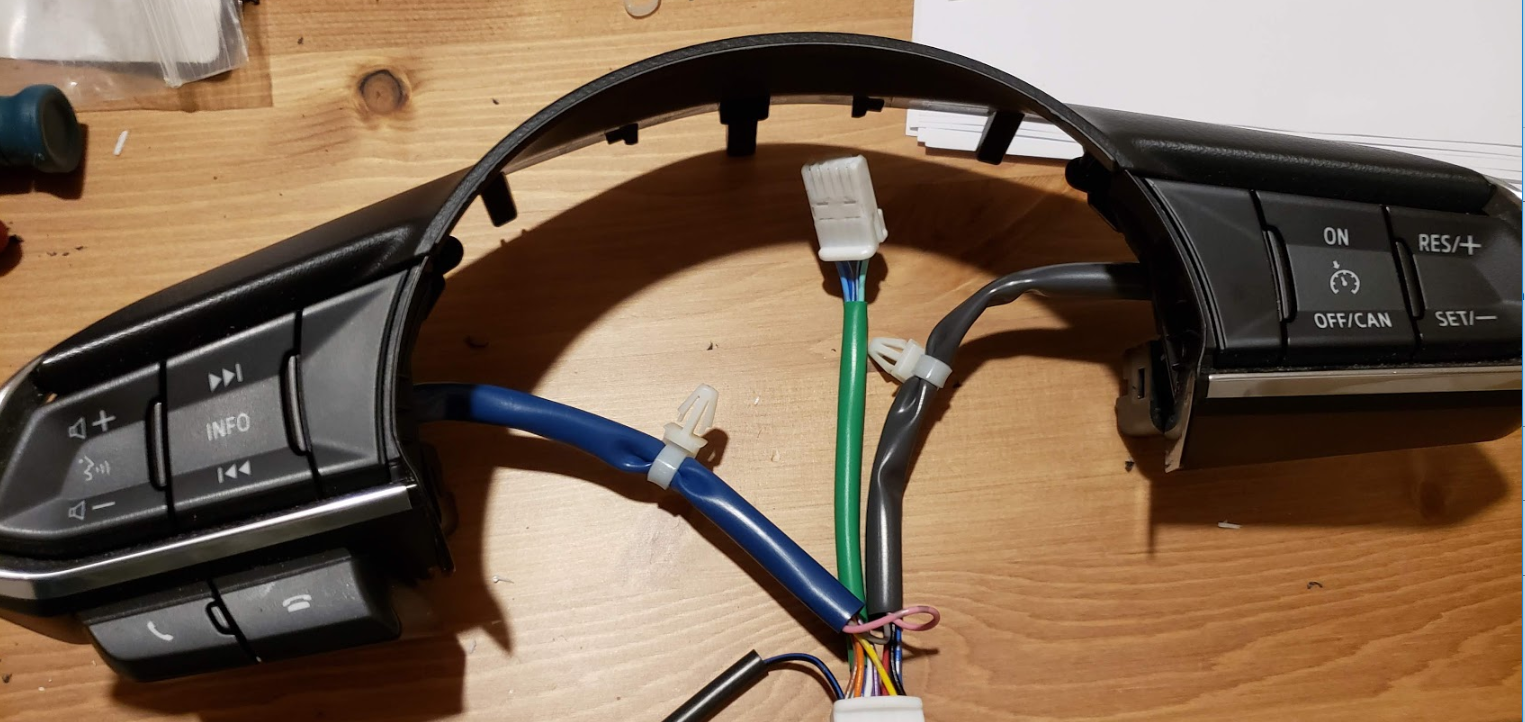
Note that this next picture is with the new wiring already installed. For the pre-installed 2017 wiring, both wires were black and not colored coded (as seen in the previous photo):
Now if we remove the wires and compare them we*ll notice that the plug design is not the same.
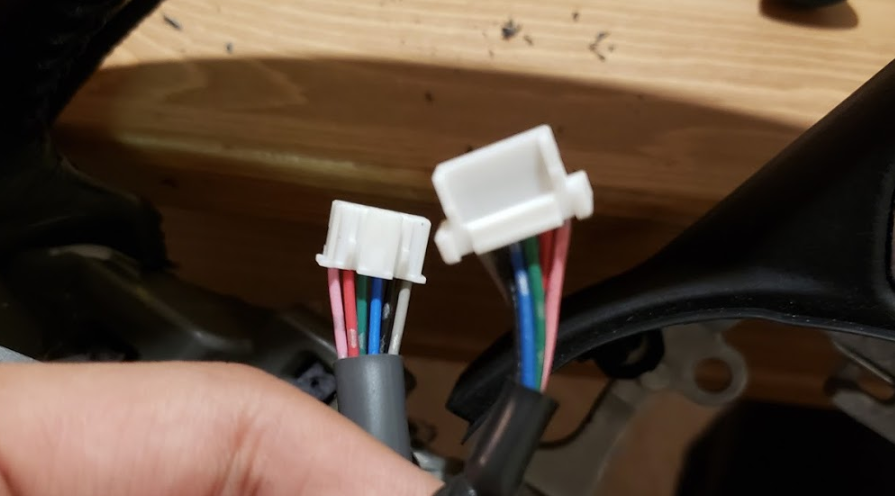
The black wire is the 2017 pre-installed wiring and the grey is the harness we want to install. The point here is the make careful note of the orientation of the wires as you unplug your original wires.
From this picture for example, the pink wire has to go on the top. If you compare the sequence of the colored wires in the main tab that inserts below the steering wheel nut, the colors are the same for both 2017 and 2016 wires. So these control plugs must be inserted with the same colored wires in the same sequence. Regardless of orientation, the plug does not fit as it is. So at this point I used flush cutters to cut any excess white tabs; I made the white plugs completely flush top and bottom. It takes quite a bit of force to insert these plugs all the way in so it doesn’t seem like it should fall out by itself. Do the same for the otherside and install the new wiring.
New wiring installed:
The next steps is just putting everything back together. Unfortunately I do not have any further photos as I wasn’t sure whether this would all work.
Also the green dots I put in the above picture are exactly where the tabs broke off. So you may want to put a little adhesive or double sided tape to secure the bottom of the controls onto the steering wheel.
Now installing the paddle shifters into the rear cover is easy enough. It is basically the same as the 2016 guide but I noticed in the 2018 M3 rear cover the paddle housing sort of snaps into place if you push it in. There*s a little pressure clip that helps you know its been properly placed. The 2016 cover does not seem to have this feature.
Then, put the rear cover onto the back of the steering wheel.
Using one of the previous photos, these holes will still be visible when you put on the rear cover and you can screw and secure the rear cover with the screws you purchased. Also, remember the two screws you took off at the front? Well these used to sit in one of these holes but from the otherside of the steering wheel. I opted to just screw it in from the back because the rear cover has the holes to do so.
Also, the original wires had these pointy white tabs that secured onto the steering wheel frame. I could not get the replacement wire tabs to fit properly so I just left them unattached (no picture unfortunately, below is a picture of the original wiring with circles on the white tabs I’m talking about).
Everything now is the same as the 2016 guide. Attach the green wire onto the appropriate hole in the rear cover and connect it with the paddle wiring. Then just put everything back together and you’re good to go. Double check all the controls on the steering wheel. I also checked real quick if the paddles worked before pushing the airbag in all the way again. You can shift between gears 1 and 2 while standing still and in drive but note you cannot go into gear 3 or higher until you reach higher speeds.
Final result:
I love the paddles. If you use manual mode 95% of your drive like I do then I highly recommend doing this. The only convenience it adds is the downshifting. Two quick presses of your fingers instead of pushing the whole shifter up twice is a lot faster. Otherwise it has made the car a lot more fun to drive mostly at the expense of fuel efficiency.
Parts I purchased:
The following are the same as 2016 Guide:
- Wiring (BNK8-66-4M2) * Note that this is not made for our 2017 car. The plastic tabs require cutting so that it fits but the electrical wiring itself seems the same. (elaborated later on)
- Paddle Shifters (BHT1-66-3P0) * These fit perfectly
- Bolts (http://www.homedepot.com/p/Everbilt...-Steel-Machine-Screw-3-Piece-814391/204274805) * I just followed the link in the 2016 guide and it worked perfectly fine
The rear cover was the tough one. I ended up purchasing an incorrectly described 2017 part, the 2016 part, and finally the following Mazda3 2018 rear cover.
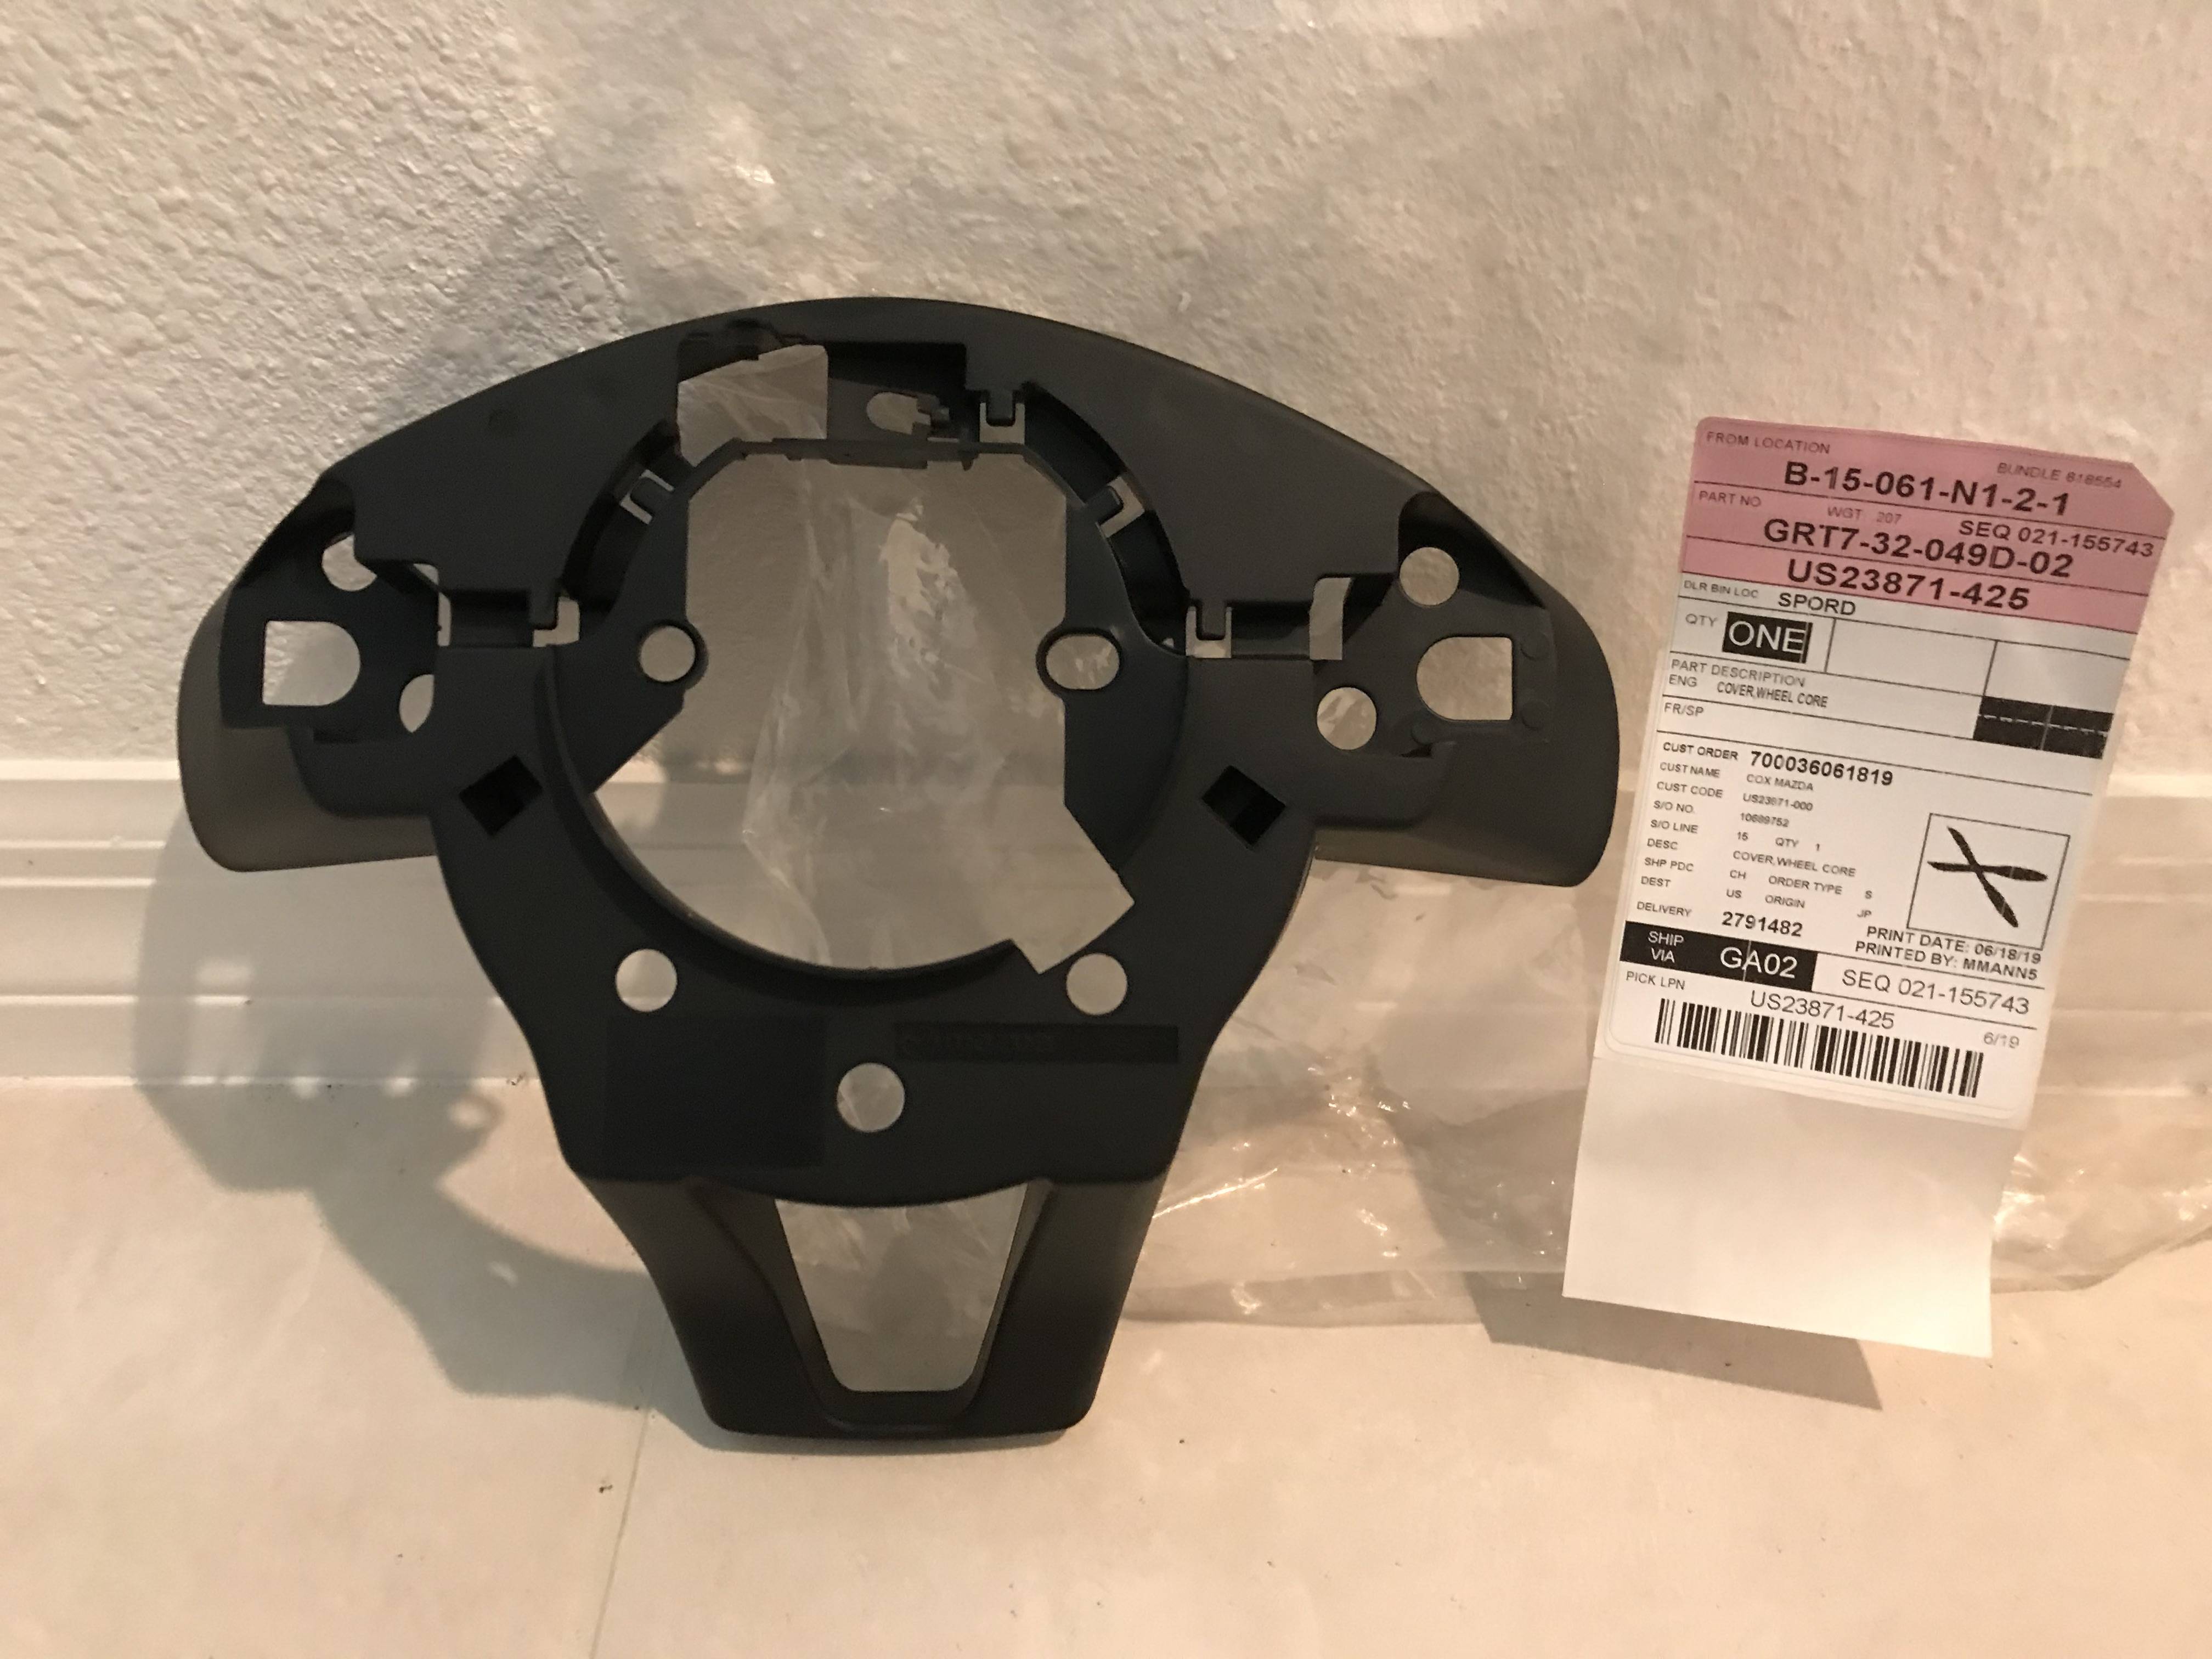
- Rear Cover (B64E-32-049-02) - https://www.tascaparts.com/oem-parts/mazda-rear-cover-b64e3204902
- The rear cover above is for the 2018 Mazda3 and thus requires some modification (just cutting) to fit the 2017 Mazda6. The cover itself is the exact shape and size required, but the Mazda3 uses different mounting points for the clips. I could not find the correct part for the 2017 Mazda 6. If you stumbled across part GRT7-32-049D-02 it is the WRONG part. Even though it says w/ paddle shifter it is just the regular cover and does not accommodate paddle shifters. I contacted MazdaUSA and their parts team *confirmed* that GRT7-32-049D-02 is the correct part to accommodate paddle shifters. So basically MazdaUSA does not even know what is the correct rear cover for the 2017 6. The reason I bought the 2018 M3 rear cover is that was when the M3 was updated to the new steering wheel style. So I was hoping it had the same shape for the rear cover and sure enough it does.
- 5in Flush cutters - https://www.homedepot.com/p/Klein-Tools-5-in-Light-Weight-Flush-Cutter-D2755/100647983 - I used this to cut the rear cover and wireharness tabs. This was really handy and I definitely recommend picking one up if you don*t already have flush cutters.
There are quite a few differences. For completeness I will briefly mention all the steps even if they’re similar to the 2016. I will emphasize when a step differs. A previous poster mentioned he did this to a 2018 Mazda 6 so I will elaborate on the points he mentioned. To take off the steering wheel there are holes on the sides of the steering wheel instead of the back. So you don’t have to turn your steering wheel all the way to see the holes. Here is the left side hole for example:
There are 2 other holes on the right side and near the bottom. Now, you see inside the hole there is a little black tube sticking out? I used a flat head screw driver and pushed the side of the tube until I heard a click. The airbag visibly will come out a bit. Do this for the other 2 as well.
Next, removing the airbag is the same as the 2016:
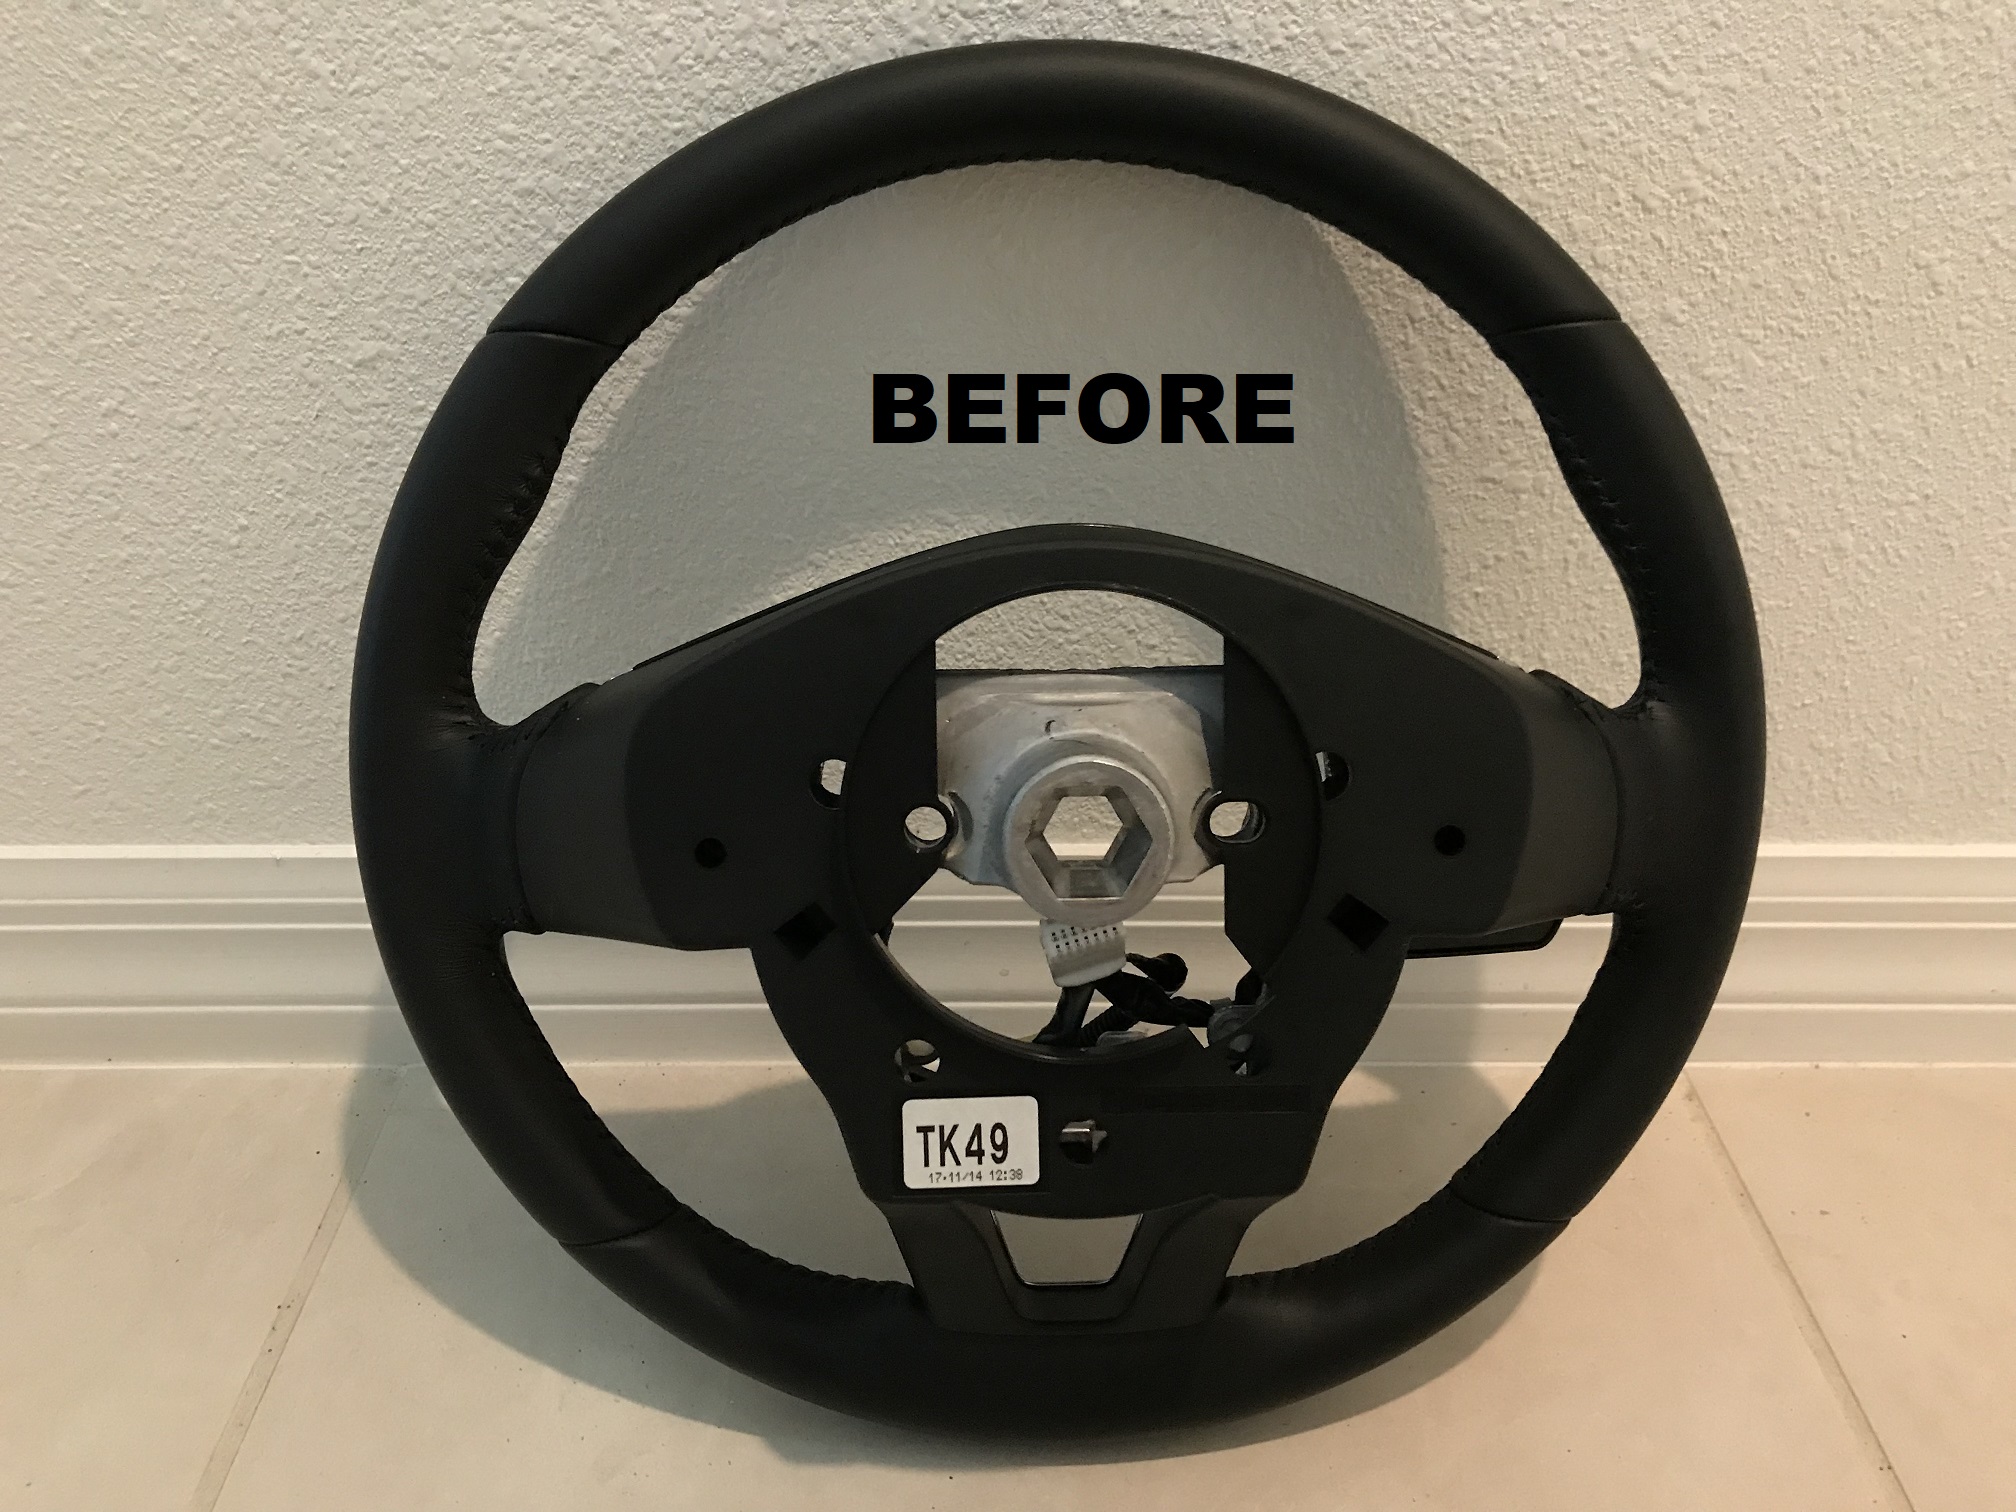
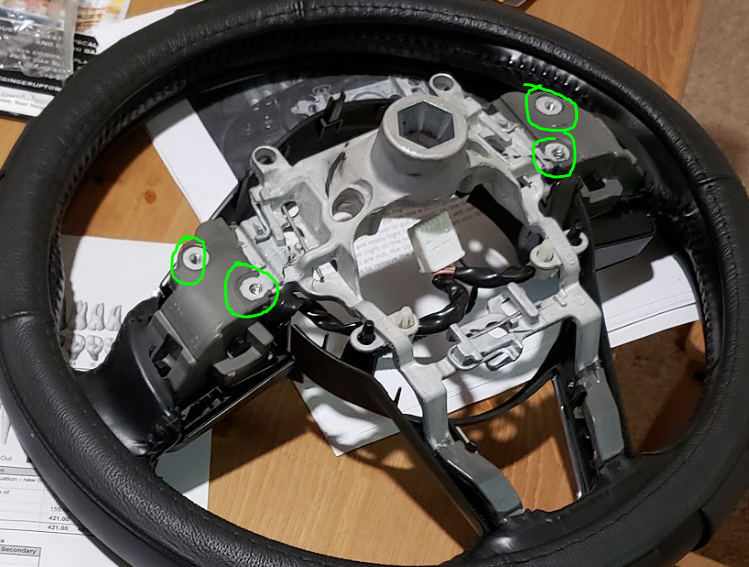
Then disconnect the white tab and remove the nut to take off the steering wheel. Let’s take a closer look at the steering wheel:
To take the rear cover off, the first thing to remove are the screws indicated in green. This is different from the 2016. They are kind of hard to get at so I used a small phillips screw driver. The screws seem to be put in quite loose so even though my screw driver was smaller than what’s intended for the screw, it untightened fairly easily.
The top red circles (2nd photo above from here) are the clips that you can press together and push out pretty much the same as the original guide.
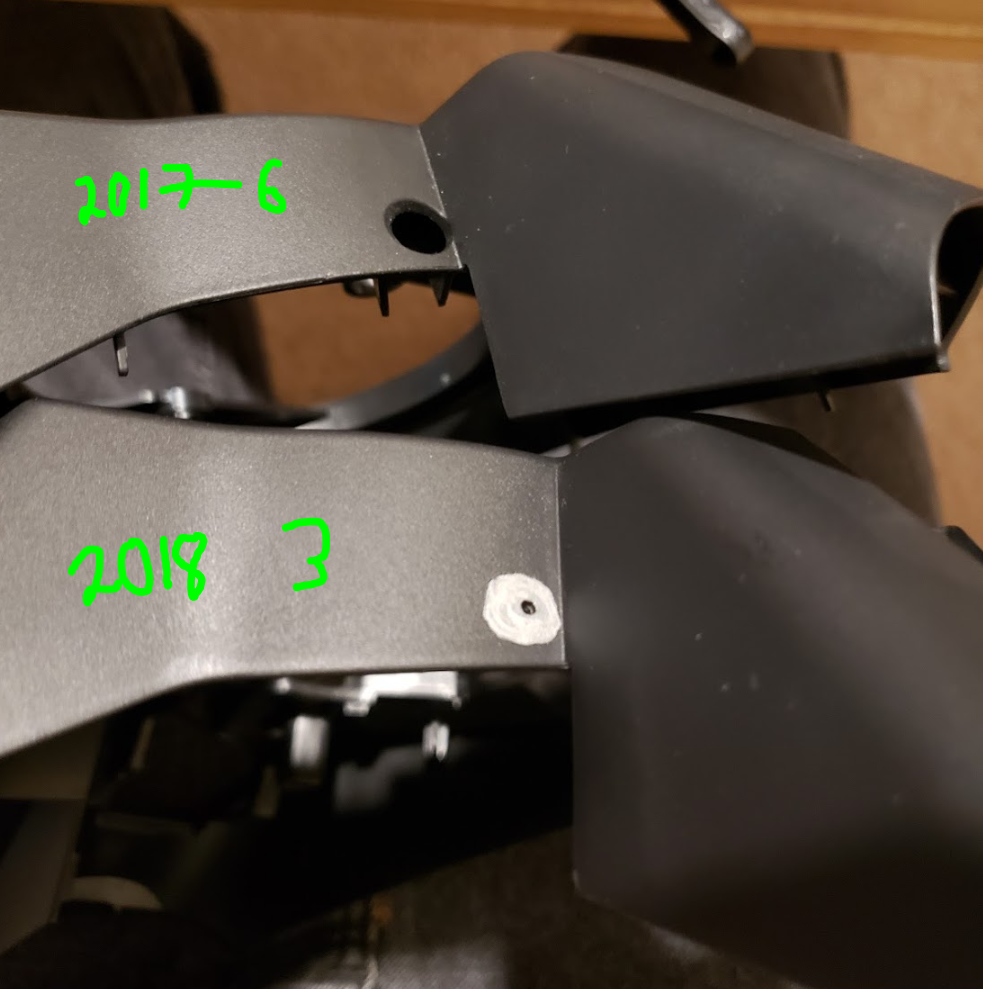
So the noted difference here is that the 2017 rear cover has 2 clips + 2 screws, the 2016 cover has just the 4 clips, and the 2018 M3 cover has 4 tabs (not clips). There was a poster in the 2016 Guide thread talking about the 2018 Mazda 6 mentioned he needed to cut the 4 tabs to put his cover on. I’m assuming that means he got a 2016 cover for his car. I also bought a 2016 cover and it did NOT fit. It is not even the same shape for the 2017 steering wheel so I’m not sure how he got it on as there should definitely be some noticeable gaps. I’d recommend buying the 2018 Mazda3 rear cover. Way cheaper and fits perfectly from what I saw. Now that the rear cover is off, lets do the necessary modifications to the 2018 cover.
Remember the first step where we needed to take off the air bag? The 2018 3 rear cover does not have those holes so we need to drill them in case we want to take off the airbag again. I marked the holes in silver sharpie and drilled them to approximate size. No need to be exact; even bigger holes would be more convenient for future airbag removal. Next, we need to cut some tabs and structures inside the rear cover.
There are two tabs circled in red that need to be cut until the square base they sit on. The structures circled in teal include some other tabs and structures. Everything circled there I cut flush. All of these seemed to prevent the rear cover from fitting when you try to put it on.
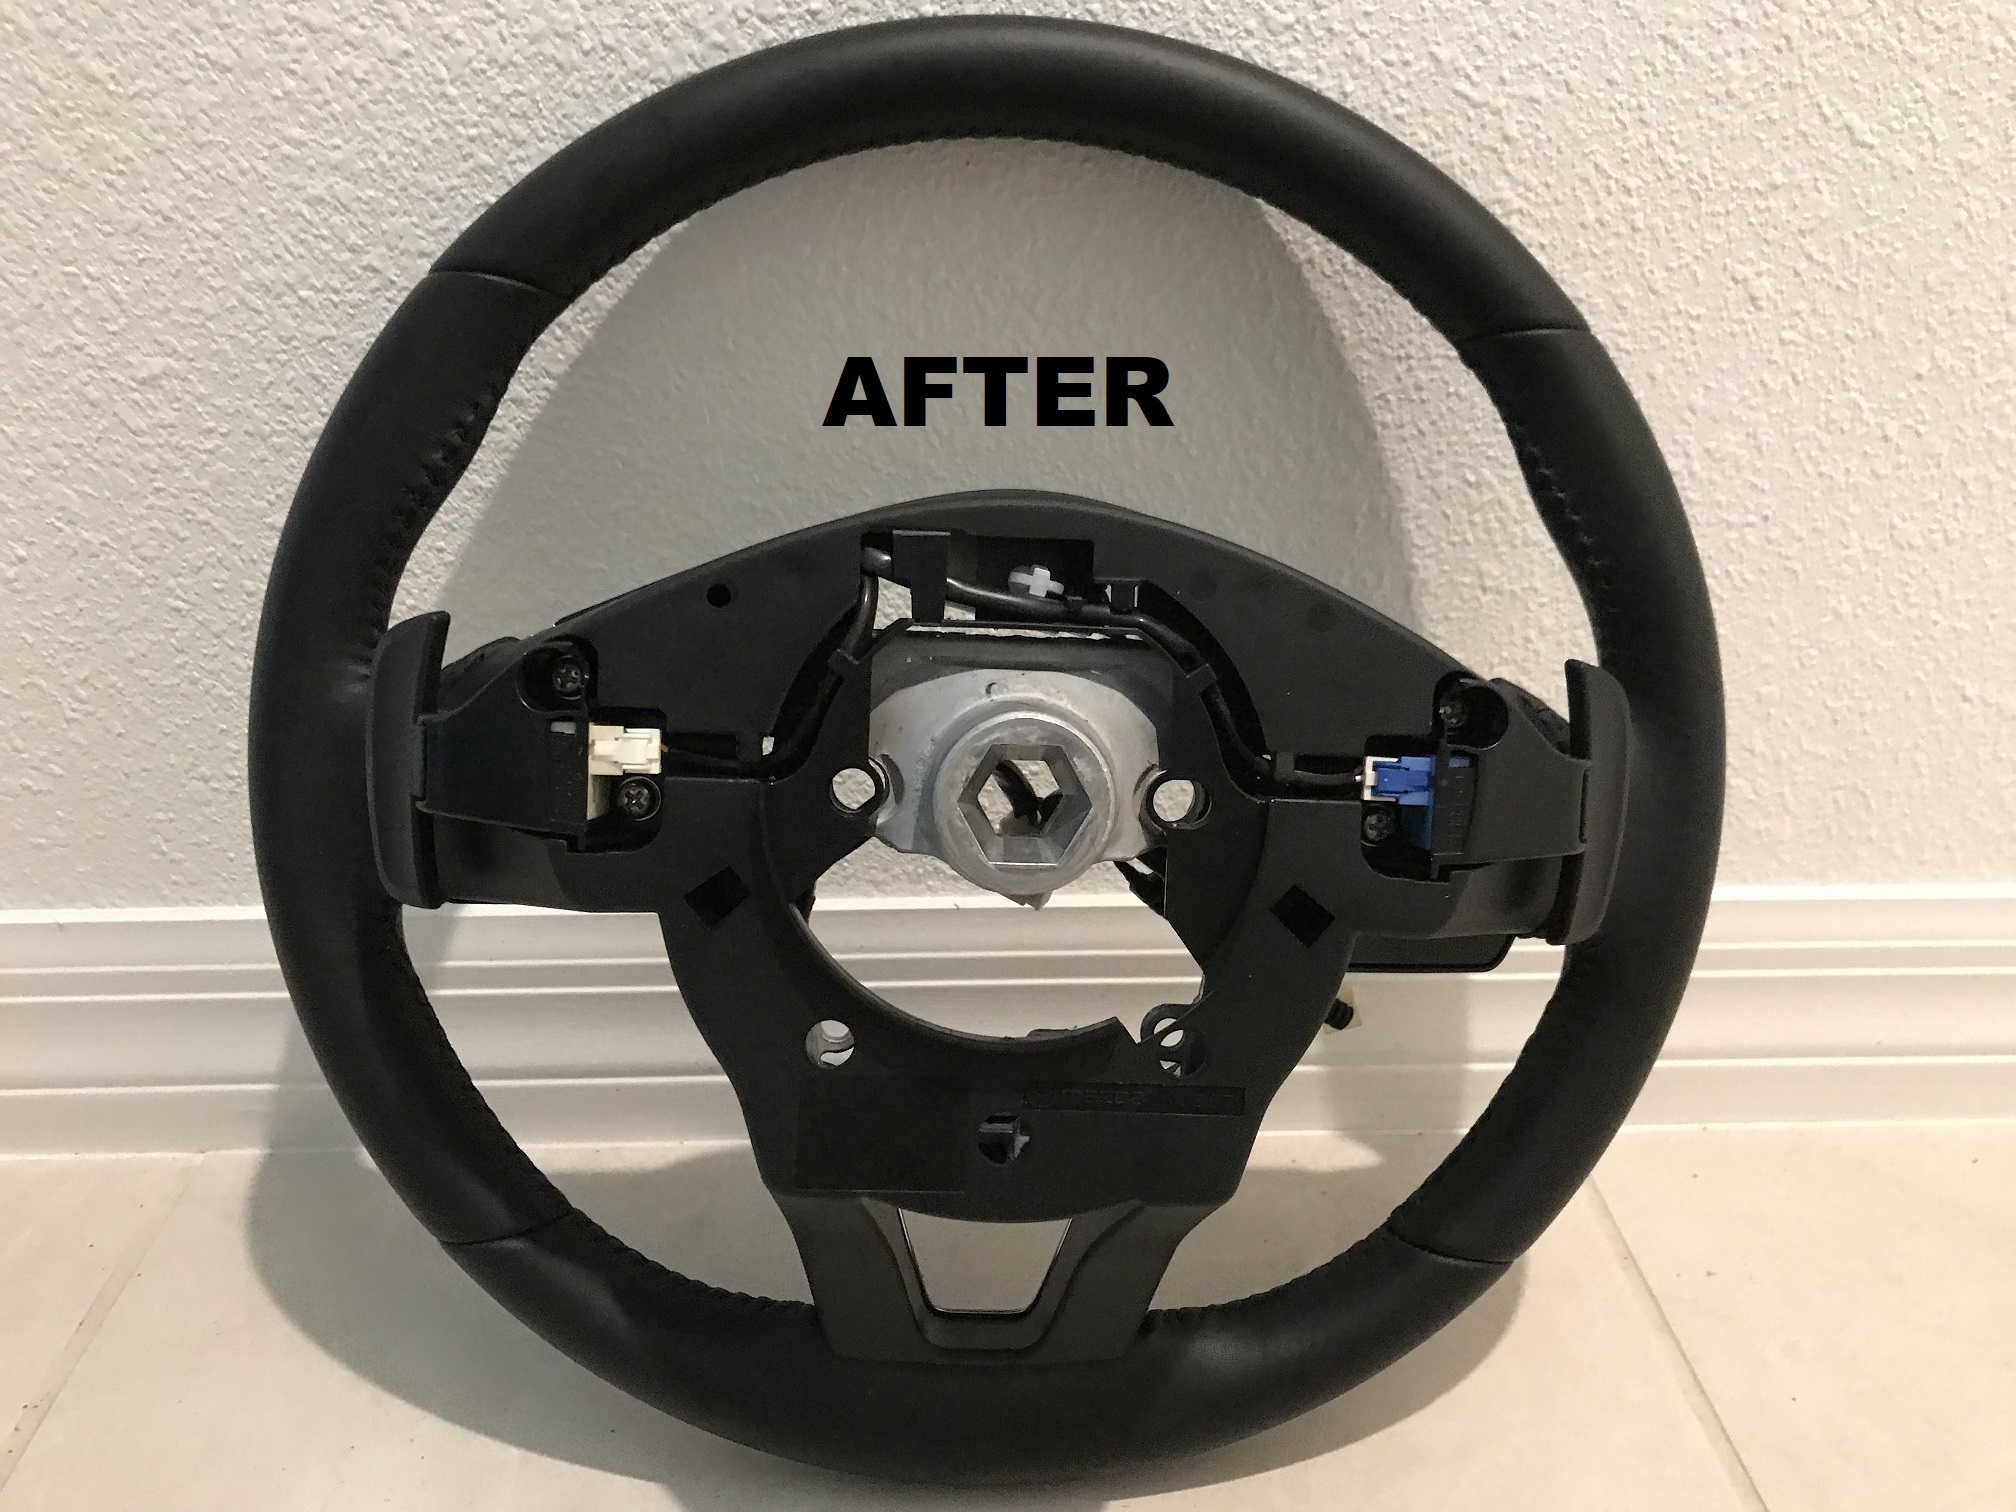
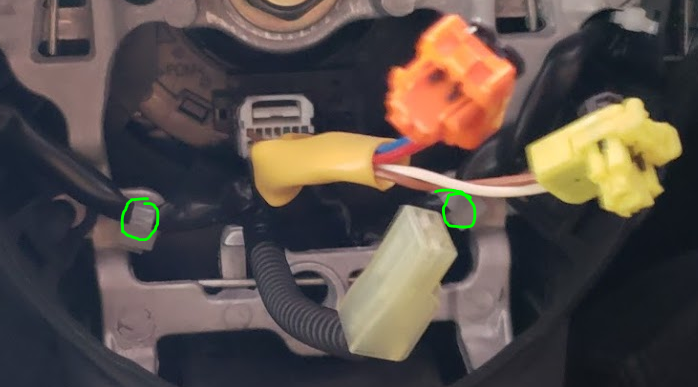
Next, accessing and removing the original wiring. In the 2016 guide you had to break two black tabs and take off some sort of internal rear cover that housed these plugs. In the 2017 car, there are 2 tabs but one is in a slightly different location. Also the plugs are connected to the back of the front control buttons.
In the above picture I’m highlighting where the wiring goes. Breaking the tabs on the steering wheel will release the steering wheel controls just like the 2016 guide.
The two tabs on each side are located in the green circles above. One of them is slightly covered by the steering wheel fabric material but you can still get to it.
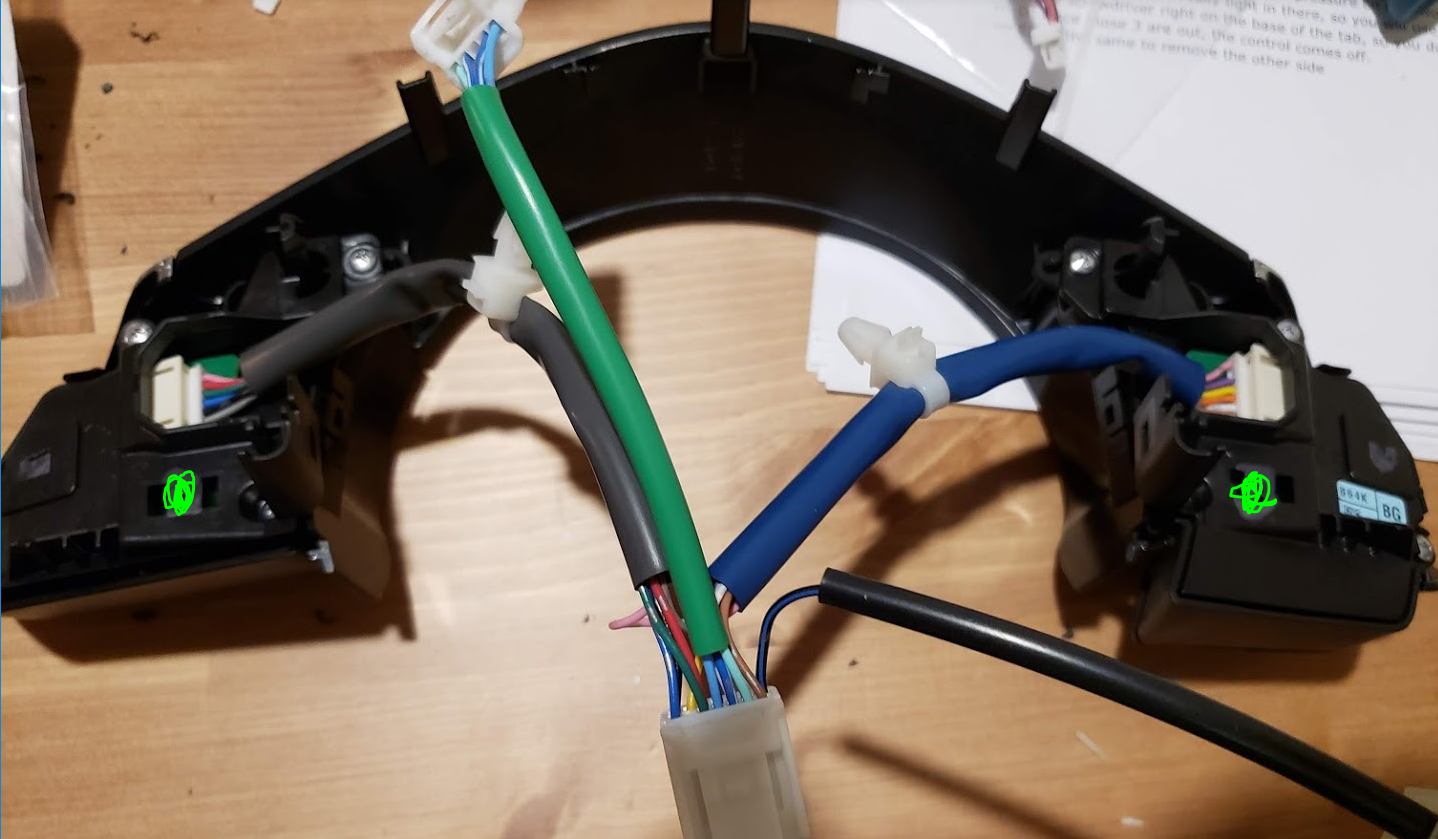
Note that this next picture is with the new wiring already installed. For the pre-installed 2017 wiring, both wires were black and not colored coded (as seen in the previous photo):
Now if we remove the wires and compare them we*ll notice that the plug design is not the same.
The black wire is the 2017 pre-installed wiring and the grey is the harness we want to install. The point here is the make careful note of the orientation of the wires as you unplug your original wires.
From this picture for example, the pink wire has to go on the top. If you compare the sequence of the colored wires in the main tab that inserts below the steering wheel nut, the colors are the same for both 2017 and 2016 wires. So these control plugs must be inserted with the same colored wires in the same sequence. Regardless of orientation, the plug does not fit as it is. So at this point I used flush cutters to cut any excess white tabs; I made the white plugs completely flush top and bottom. It takes quite a bit of force to insert these plugs all the way in so it doesn’t seem like it should fall out by itself. Do the same for the otherside and install the new wiring.
New wiring installed:
The next steps is just putting everything back together. Unfortunately I do not have any further photos as I wasn’t sure whether this would all work.
Also the green dots I put in the above picture are exactly where the tabs broke off. So you may want to put a little adhesive or double sided tape to secure the bottom of the controls onto the steering wheel.
Now installing the paddle shifters into the rear cover is easy enough. It is basically the same as the 2016 guide but I noticed in the 2018 M3 rear cover the paddle housing sort of snaps into place if you push it in. There*s a little pressure clip that helps you know its been properly placed. The 2016 cover does not seem to have this feature.
Then, put the rear cover onto the back of the steering wheel.
Using one of the previous photos, these holes will still be visible when you put on the rear cover and you can screw and secure the rear cover with the screws you purchased. Also, remember the two screws you took off at the front? Well these used to sit in one of these holes but from the otherside of the steering wheel. I opted to just screw it in from the back because the rear cover has the holes to do so.
Also, the original wires had these pointy white tabs that secured onto the steering wheel frame. I could not get the replacement wire tabs to fit properly so I just left them unattached (no picture unfortunately, below is a picture of the original wiring with circles on the white tabs I’m talking about).
Everything now is the same as the 2016 guide. Attach the green wire onto the appropriate hole in the rear cover and connect it with the paddle wiring. Then just put everything back together and you’re good to go. Double check all the controls on the steering wheel. I also checked real quick if the paddles worked before pushing the airbag in all the way again. You can shift between gears 1 and 2 while standing still and in drive but note you cannot go into gear 3 or higher until you reach higher speeds.
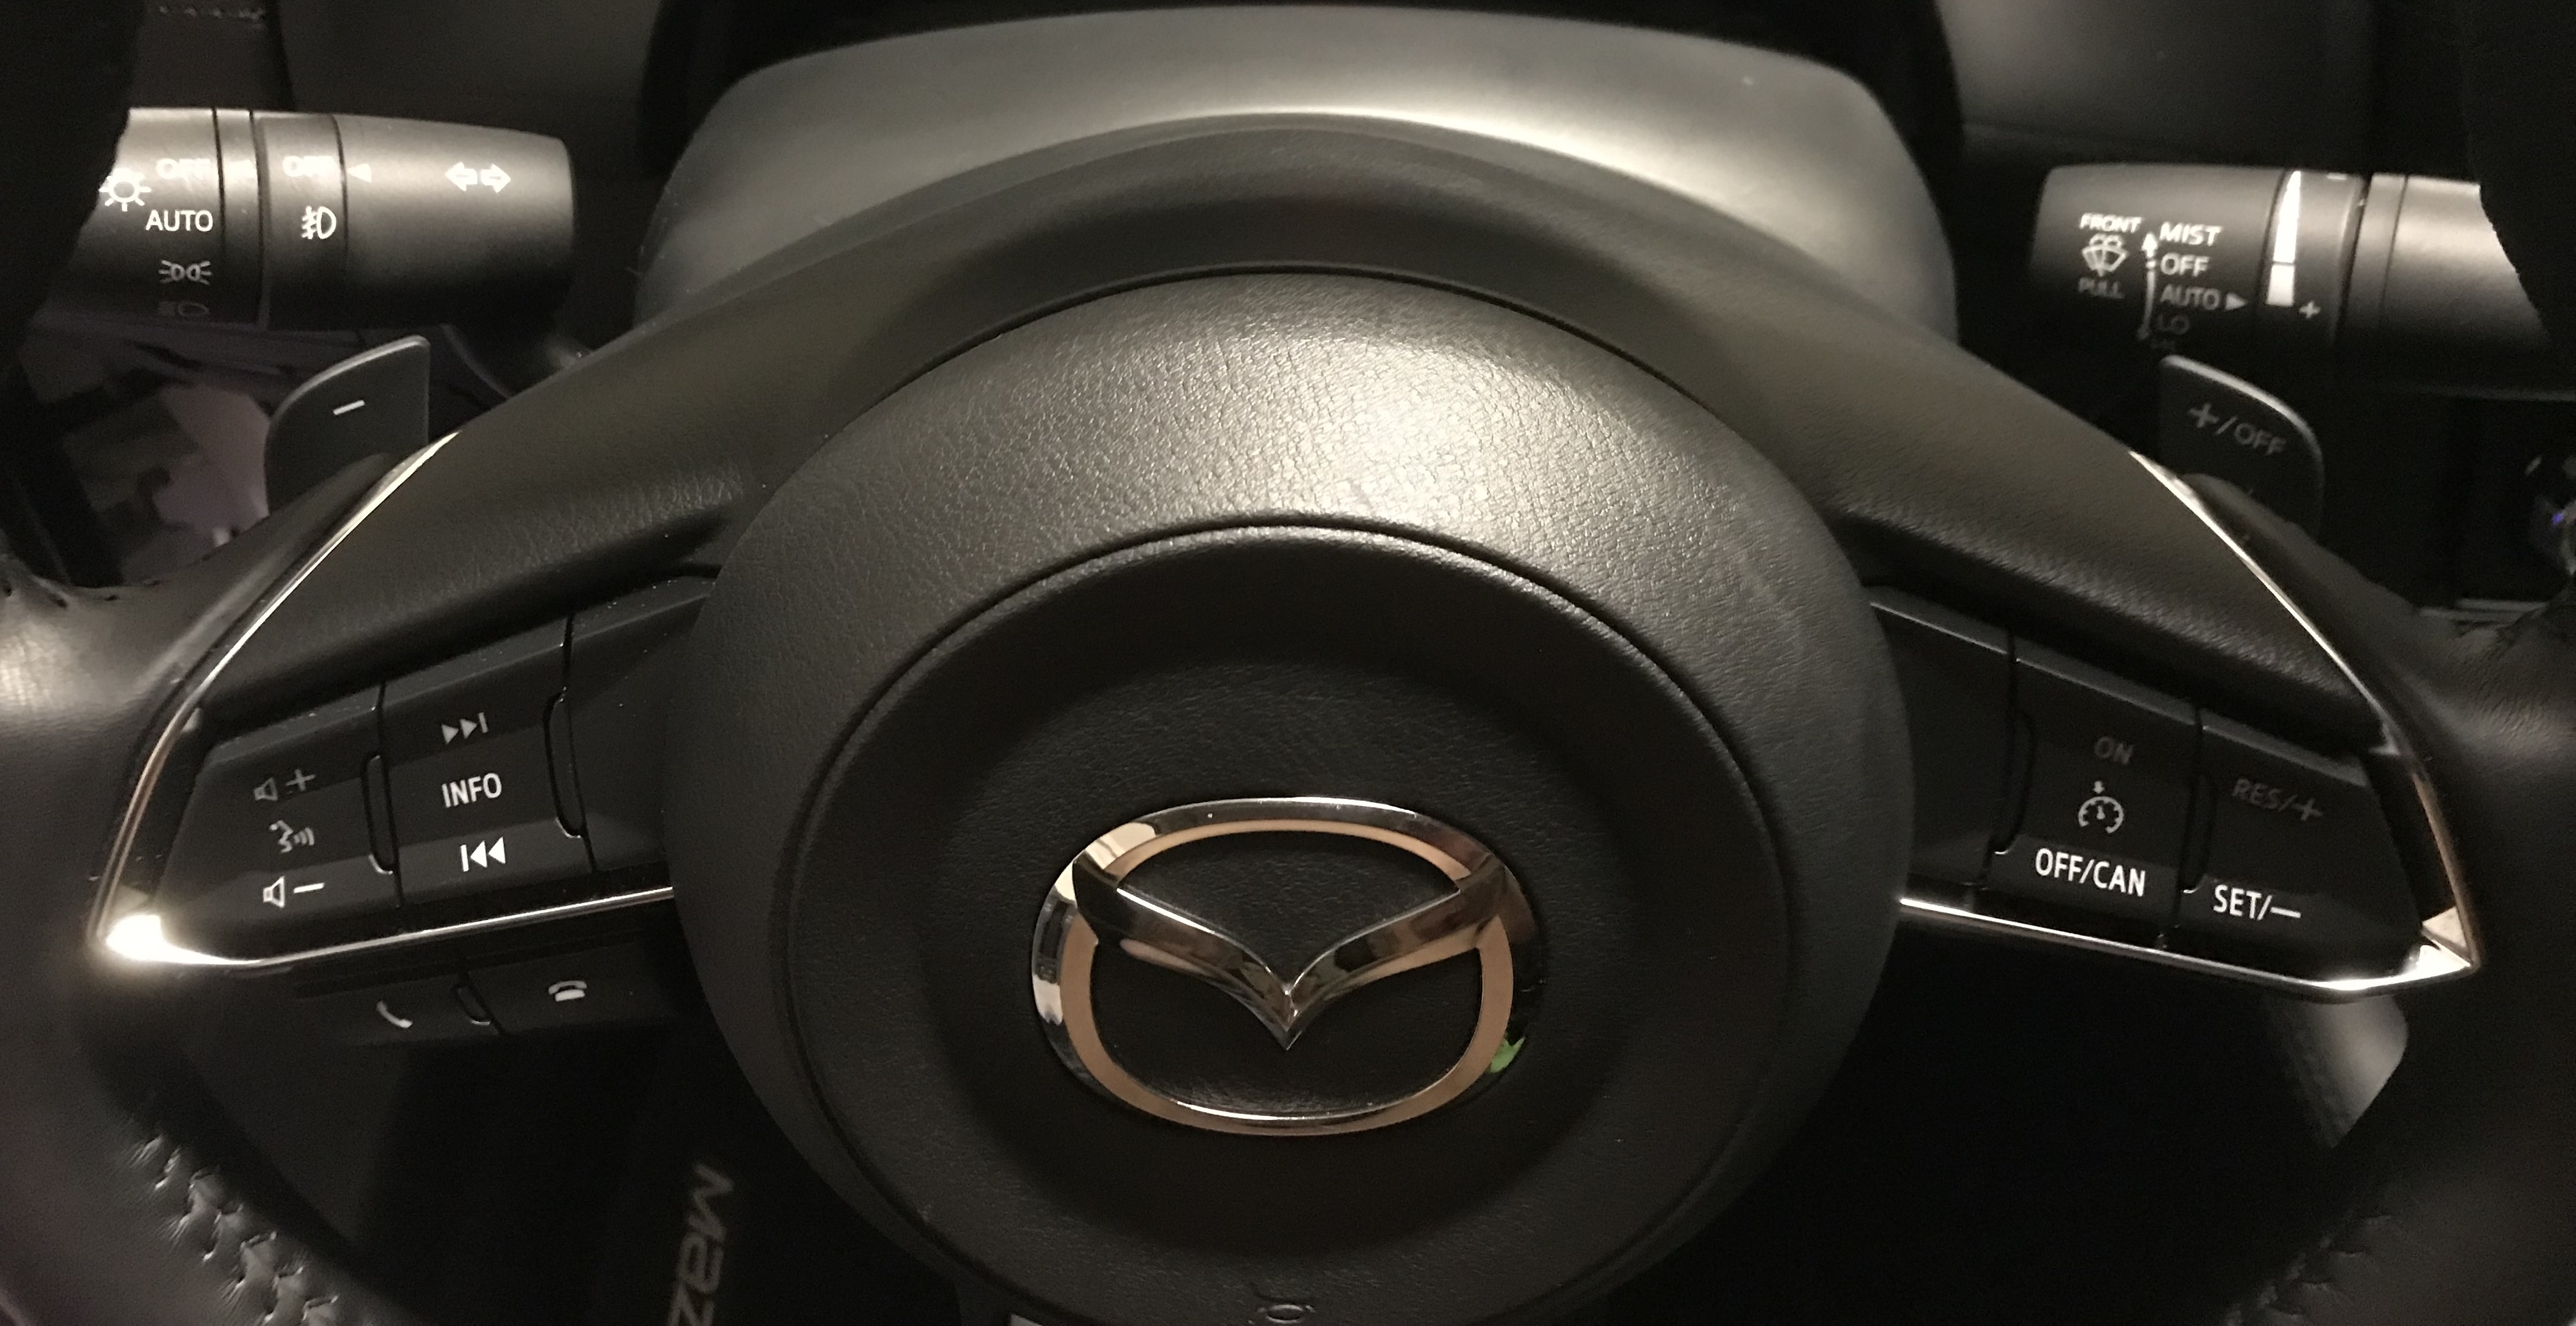
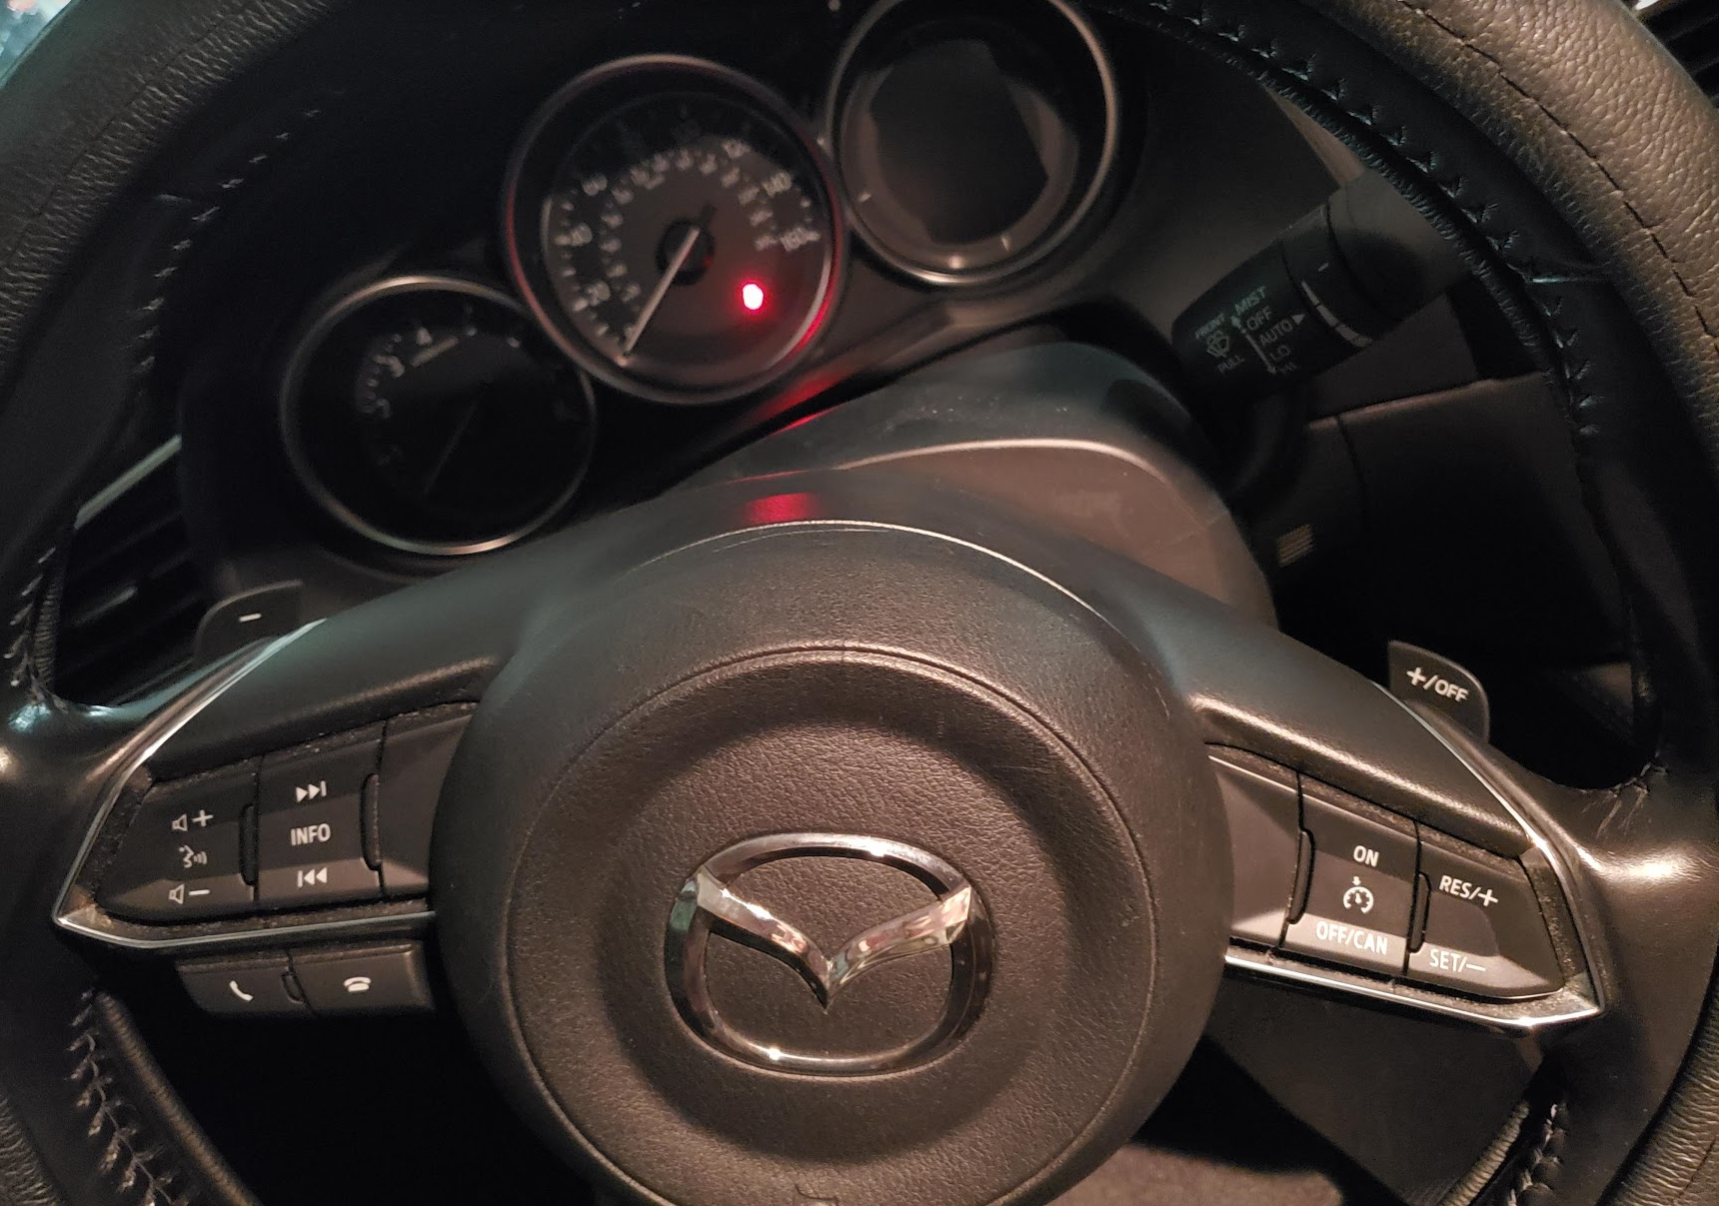
Final result:
I love the paddles. If you use manual mode 95% of your drive like I do then I highly recommend doing this. The only convenience it adds is the downshifting. Two quick presses of your fingers instead of pushing the whole shifter up twice is a lot faster. Otherwise it has made the car a lot more fun to drive mostly at the expense of fuel efficiency.