
Howdy folks,
This is the installation how to for the Gentek GenK45A mirror; similar models will probably work the same way. I got mine from eBay through XXXXX; you can probably ask him for the Mazdaspeed setup like he did for the guy in Pasadena (me), and he should be able to set you up.
Tools: a small torx wrench (for the mirror screw), wire cutters, zip ties, pliers to crimp the wire taps, small thin screwdriver, possibly something to pry trim off (though I got it all off by hand).
You will need the wire harness, some wire taps, and a mirror cable cover. I got my mirror online at eBay from this vendor; he included everything I needed for the installation, and was a good dealer. You should be able to tell him that you want the same setup for a Mazdaspeed 6 that the guy in Pasadena ordered and get what I have, or something similar.
So, here we go!
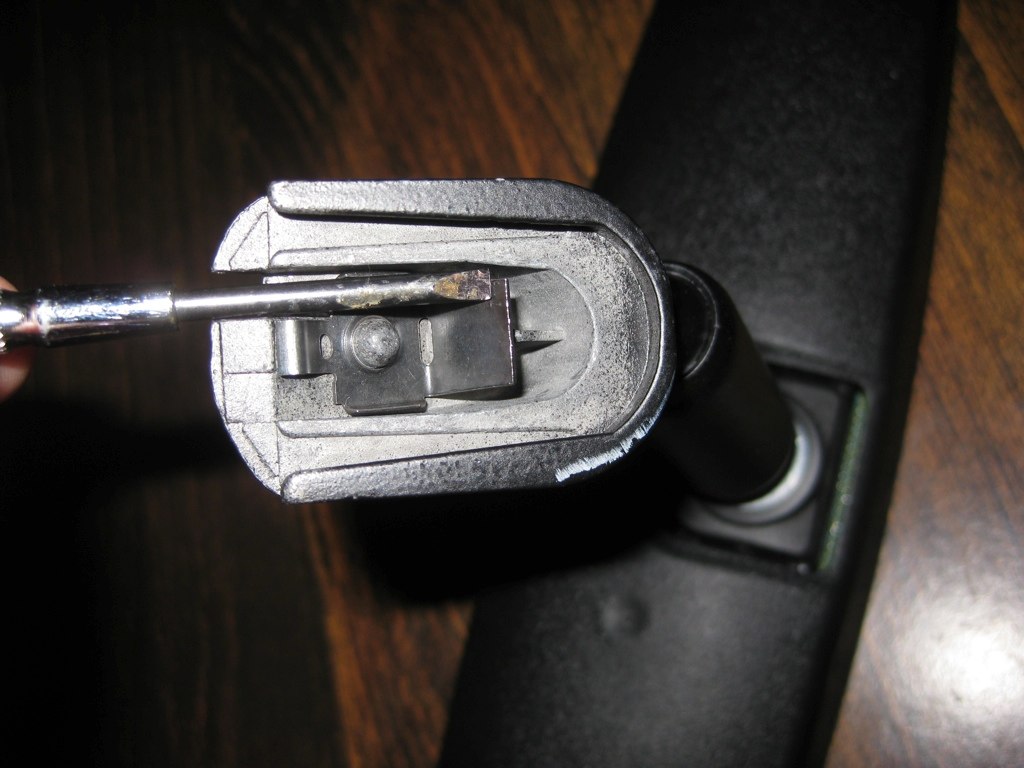
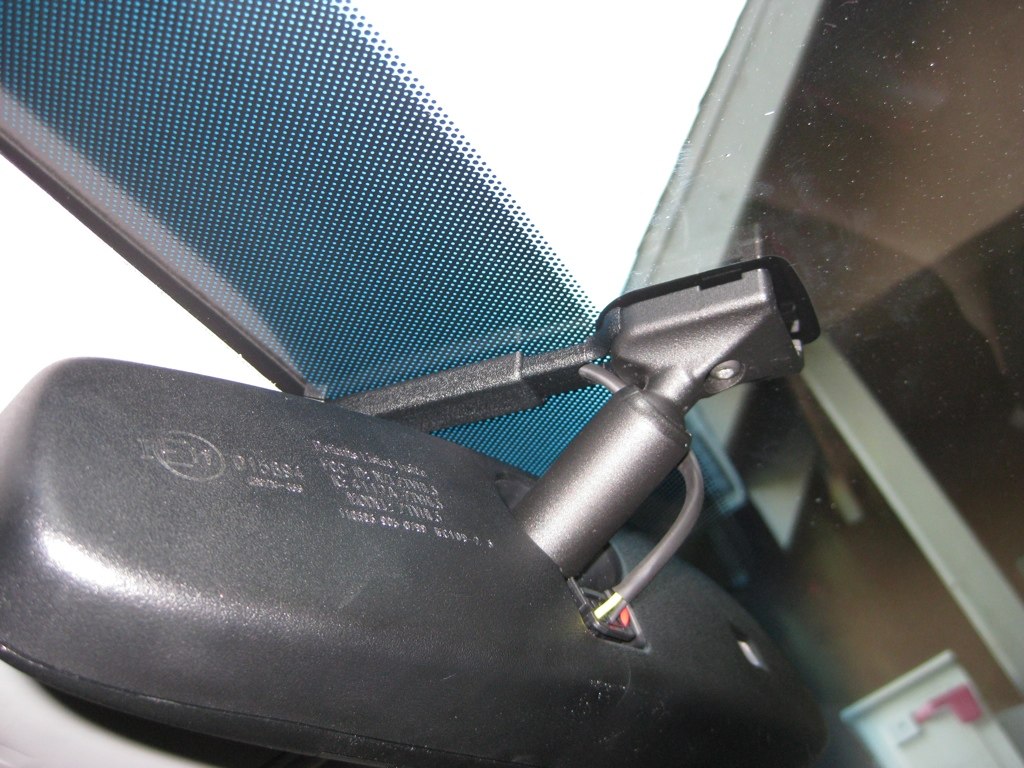
1) Remove the old mirror. Take a long, thin screwdriver (like a jeweler's screwdriver) and push it into the small notch in the bottom of the rear view mirror. As you push, the spring clip will be released; pull the mirror carefully toward the headliner and it will slide off. The picture shows the inside of the mirror when you do this.
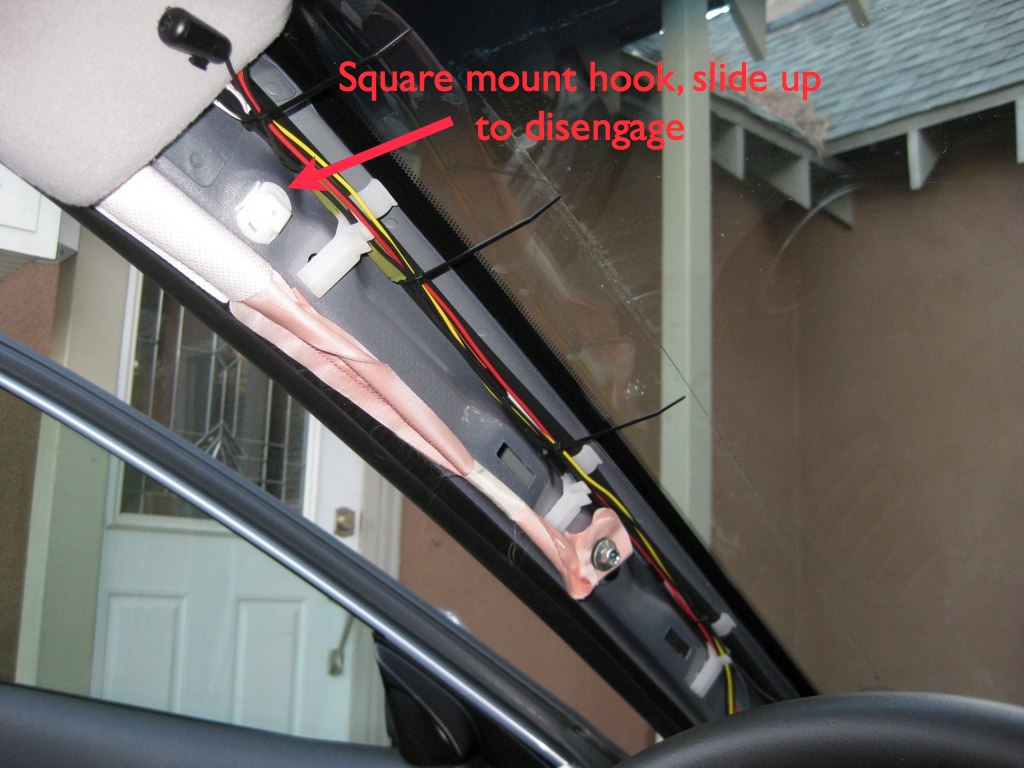
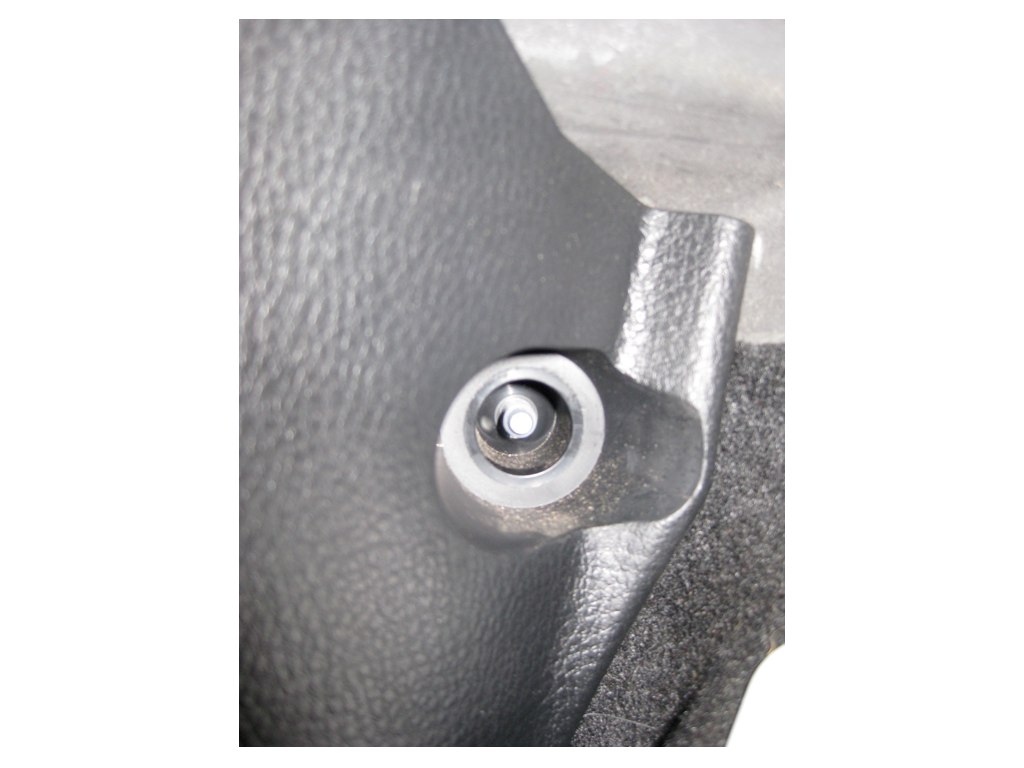
2) Remove the left A pillar plastic cover. There are two tabs in the middle of the cover; pull it outwards to release them. Then, slide the cover up towards the headliner, off of the square button; eventually it will slide up and away. Step 7 has a picture of the inside of the A pillar, refer to it for this step. Pull the cover out and set it aside.
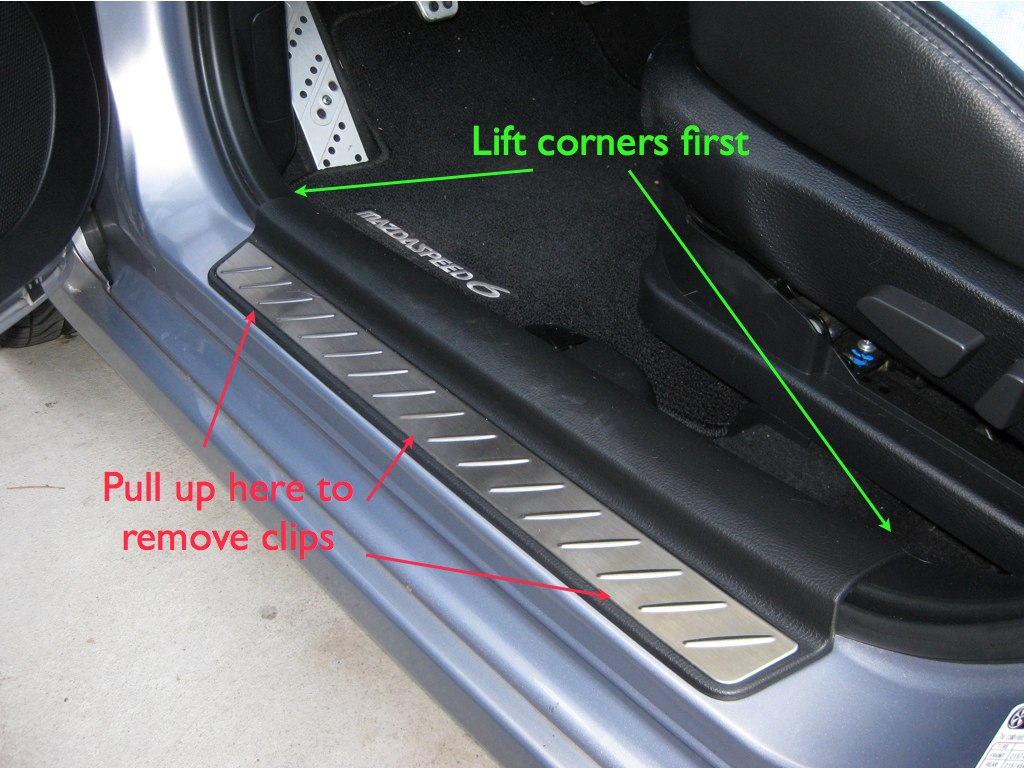
3) Remove the driver door kick plate. Release the clips on each end by pulling up towards the interior, then pull the entire kick plate up (under the metal works best) to release the three clips.
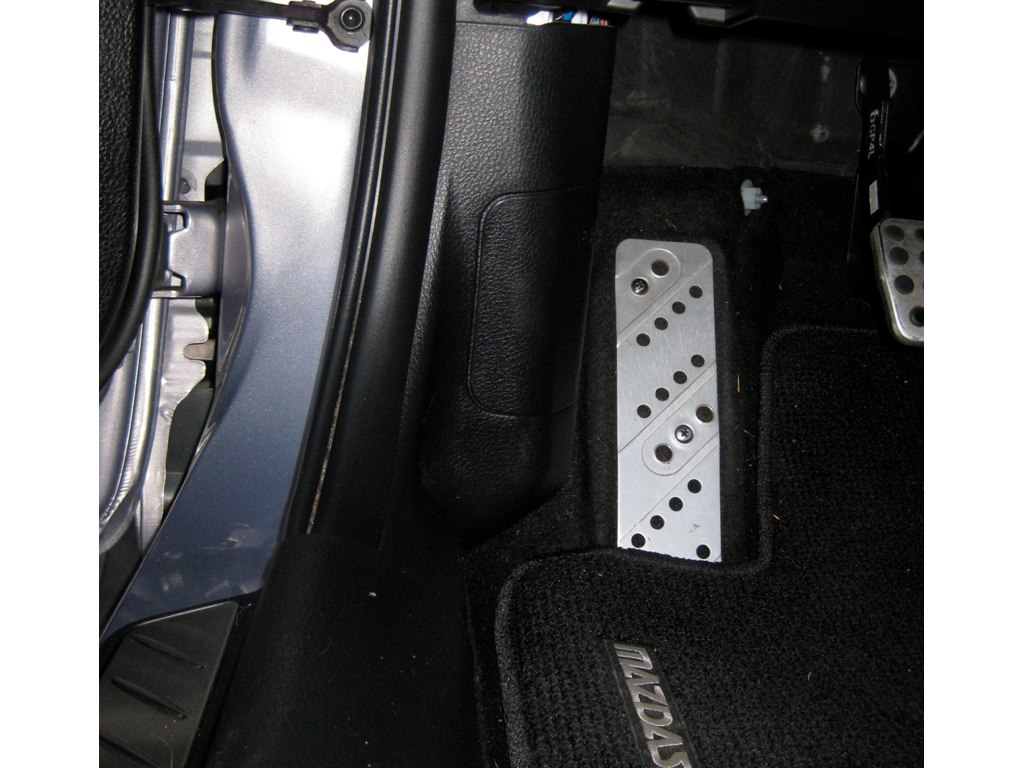
4) Remove the fuse box cover by opening the fuse box and pulling towards the center of the car. The front pin will release; a threaded bolt at the back corner takes some effort the first time to pull out but eventually it will come loose as well. Use a flashlight to see it and figure the best way to pull it off.
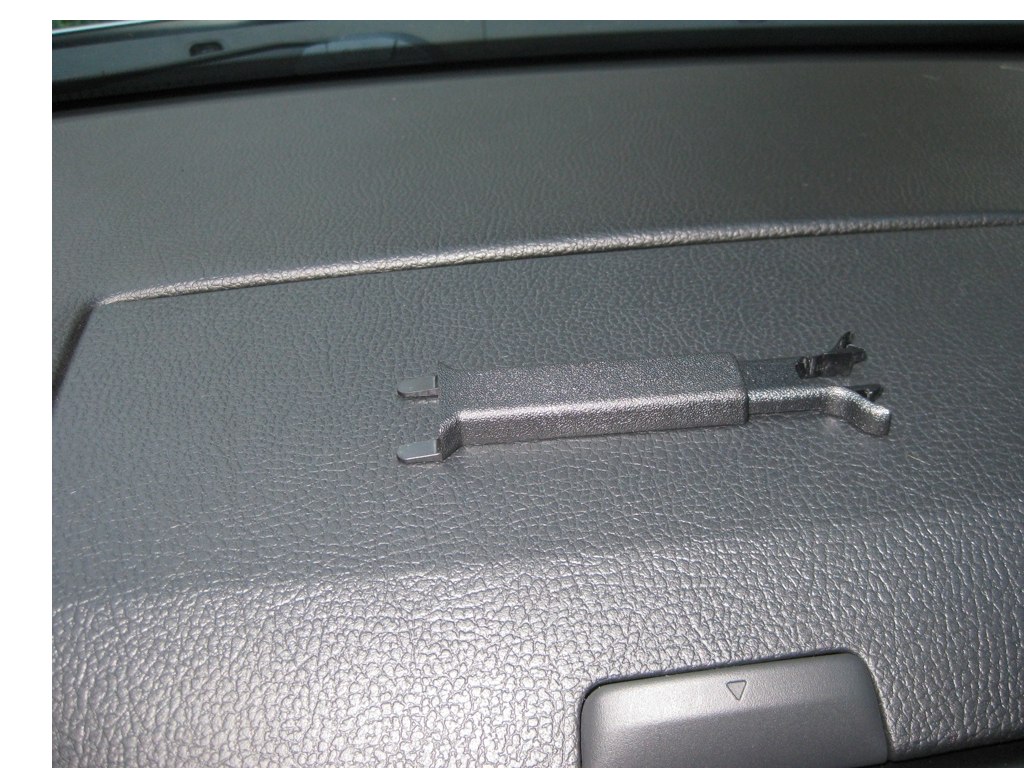
5) Install the new mirror by sliding it onto the button the old mirror was mounted on; if it doesn't go on then you need to replace the button. The mirror has a screw, tighten that down until the mirror is fixed solidly (try not to over tighten).
6) Plug the wire harness included with the mirror into the back of the mirror. Run it straight up to the headliner, and tuck it along the inside of the headliner to the driver's side A pillar.
Install the plastic wire cover if included; this snaps into the mirror on one side, the other slides under the headliner.
It may help to put a couple of small zip ties around the wires, clip the extra, and then use them to help wedge the wires under the head liner (they like to roam free otherwise).
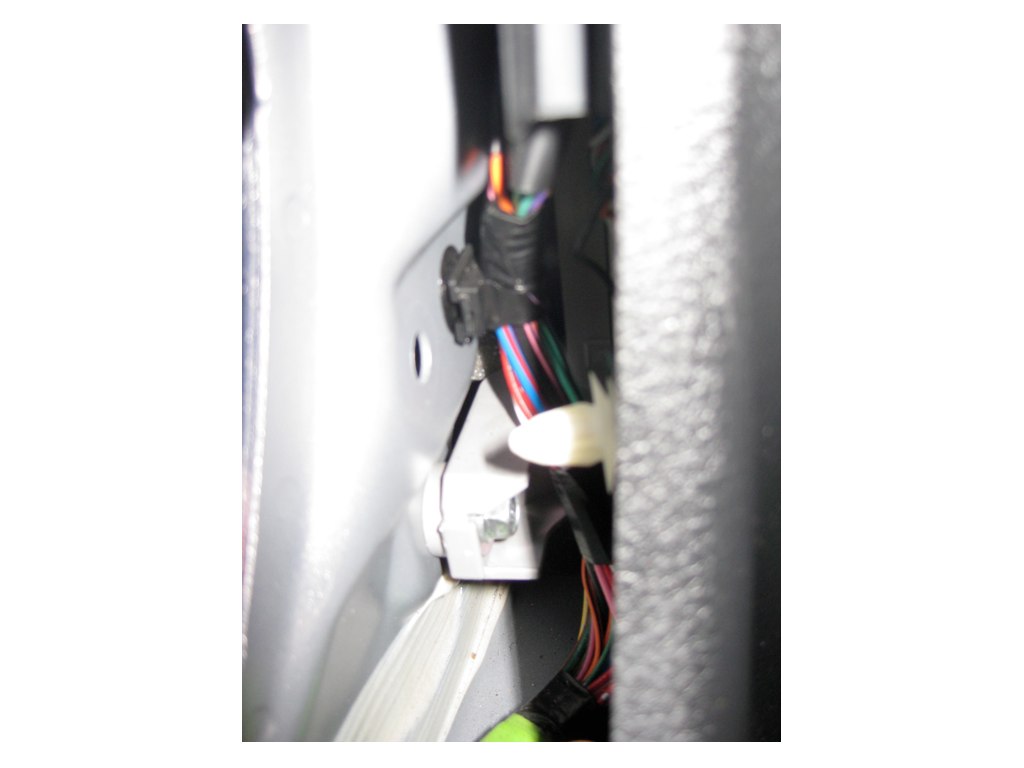
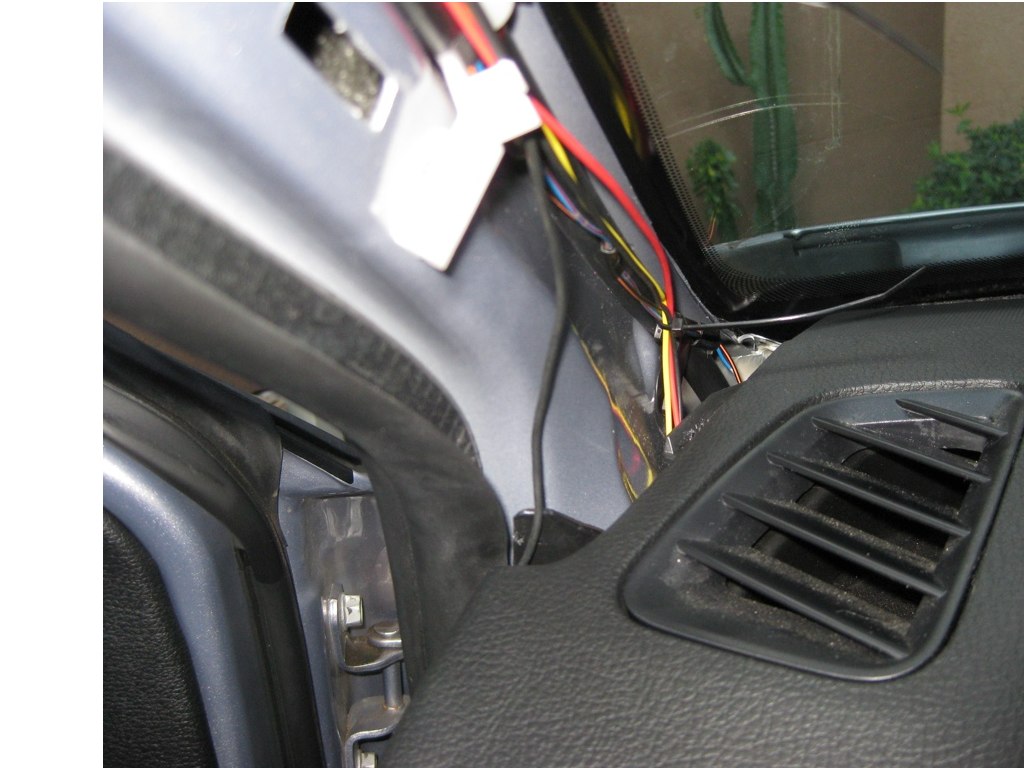
7) Run the wires along the A pillar as shown (the wires zip tied are for the mirror, my Bluetooth mic is the thing at the top left). Zip tie them in place, but be careful not to tie around the rubber hose.
Thread the wires down into the hole at the base of the A pillar; this leads behind the dash, so look up from below and pull the wires all the way down.
8) Once the wires are zip tied in place, you can reinstall the A pillar cover by first sliding it onto the top square hook and then snap it into place (it won't feel that solid, compare it to the passenger's side cover to be sure you have it down). Unplug the mirror at this point, so you don't cause any problems while you are wiring it up.
9) The Homelink mirror comes with three wires, one for accessory power, one for ignition power and one for ground. The red wire goes to accessory; connect this to the orange wire in the wire bundle at the top of the fuse box.
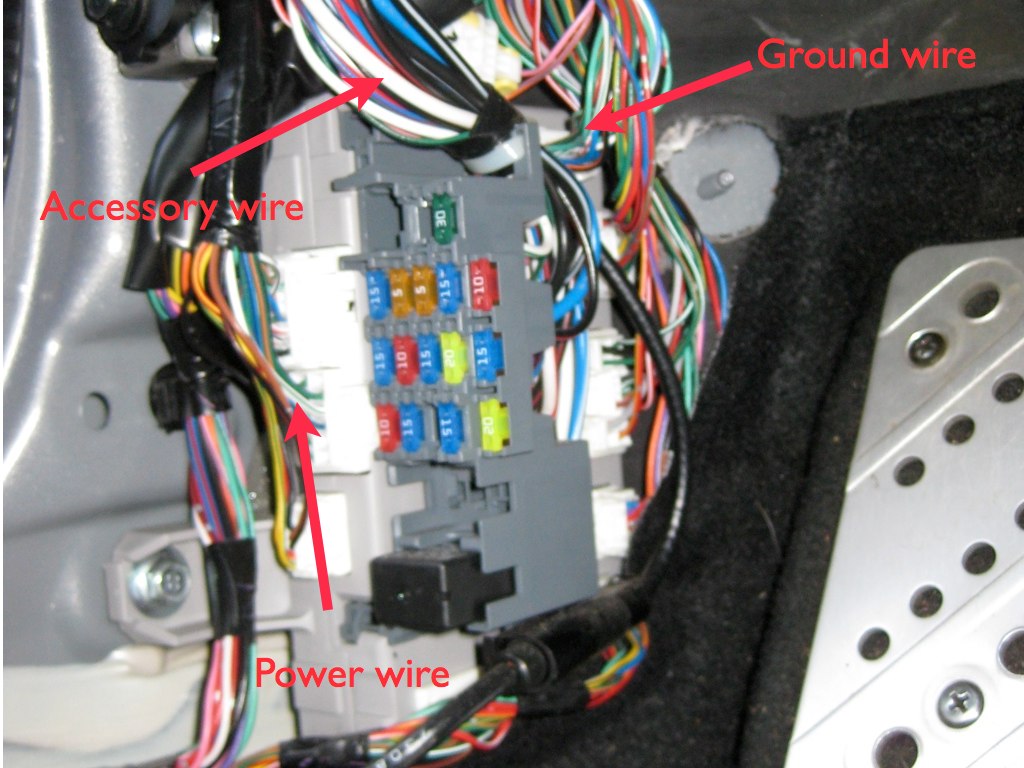
You may have to dig to find the orange wire, it is hidden within all the otter wires. Carefully pull it out, and use a wire tap to connect the red mirror wire to the orange wire.

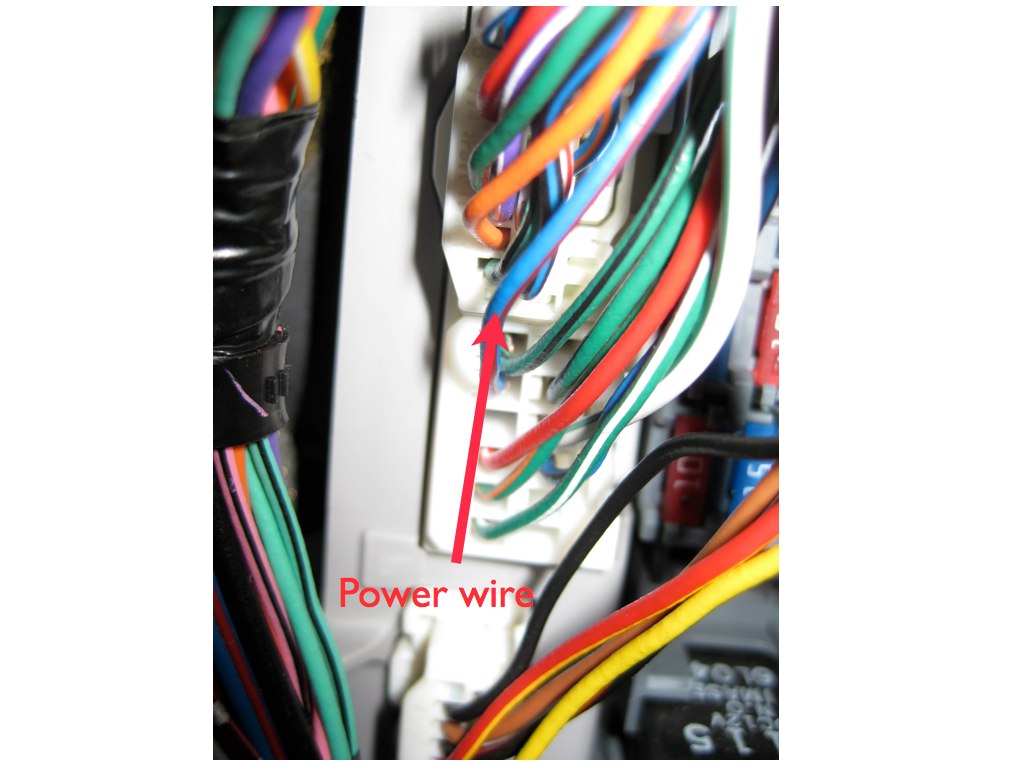
10) The yellow wire goes to power when the ignition is on; if this wire is powered all the time it will drain your battery. There are several wires you can tap into, I used one I already tapped for the shock sensor. This is the blue/red wire in the middle left plug, right to the left of the fuses.
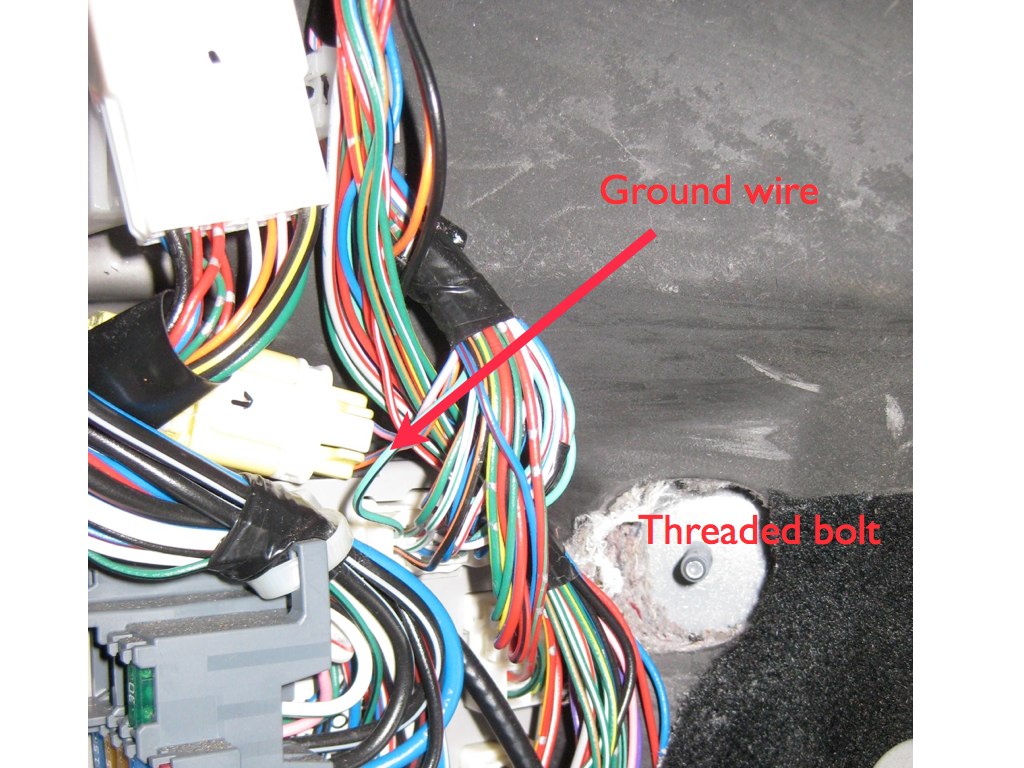
11) The black wire goes to ground; this is apparently a standard green/black wire seen in many spots. There is a green/black wire next to the wire tapped in step 10, you can try it, but I used the wire in the pictures since I had already tapped it before. That wire is in the top plug at the back of the fuse box.
12) Once the wires are all tapped, plug the mirror back in, turn the ignition to the ON position, and look at the mirror. The LCD display for the compass should turn on when the ignition comes on, with all pixels lit; it will then change to a C (for calibration) or a direction (which may or may not be accurate). If this happens, you're done.") If not, double check your wiring and connections.
If not, double check your wiring and connections.
13) Once the mirror is working, zip tie all the cables into neat bundles, making sure not to pull any wires too tight (you can also trim the mirror wires to length before you tap into the car wiring to make this neater). Reinstall the covers for the fuse kick panel and door kick plate.
14) Take the car to an empty parking lot. Hold the mirror compass button (far right) until the C appears in the display. Drive around in a circle until the mirror calibrates the compass. If the mirror ships in calibration mode, then you can just drive around and it will calibrate itself after a while.
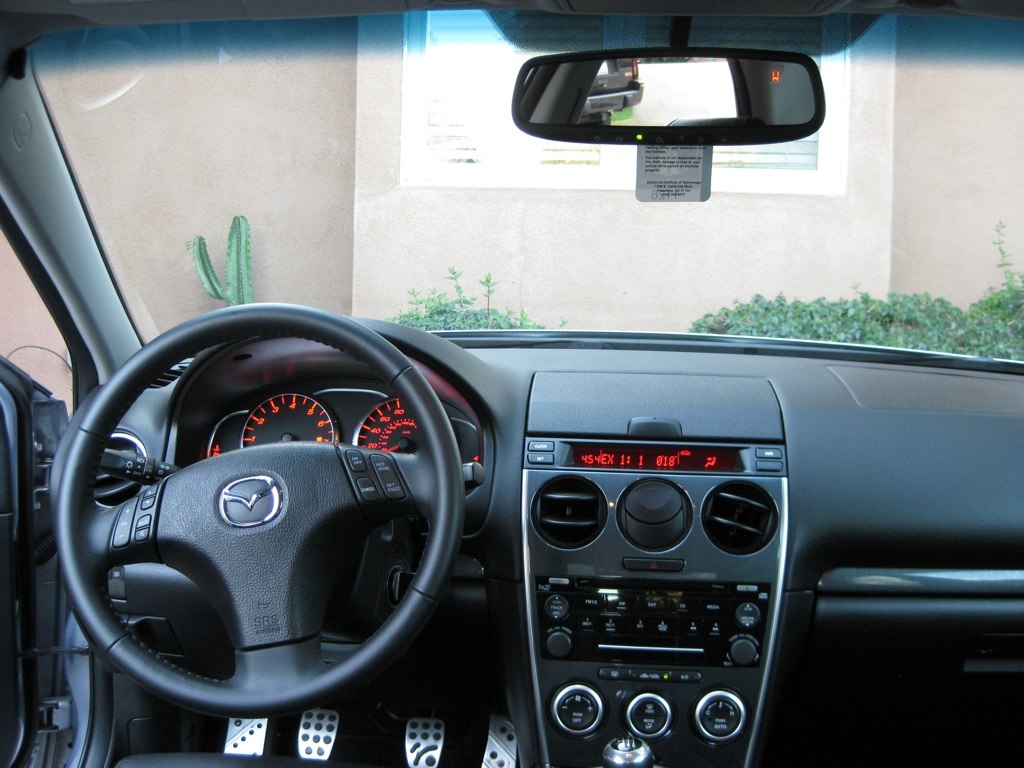
In the pictures, you can see that the mirror glass in my mirror doesn't have a box around the display. The guy who set this up for me put the glass on that way. The advantage is that you don't have the box cutting out a part of the reflection, which I liked. The drawback is that it's harder to see the display in daylight, and the display is also polarized so if you wear polarized sunglasses it can disappear (tilt your head to make it reappear). If you want to see the direction at all times, get the display with the box.
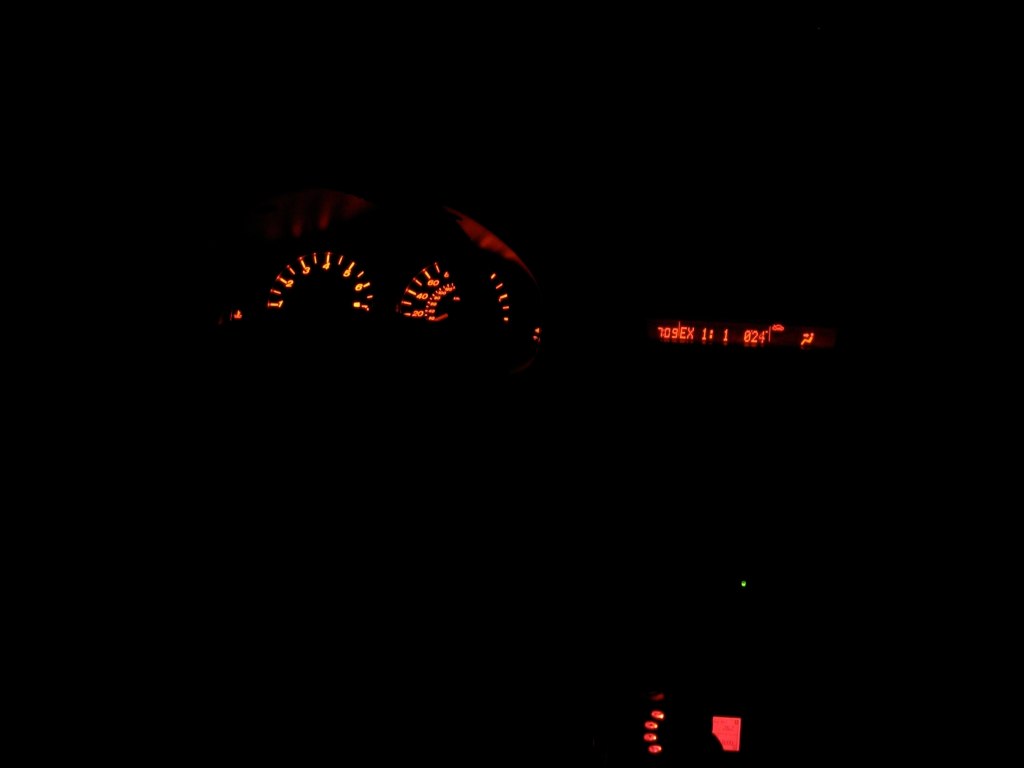
The color is an amber color; it's not a perfect match to our lighting, it's a bit too orange. Red is probably a better match if you can get it, but the amber works well I think.
Hope this helps anyone who wants to do the modyou get a larger, better, auto dimming mirror out of it, and I'm really happy with the improvement.
This is the installation how to for the Gentek GenK45A mirror; similar models will probably work the same way. I got mine from eBay through XXXXX; you can probably ask him for the Mazdaspeed setup like he did for the guy in Pasadena (me), and he should be able to set you up.
Tools: a small torx wrench (for the mirror screw), wire cutters, zip ties, pliers to crimp the wire taps, small thin screwdriver, possibly something to pry trim off (though I got it all off by hand).
You will need the wire harness, some wire taps, and a mirror cable cover. I got my mirror online at eBay from this vendor; he included everything I needed for the installation, and was a good dealer. You should be able to tell him that you want the same setup for a Mazdaspeed 6 that the guy in Pasadena ordered and get what I have, or something similar.
So, here we go!
1) Remove the old mirror. Take a long, thin screwdriver (like a jeweler's screwdriver) and push it into the small notch in the bottom of the rear view mirror. As you push, the spring clip will be released; pull the mirror carefully toward the headliner and it will slide off. The picture shows the inside of the mirror when you do this.
2) Remove the left A pillar plastic cover. There are two tabs in the middle of the cover; pull it outwards to release them. Then, slide the cover up towards the headliner, off of the square button; eventually it will slide up and away. Step 7 has a picture of the inside of the A pillar, refer to it for this step. Pull the cover out and set it aside.
3) Remove the driver door kick plate. Release the clips on each end by pulling up towards the interior, then pull the entire kick plate up (under the metal works best) to release the three clips.
4) Remove the fuse box cover by opening the fuse box and pulling towards the center of the car. The front pin will release; a threaded bolt at the back corner takes some effort the first time to pull out but eventually it will come loose as well. Use a flashlight to see it and figure the best way to pull it off.
5) Install the new mirror by sliding it onto the button the old mirror was mounted on; if it doesn't go on then you need to replace the button. The mirror has a screw, tighten that down until the mirror is fixed solidly (try not to over tighten).
6) Plug the wire harness included with the mirror into the back of the mirror. Run it straight up to the headliner, and tuck it along the inside of the headliner to the driver's side A pillar.
Install the plastic wire cover if included; this snaps into the mirror on one side, the other slides under the headliner.
It may help to put a couple of small zip ties around the wires, clip the extra, and then use them to help wedge the wires under the head liner (they like to roam free otherwise).
7) Run the wires along the A pillar as shown (the wires zip tied are for the mirror, my Bluetooth mic is the thing at the top left). Zip tie them in place, but be careful not to tie around the rubber hose.
Thread the wires down into the hole at the base of the A pillar; this leads behind the dash, so look up from below and pull the wires all the way down.
8) Once the wires are zip tied in place, you can reinstall the A pillar cover by first sliding it onto the top square hook and then snap it into place (it won't feel that solid, compare it to the passenger's side cover to be sure you have it down). Unplug the mirror at this point, so you don't cause any problems while you are wiring it up.
9) The Homelink mirror comes with three wires, one for accessory power, one for ignition power and one for ground. The red wire goes to accessory; connect this to the orange wire in the wire bundle at the top of the fuse box.
You may have to dig to find the orange wire, it is hidden within all the otter wires. Carefully pull it out, and use a wire tap to connect the red mirror wire to the orange wire.
10) The yellow wire goes to power when the ignition is on; if this wire is powered all the time it will drain your battery. There are several wires you can tap into, I used one I already tapped for the shock sensor. This is the blue/red wire in the middle left plug, right to the left of the fuses.
11) The black wire goes to ground; this is apparently a standard green/black wire seen in many spots. There is a green/black wire next to the wire tapped in step 10, you can try it, but I used the wire in the pictures since I had already tapped it before. That wire is in the top plug at the back of the fuse box.
12) Once the wires are all tapped, plug the mirror back in, turn the ignition to the ON position, and look at the mirror. The LCD display for the compass should turn on when the ignition comes on, with all pixels lit; it will then change to a C (for calibration) or a direction (which may or may not be accurate). If this happens, you're done.
If not, double check your wiring and connections.13) Once the mirror is working, zip tie all the cables into neat bundles, making sure not to pull any wires too tight (you can also trim the mirror wires to length before you tap into the car wiring to make this neater). Reinstall the covers for the fuse kick panel and door kick plate.
14) Take the car to an empty parking lot. Hold the mirror compass button (far right) until the C appears in the display. Drive around in a circle until the mirror calibrates the compass. If the mirror ships in calibration mode, then you can just drive around and it will calibrate itself after a while.
In the pictures, you can see that the mirror glass in my mirror doesn't have a box around the display. The guy who set this up for me put the glass on that way. The advantage is that you don't have the box cutting out a part of the reflection, which I liked. The drawback is that it's harder to see the display in daylight, and the display is also polarized so if you wear polarized sunglasses it can disappear (tilt your head to make it reappear). If you want to see the direction at all times, get the display with the box.
The color is an amber color; it's not a perfect match to our lighting, it's a bit too orange. Red is probably a better match if you can get it, but the amber works well I think.
Hope this helps anyone who wants to do the modyou get a larger, better, auto dimming mirror out of it, and I'm really happy with the improvement.

