General How-To Audio Install Thread for Mazda3 & MS3

xcoldr1cex

Member
:
2007 Mazdaspeed3 GT
i can add some pics for the door connectors - i dremeled my connectors out and got two twisted pairs of 16 guage in each side. the passenger connector is much easier to work with - lots of room to dremel - the driver's side is a PITA. pictures below.

if you break any of your "plastic trees" on your doors - you can pick them up at autozone - they're marked for nissans and infinities though, but they work in our door just fine.

for those with BOSE - you can tap either the preamp outputs or the speaker outputs under the DRIVERS SEAT - where the Bose amp is located. There is also a 12V, Ground, and Remote connection there (I think the remote connection is just always on with the car though - not on with the HU)
 
Last edited:
the connector is held on with FOUR clips in each corner - you have to push each in and wiggle it out - the hardest to reach is the bottom one furthest away from you driver's side. it's easy if you want to remove your whole door from the frame - but that's probably more effort than just trying to remove it. (although it can get frustrating)

4kurluh.jpg

4qz9zb4.jpg


I dremeled out a portion of the connector that holds both of them together in order to fit my thick wires (red boxed area)- so I used a zip tie to hold the connector together.

5yvrk8w.jpg

4zokdo7.jpg


All done -
62fsimc.jpg


the passenger side has plenty of empty slots that you can just dremel out
62iy1ix.jpg
 
Last edited:
i mounted my processor under my seat also - but where the stock bose amp was located:

vrramp.jpg


i cut some of the metal tabs that held the amp in place off with a dremel, mounted a piece of wood to the metal, sprayed it all down with truck bedliner to make it look better even if it'll be hidden under the seat

mounted/painted :

35c4ei0.jpg


installed under seat:
nd7mur.jpg
 
also made some tweeter pods:

i cut out circles from 3/4 mdf (all i had around) using a hole saw and hot glued them to the sail panels. i aimed them one foot forward and six inches down from my head (to the best of my ability) by drilling out a hole large enough in the center to hold a laser pointer and by holding it steady while the hot glue dried. i don't know how successful i was but i guess it'll have to do

i stretched panty hose over the whole thing gluing with super 77 and hot glue and did a layer of resin. the super 77 and resin combo didn't mix very well and i got some bubbling in the panty hose

281toyd.jpg

2rc8v8k.jpg


to remedy this problem i cut out the bubbled parts and covered the whole thing with rage extreme bodyfiller. wasn't very good with the stuff since the instructions just said to mix the filler with the hardener 2% by weight ( i had no idea how to do this without a scale or a 4x4" square with a "ribbon" of hardener". so i ended up wasting a bunch and having rough surfaces since the filler hardened much faster than i expected it to.

i did this a few times to try to fill in all the rough spots after sanding with 40 grit paper - never quite got the hang of it but after doing it a few times and sanding with 40 and 100 grit - i decided to leave it and paint. i got some sem primer and graphite interior paint (the distributor didn't have the texture paint ) - did 3 coats of primer, sanded with 320 grit, and did 2 layers of paint. they came out ok, a bit rough in some spots but i figure i can just wrap it in cloth if it gets on my nerves.

sanded - ended up doing another layer after this i think

2wp1qtl.jpg

1zx13bm.jpg

349e0za.jpg

mw8ayu.jpg
 
NOTE: I'm not sure what I did here was necessary after all... Now that I think about it more, the "nubs" as I call them are there because of the "ridges". It's possible the nubs would require the use of longer screws though... I'll leave this post up as what I did doesn't hurt anything IMO, it'll probably just take longer...

I just got finished modifying the Crutchfield dash kit to work with the Climate Control LCD on my '07 MS3...

The kit came with 2 black plastic brackets that weren't mentioned anywhere in the manual (I didn't see them at least). The brackets were obviously made to mount the LCD, but it's not clear how. Here's what I did, it so far it seems to work well...

Here's one of the brackets bolted to the back of the LCD. Note the little nub thing (Highlighted in yellow)
IMG_4329.png


With both brackets installed to the LCD (they only fit one way) they line up perfectly with these 2 mounting holes on this panel...
Problem is: there are those little ridges that block the brackets (and LCD) from sitting flush.
IMG_4320.png


A Dremel and some safety glasses make quick work of those though!
IMG_4327.png

And a hacksaw fixes those nubs, no sweat.
IMG_4332.png

You may want to clean up the modifications with a file and/or razor blade.

With both ridges and both nubs "fixed" the LCD installs like so...
IMG_4341.png


And the long trim piece mounts nice and flush, just like stock.
IMG_4345.png
 
Last edited:
so with the crutchfield dash kit - you still retain climate control function? nice... maybe i'll get a new headunit in the future.
 
Last edited by a moderator:
Excellent write up guys! (headbang)

You all make me feel like I have alot of stuff to learn about electronics. I have a MS3 GT and have been wanting to make changes...this is a great start.

I noticed you guys replaced the wires in the door for the speakers...is the stock stuff too weak for a power upgrade?
 
this is my first brand new car too - took apart the whole interior a few weeks after i had it to do sound deadening haha. never worked on cars before either! this car is really easy to work on.... don't be scurrrred!

stock wiring is like 18-20 ga or something. really small. also since we're running amps to power the front speakers from the rear of the car - we had to run new speaker wire from the hatch to the front doors. you only have to do it once - and you can change out your speakers as you please so it's not that big of a deal. if i ever do a 3 way though i'm going to have to put the 3rd speaker somewhere else- no more room to run speaker wire to the door unless i drill a new hole.
 
I haven't done many installs (3 or so) but this car seems to be very easy so far! So many of the panels just pop on and off... Drop a bolt (or both mystery brackets as it were) down in the console? Pop off a few panels and grab them.

Anyway, I didn't get to work on my install much today, but I did finally put my new deck in the dash. I don't have any speakers hooked up but I did get to turn it on and push buttons and stuff. It was oddly fun!

I'll be sure to post some pics and stuff... tomorrow* prolly.

*well, later today

...later
OK, I've been messing with the stereo some more but have got very little done. Once I actually do something worth posting I'll post here...
 
Last edited:
i plan on writing up a section for installing a monitor and volt gauge... as soon as it painted(friday), i'll unveil it here.

oh, and BRAVO for a wealth if information! good read indeed!

also made some tweeter pods:

i cut out circles from 3/4 mdf (all i had around) using a hole saw and hot glued them to the sail panels. i aimed them one foot forward and six inches down from my head (to the best of my ability) by drilling out a hole large enough in the center to hold a laser pointer and by holding it steady while the hot glue dried. i don't know how successful i was but i guess it'll have to do


got ya so far, is there a trick to getting the mdf circles back out after the resin step? or holesaw again?
 
you don't take them out - you use a holesaw to cut a opening for your tweeter and it serves as the baffle for the tweeter.

also if you use a heavier weight material - you don't really need to do body filler - you can just do layers or resin and it should hold up fine since it's not a high traffic area. i only had some grill cloth around and it was just easier for me to stretch the panty hose over. as i mentioned before - don't use super77 to hold down the fabric- use hot glue instead as it won't unstick when you start putting on the resin.
 
On my car (and I have to assume all MS3s) there is a hole with a plug in it by both front doors. I think I'll pull my speaker cable through that plug and then through a hole the rubber-boot-thing on the door. Do y'all think that would be ok?

If I don't have to; I wasn't planning on covering the speaker cable with anything (well, maybe a cable wrap) between the body and the door. Can anyone think of a reason this is a bad idea?
 

Attachments

  • 11072007048.webp
    11072007048.webp
    11.4 KB · Views: 1,115
JUST A NOTE TO RUNNING DOOR SPEAKER WIRE... THE METAL THE PLUGS ARE INSTALLED IN IS VERY VERY SHARP AND YOU CAN EASILY DAMAGE YOUR FACTORY WIRES BY PULLING ON IT TO MUCH TO DRILL A HOLE IN IT.... TAKE A COUPLE SMALL PIECES OF DUCT TAPE AND COVER THE STAMPED METAL EDGE TO REDUCE YOUR HEADACHES (learned the hard way!!)
 
I have a habit of being very long winded... If these instructions aren't enough just lemme know and I'll elaborate later...

Here's how you can run wire under the big black plastic things that run along the rear-edge of the hood. I'm going to call these plastic pieces "windshield trim".
IMG_4408.jpg


You wont need any special tools to do this. It took me somewhere in the neighborhood of 2 hours, but I didn't know what I was doing and I also had to stop to take pictures.

Take the glove box out.

Remove the windshield wipers (there's a single 12mm nut per wiper; just unscrew and jimmy them loose). You may want to mark/note how the wipers are positioned before removing them (a dry-erase marker would be good for this).

The windshield trim is held on with 2 screws (under black plastic caps) and by the long rubber weather-seal. The wiper fluid lines are attached to the windshield trim. I suppose it's probably possible to completely remove the fluid lines but I did not find it to be necessary.

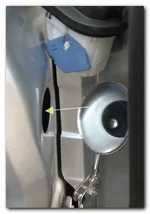
Take the screws out first, then pop the hood. Find the rubber seal (you can't miss it). You'll need to gently pull the seal off a bunch of blue cleats that look like this...
IMG_4421.jpg

I found stretching the seal to release one side of the cleat then the other worked well.

With the screws taken out and the seal removed you pretty much just need to pull to get the windshield trim off. Like a lot of the pieces on this car you just need to be careful. The trim comes off horizontally (toward the front of the car) for the most part.

Set the trim aside.
IMG_4367.jpg


Under the windshield trim there is another plastic thing, I'm going to call this one the "runoff duct". It is held on by 3 round detachable anchors and 3 clips. To get the detachable anchors off you need to unscrew the center part 1/2 turn, pull the center up, then pull the whole anchor out.
Take out the anchors, unhook the clips, then pull out the runoff duct and set it aside.
IMG_4368.jpg


Look for the big bunch of wires coming through the firewall behind where the glove compartment was. There is a big rubber grommet there that we are going to run the power wire through.

There is a little nub near the top of the grommet. Use some long needle nose pliers to pull the tip of the nub to the inside of the car.
IMG_4395.jpg

Use the pliers and some wire cutters to cut the end of the nub off. Push the nub back to the engine side. You're left with a hole to the outside world...
IMG_4397.jpg


Now thread the wire through the nub thing. I put a little soapy water on the end of the wire to get it started. Pull enough through so the other end will reach the battery.

Next cut a small hole in this grommet and pull the wire through.
IMG_4406.jpg

Like so...
IMG_4415.jpg


I put a cable protector on and zip tied the cable to this metal thing. There might be more you could do here, but I think this'll be sufficient.
IMG_4410.jpg


Now you can pretty much put all the pieces back on. On the battery side I had to cut a small part of the windshield trim off to get the cable through. I put on some more cable protector to protect against the sharp plastic.
<<I'll put a pic of this up soon...>>


++++++++++++++++++++++++++
++++++++++++++++++++++++++
The way I see it, this is a perfect place to get the wire from the battery to the passenger-side firewall grommet. It's pretty far from the heat of the turbo plus the install is pretty easy and straightforward.

One slight downside could be that where the power cable comes out is right next to the main ground wire of the car. But so-long-as the power cable is fused close to the battery I don't this is a real concern.
 
thanks for that! even though i ran my wire already through the same grommet i'm going to have to redo it with 0ga... i don't think it'll fit through the nub though :\ so i'll have to figure something out..
 
I put my speaker wire through the rear-door plugs like so...
I cut the clip that holds the 2 plugs together off the outside plug. Then I used a dremel to open up an existing hole in the inner plug. Then it was just a simple matter of threading the cable through both holes.
I used a couple zip ties to hold the 2 plugs together.
IMG_4427.png
IMG_4434.png
IMG_4436.png

As you can see, one zip tie goes through both plugs. The bigger end wont fit through the small opening on the inner plug. I cut the other zip tie short, but not so short that it would fit through the (rather large) hole in the outer plug.

It looks like it'll work, but I haven't "tested" them or anything...

Also, I have to get this off my chest: changing the speaker wire in the front doors of car is one of the biggest, colossal, ******* pains in the ass I've attempted in recent memory. I can't suggest that you don't do it (that would be hypocritical) but just know what you're in-for before you start...
 
Last edited:
You know what... I never related my experience back to you.. but the EXACT same thing happened to me.

Passenger side was awesome. Drivers side took about 3.5 hours.

I HAD to leave for a while like you did so that I didn't start taking swings at the car.

I spent so ******* long on that thing... and then.. all of a sudden.. it FELL out. Both halves.. together. I almost wet myself.

This makes me think that the drivers side connector wasn't fully engaged on either of our cars.. and it wasn't actually OUR fault it got stuck in the sheet metal.
 
Last edited by a moderator:
Oh... For me the connectors were actually pretty easy, I guess I got lucky in that respect... Pull the rubber seal thing off (rubber is surprisingly resilient, just grab it with some pliers and pull), then work on each of the 4 clips one by one. I used this tool
IMG_4460.png

to push in each clip, then pulled the connector out just enough so the clip wouldn't re-engage. Side note: this is probably one of the most handy tools I have! It came in a 4-pack from Wal*Mart

The major pita for me was getting this rubber tube from inside the car
IMG_4457.png

to that grommet on the outside.
IMG_4453.png

The passenger side wasn't as bad (just shove your arm in there and guide it)... it only took about an hour, the driver side took something like two and a half hours!
Once the tube was in, getting the speaker cable through wasn't that bad (white lithium helped a lot).
 
Last edited:

New Threads and Articles

Back