For those that painted their interior door handles..

:
11 Miata GT PRHT, 00 Silverado RCSB
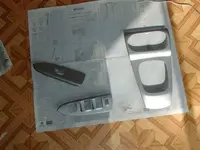
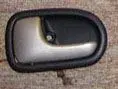
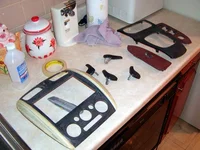
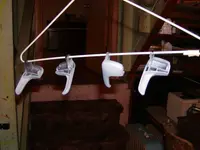
How do you get the silver door handle out of the black part that holds it in. I know there's a spring and it's locked in there, but I have no idea how to get that all out. I'd kinda like to paint it on both sides and get all of it and I've seen it on the forums, but I can't figure it out..

I even flipped through the factory service manual and couldn't find anything.

So anybody know how? I'd appreciate the input. :)

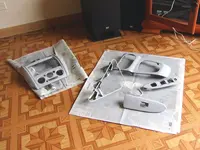
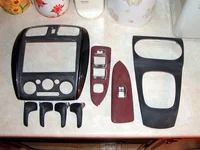
I'm not talking about taking the assembly out of the door either, just taking the actual handle itself out.. See attachment.
 

Attachments

  • handle.webp
    handle.webp
    2.3 KB · Views: 185
Man thats a pain in the ass...
To get mine out, i used a really thin screwdriver, just barely big enough to fit the pin that holds the spring in. You have to hold the assembly, and push the pin out carefully. Make sure to pay attention to how the spring is loaded in the handle, so you can put it back in after you paint it. The pin may be hard to take out, but with a little force you can feel it give, then when enough is out so that a pair of pliers can grab it, just pull it out :) good luck
 
haha yeah dude i was just sitting here looking at it going "this ######" and i jammed a pen in the hole... and the pin moved.. and i was like "woo! that's how it comes out!" lol.

Thanks for the quick response though. I appreciate it. :D
 
No problem, nothing else to do at 1:30 in the morning... Sand it before you paint it, the primer sticks better :) then sand the primer nice and smooth so you get a factory like finish. I did a half-assed job the first time, and it chipped, and it was uneven, so i had to take it out and do it again. Oh and the first time i did it, it took me an hour to put the damn thing back together because i couldn't remember how the spring was supposed to go in.
 
Would you believe that I've been sanding all night.. Let's see my last post was at 2:35AM.. and now it's 6:14AM.. :D My fingers are sooooooo smooth now, lol.
 
Haha.. this is what it looks like about 4 hours ago, and what it looks like now. I wet sanded it with 400 grit automotive sandpaper.. Some of those places are a pain in the ass to get to and I was tempted to get out the dremel and very very lightly sand it.. but no, don't wanna mess anything up.. So there are a few VERY slight parts that didn't have all the paint removed.. but it is scuffed up enough that primer will stick. So far sanding = biggest pain in the ass. :D
 

Attachments

  • silvertrim.webp
    silvertrim.webp
    92.4 KB · Views: 227
  • Sanded.webp
    Sanded.webp
    60.4 KB · Views: 242
Triple post. :)

By the way, those pins were pretty easy to get out. I pushed a screwdriver through until the pin was about 1 cm out the other end.. then grabbed the Robo Grips and yanked the pin out with those. No problem at all. And I left the springs in how they were so I shouldn't have a problem with reinstallation.
 
what color are you painting the trim? make sure you show us your progress!! thanks!
 
anodizit.jpg


That blue. Should match the outside of my car pretty well.

Still gotta prime, do a bit more sanding, base coat, and then blue... I have a busy day tomorrow. :D
 
N2OInferno said:
anodizit.jpg


That blue. Should match the outside of my car pretty well.

Still gotta prime, do a bit more sanding, base coat, and then blue... I have a busy day tomorrow. :D
did you know you can buy can's of paint that match your car exactly?
 
be patient while letting them dry :)
about popping off the handles... its a b****, i did it couple times and honestly, i cant type out how to do it, u just gotta experiment like i did. ull get it.
also, if u tape up around the handles, it works just as good. good luck dude and show us your progress! - chris
 
I know I can buy the cans of paint that match exactly, but I'm not going to spend that kind of money on one can of paint that I won't even use all of it..

I wasn't really concerned with getting an exact match.. just a close one.

If I'm right, you're talking about the paint from paintscratch too, right? I'd rather use an acrylic paint on the plastic in my car than an enamel.. Just easier to work with. :D
 
Alright, got it all masked off and primed. I had to come up with a creative solution to hold the handles up while they dried since I didn't want the primer touching anything and leaving marks.. Here's some more pictures.. Next is.. more sanding!

EDIT: I dunno why all the Plasti-Kote cans say Ultra Enamel on them (the clear says it too) because on the back it says acrylic. Oh well.
 

Attachments

  • masked.webp
    masked.webp
    68.4 KB · Views: 171
  • primer.webp
    primer.webp
    108.9 KB · Views: 150
  • primed.webp
    primed.webp
    120.2 KB · Views: 159
  • primedhandles.webp
    primedhandles.webp
    34.5 KB · Views: 188
Last edited:
I have pics but I'm not going to upload them yet. I shot the center piece with the base coat for the Anodizit and all of a sudden two big blobs splattered out of it and messed it up pretty bad.. I dried it and had to resand it and then prime it again.. pissed me off.. but oh well.. I have about ten minutes before I go put some coats of blue on some of the pieces.. I gotta take a look at the door handles because it looks like i may have gotten two of them a little heavy and there might be drips.. :( 
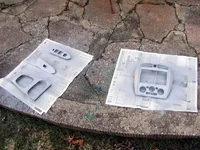
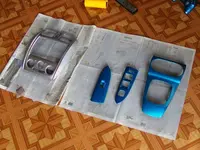
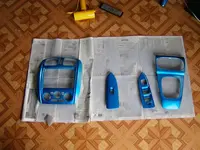
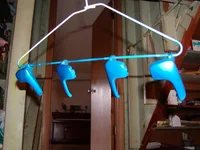
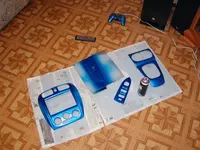
So I might have to resand those too.. Oi, this is a bigger pain than I thought it would be. Oh well, still hangin in there...
 
It took me 3 hours to strip the paint completely from that center piece, get it sanded again, prime it again and get it back to the base coat step.. Meanwhile, the other pieces were coming along fine..

Oh yeah, after primer, I sanded very very lightly with 400 grit sandpaper and then applied the base coat. Then I applied three coats of the color. Unfortunately, the way I'm doing this is I paint it outside and bring it in to dry. It's a bit chilly and humid outside and it's warmer and less humid in the house.. better to dry in here. :D Well, I dropped the one-switch door garnish on the newspaper I've been painting on on my way inside.. Ruined the paint. In half an hour it was back to the same step though..

I have a couple of tiny runs on the handles.. found out that the ones are opposite handles.. Well, those go to the rear doors now. :D My car will probably never be a showcar anyways. They're barely noticeable because of the metallic qualities of this paint too. I have a picture, dunno if you can see or not..

Anyways, other than recoloring that last garnish, I'm done with color. I'm going to shoot it with a few coats of clear too. It may or may not make it look duller from the metallic, but I want the paint to stay on the panels, and not chip off, so that's my best bet. Should I wait a day to clearcoat it or just give it an hour or so until it's "dry" and then shoot it? Anyways, it'll all be done and hopefully put back in the car by Monday. I want to give it ample time to dry.

Now, the pictures...
 

Attachments

  • primedandsanded.webp
    primedandsanded.webp
    69.1 KB · Views: 141
  • basecoat.webp
    basecoat.webp
    53.8 KB · Views: 139
  • 1stblue.webp
    1stblue.webp
    77.2 KB · Views: 140
  • 2ndblue.webp
    2ndblue.webp
    69.2 KB · Views: 172
  • handlesblue.webp
    handlesblue.webp
    48.6 KB · Views: 148
haha i just saw that the paint perfectly matches my PS2 controller. :D

That base coat by itself, by the way, makes an excellent silver color. The top coats are really thin, almost watery, and are translucent so the metallic comes through.
 
looks nice! i'd make sure the paint is good and dry before the clear coat.


N2OInferno said:
It took me 3 hours to strip the paint completely from that center piece, get it sanded again, prime it again and get it back to the base coat step.. Meanwhile, the other pieces were coming along fine..

Oh yeah, after primer, I sanded very very lightly with 400 grit sandpaper and then applied the base coat. Then I applied three coats of the color. Unfortunately, the way I'm doing this is I paint it outside and bring it in to dry. It's a bit chilly and humid outside and it's warmer and less humid in the house.. better to dry in here. :D Well, I dropped the one-switch door garnish on the newspaper I've been painting on on my way inside.. Ruined the paint. In half an hour it was back to the same step though..

I have a couple of tiny runs on the handles.. found out that the ones are opposite handles.. Well, those go to the rear doors now. :D My car will probably never be a showcar anyways. They're barely noticeable because of the metallic qualities of this paint too. I have a picture, dunno if you can see or not..

Anyways, other than recoloring that last garnish, I'm done with color. I'm going to shoot it with a few coats of clear too. It may or may not make it look duller from the metallic, but I want the paint to stay on the panels, and not chip off, so that's my best bet. Should I wait a day to clearcoat it or just give it an hour or so until it's "dry" and then shoot it? Anyways, it'll all be done and hopefully put back in the car by Monday. I want to give it ample time to dry.

Now, the pictures...
 
I waited a while and it was "dry" to the touch so I went ahead and shot it once with clear. It actually didn't decrease the metallic-ness at all.. It's shiny now though. :D And it made it a deeper blue. It's very nice looking. Pictures don't do it justice. It doesn't look 150% great because, well, it's just spray can paint. But I'd say it's at least 97% great. :D
 

Attachments

  • 14oneshotclear.webp
    14oneshotclear.webp
    66.5 KB · Views: 164

New Threads and Articles

Back