Finally got off my lazy ass and installed my CAI

Matthew

Member
Contributor
:
CX9, CX5, i8
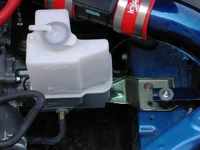
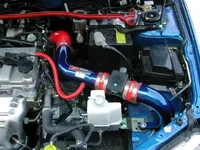
Wow, I'm totally happy with the CAI. I got the blue, and it almost matches my paint job totally. The red rubber joints and accents match the strut bar, so its pretty bad ass. I think i might try to paint my valve cover either red or blue. Does anyone know if you can get high temp paint matched to our laser blue mica? the only con was that i didnt realize i had to take off the whole damn bumper, and the power steering reservoir was different than the one they had in the injen instructions, so i had to fabricate my own relocation. I'll post some pictures tommorrow morning, i think the relocation job went well. I'm just too lazy to go out to my car right now and get my digicam :)

PS - just to put in my .02 about CAI vs SRI - i have had both now, and notice almost zero difference. BUT the CAI looks 300 times better.
 
You should not have had to take your whole bumper off. You can just take the plastic wheel wells out to gain access to the end of the pipe to put the filter on.
 
i have big stupid hands that have a hard time fitting in there, it was easier just to take off the bumper...it was only like 20 screws and i was waiting for my friend to adjust the suspension on his car and paint his valve covers, so it was a learning experience.
 
cool.

yeah, too bad you didn't mention it before the install. Well, next time you have to get to the filter to change it or clean it just jack up the car, cock your wheels to the left, and unscrew the cover inside the wheel well adjacent to where the filter sits. You can also unscrew the cover from the bottom of the bumper (4 screws I believe) right underneath the filter and that should give you all the access you need.

I have the same different reservoir as you have, the one that only has one bracket thing, but it's on the other side of the reservoir and it won't let you attach it to the radiator - I also had to play around with the existing holes and the original mounting bracket to figure out a place, but now it's all good.

Enjoy the new growl of your engine :D

edit:I took off a total of 8 screws and got a real good working area. Even "stupid hands" (lol) could get in there.
 
damn, stupid me i guess...well ill post pics of my relocated housing tommorrow...i used a hacksaw to cut that bronze metal piece it was originally attached to (but it doesnt look all crappy), filed it down, cut off the attachment on the housing and filed the stub down, then reverse mounted the bracket so the housing sits to the intakes like 7 oclock position, near the sensor. it doesnt look bad and its not hanging there in midair where maybe on day it could snap off.
 
cbcbd said:

I have the same different reservoir as you have, the one that only has one bracket thing, but it's on the other side of the reservoir and it won't let you attach it to the radiator - I also had to play around with the existing holes and the original mounting bracket to figure out a place, but now it's all good.

are you talking about the one piece metal bracket on the
bottom of the resevoir? I just pulled mine off and threw it away.
 
no, we both have the reservoir that has the mount on the "wrong" side...ill show you pictures today
 
where i placed the reservoir
 

Attachments

  • reservoir_placement.webp
    reservoir_placement.webp
    24.7 KB · Views: 252
Looks good, that would have been a good time to paint your headlights black like the Canadians version. :)
 
im ordering laser blue mica paint and im going to paint my valve covers, some fittings, and my headlights blue instead of black...then im going to order red 8.5 wires, so it should look pretty tight...i just have to wait to get back from vacation on the 13th
 

New Threads and Articles

Back