
-----------------------------------------------------------------------------------THIS IS MY FIRST DIY/ HOW TO sooo KEEP THAT IN MIND WHEN IT GETS bad, LOL- hope this helps some 1 though
So my old horn finally died after rusting through and through, so i needed a new one .
like this but RUSTY + Broken
Searched Autozone for a cheap little 15$ horn that sounded like a little clown car;s horn. (so that didnt cut it, it was weaker than my previous old one! )
I ended up getting to Meijer and ran into this:
Maxi Sound Dual Universal Wolo Horn (also at AAP)

For about 20$
Sorry no pics of old horn but steps are as follows:
1) To remove old horn and begin work, Remove Grill.
(to do so pop the hood and remove 2 big screws located at the left and right ends of the grill under the hood, and pop out the tabs, and carefully remove )
For more In-Detail info/ how to on REMOVING GRILL, please refer to 'Ride92's Grill DIY) ..Then continue here from step 2
And set it aside, like so:

2) Disconnect the old horn and since the new ones come with 4 brackets and nuts,washers, & 2 bolts, i removed all the old hardware) So take the old bracket off to work w more room.
3a) Now, since the old horn had only 1 connector wire, we need to bridge the 2 horns and ground each, while creating a " Y " wire to run from the connector to the 2 horns (which have 2 prongs each, 1 for ground and 1 for bridging/connecting)
3b)Next, using the 2 black wires they included, connect each of the horns to one of them on any of the prongs, and then make yourself a bridge (something like this- but LONGER, since i ended up needing a longer one and didnt take pics again afterwards)
(edit)
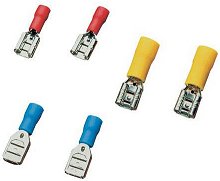
3c) On the ends of the bridge have the red connectors from this illustration
Ex:
Like so:

4) Then you will need to cut and add another wire to split it into the Y shape i mentioned.
Like so:


5) at the end of that Y you see above ^ (the blue wire in the middle) will need a blue connector , which will be inserted directly where the old horn was attached.
like so:
OKAY, enough electrical, Time to mount the new hardware!
6) Now since i failed to take more step by step pics (since i didnt know i was going to make a DIY) i dont have shots of mounting , just finished pics..
[ATTENTION: YOU WILL NEED TO REVERSE THEM SO THE RED SIDE IS FACING THE RADIATOR AND THE BLACK IS FACING YOU- GRILL WOULDNT FIT BACK ON W RED FACING OUT LIKE IN THE BELOW PIC]
^

And should instead be mounted like this:

What I did was:
A) found two holes in the frame behind the grill and mounted the brackets on with the bolts and nuts tightly in place.
B) inserted the horns onto the other end of the brackets and secured them with locking washers and nuts.
7) Now you should have a perfect reach for the grounds to extend towards a nearby bolt which holds the radiator, and simply unbolt, Slip on the ground and re-tighten.
should now look like this:

8) (pretty sure i havent left anything out..so that should be it for all the major work you need to do! )
Another shot of almost finished work:

JUST REMEMBER, MAKE SURE TO HAVE RED FACING THE OTHER WAY SO U CAN REINSERT THE GRILL..unless u want to roll w no grill
like this lol:

But if you do, you need to make it look like so:


9) Check the horn to see if it works (use remote, its quicker)
10) reinstall grill carefully while makeing sure the openings are pointing down, and drop below the lower plastic portion that comes off the grill - in order to ensure nothing else gets in through the grille
Like so:

And thats it!!
hope the writing wasn't too bad since im brain-dead right now for some reason lol and being my first diy
well, ENJOY!
-Taus

Last edited:
