So here it is, a front speaker component set install on a '17 CX-5 NON-BOSE
Please note: before proceeding be sure to heed Anchorman's caution in this thread about an important side impact sensor which could have it's performance affected by an improper speaker installation. That link also includes a link to a valuable PDF about how to get the door panel apart - which I totally used and were a MASSIVE help.
https://www.mazdas247.com/forum/showthread.php?123864877-2017-speaker-change-WARNING
The speakers I installed are Polk Audio DB6502 consisting of a 6.5" driver, 0.75" silk dome tweeter and crossover set.

Another part I used in the install is a PAC AOEM-MAZ2. The purpose of this adapter for my install is two-fold.
https://pac-audio.com/catalog/audio-interfacing/aoem-maz2
1 - Provide a place for me to interrupt and patch into OEM wiring without having to make a single cut or splice in an OEM wire - so everything is instantly and completely reversible if needed.
2 - Provide a low level output from the OEM stereo system into an amplified bass-box that I will be adding at a later time.
Although not officially supported in the vehicle I took a leap in trying it out with an educated guess that it would be just fine (and it has been). I had previously used this very same piece in my 2010 Mazda3 and have seen people using it in everything from Gen1 CX-5's (which had a near identical, if not identical infotainment system & TAU configuration) to Toyota Yaris' and CX-3's with Mazda's infotainment.
https://pac-audio.com/catalog/audio-interfacing/aoem-maz2
I chose those speakers because I like silk dome tweeters, like Polk in general (with past experiences) and this was a pretty economical / pretty efficient 4 Ohm speaker set to get a silk dome tweeter. A lot of other sets in this or lower price range are plastic or metal tweeters which I personally find a bit dull (plastic) and harsh (metal). That's just my personal opinion - I just like the sound of silk tweeters.
My install was broken up into 2 days due to external timing requirements, but total time input from opening car door to snapping the last panel in was probably about 4 hrs. And that included a proper install of my dash cam wiring while I had the pillar off. Admittedly I was pressured to finish on the second day in much less time than I had on the first day so my photos fell short when working on the car vs when I was modding / installing the speakers.
Step 1: Strip the car. I removed both door panels and both pillars to get me started. The car came apart and went back together very nicely. A pleasant surprise vs my old installer days. Trickiest 2 parts were:
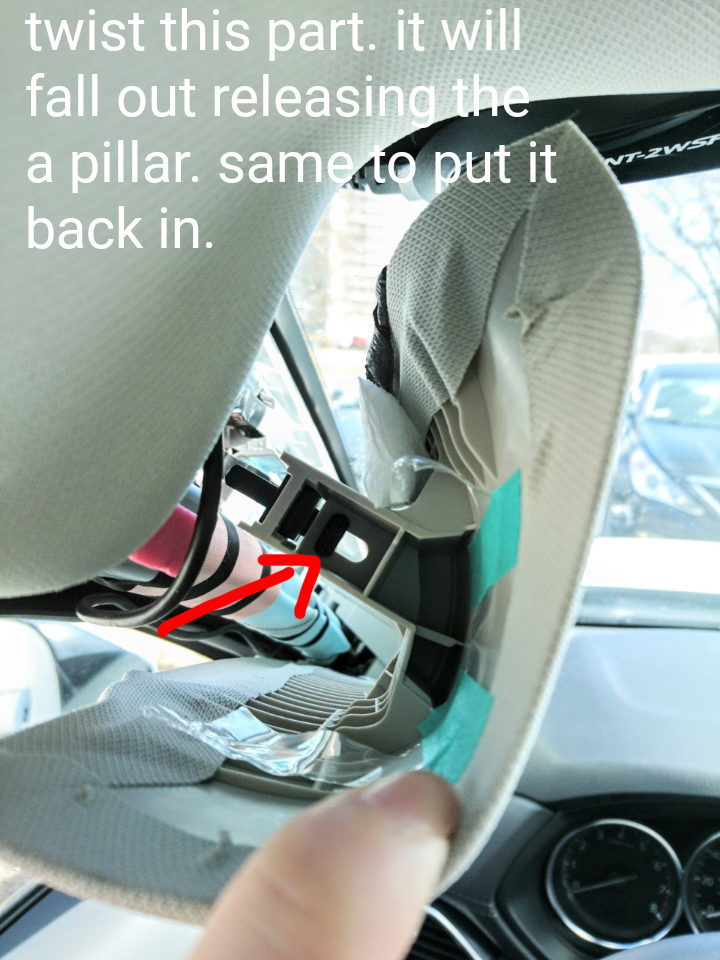
- The tether on the A pillars - a long handled / long nose pair of needle nose pliers helps here, and getting them back in was tougher than getting them out for me.
(Credit to nonoabby123 for providing this pic in another thread)
- The stronger white clips in the upper outboard corner of the door panels. Having never dealt with these before it took a few seconds to figure out the right way to do it. I cracked the first one by putting too much outward pressure on the door panel when trying to get it off, but didn't fully break it and it went back together just fine. Instant learning moment and the second door came off perfectly fine in 1/3 the time.
I then also removed the under-tray under the glove-box (snaps out), the glove box itself (fold down, pop off the piston, pull out), and later the passenger side kick-panel (which required removing the door sill first). The door sill pops straight out. The kick panel had a plastic nut to remove in the footwell and needed the rubber door seal pulled out to release a hidden clip which covers the body seam @ the door frame.
Links to door panel removal tips can be found in these threads:
Step 2: Next I installed the PAC AOEM-MAZ2 to suit my speaker installation:
- The harness is an intercept of the factory wiring harness between the TAU (Tuner Amp Unit) and the car. It is installed by unplugging the harness from the TAU, plugging that car harness into the PAC harness, then plugging the other end of the PAC harness into the TAU. I modified the wiring between the PAC harness ends to suit my speaker installation.
- I carefully examined the PAC harness to pull out the front speaker + and - cables for the front 2 speakers which bridged the OEM harness.
- I then snipped those cables in the center, stripped the ends and extended the cables with some new speaker wire. These extensions will connect to 2 of the 3 crossover connections for each side. The end coming from the TAU is the "input" for that side on the crossover and the end going out to the car is the "output" for the woofer on the crossover. The output will send the woofer signals to the door speaker via the OEM cabling.
- I soldered and shrink-wrapped everything, because it's my car and I was taking my time to do it well. Plus, I was actually enjoying working on the car")
- With the above completed I connected the PAC harness in place between the car's TAU connector and the TAU harness.
Step 3: Run new wires for the tweeters.
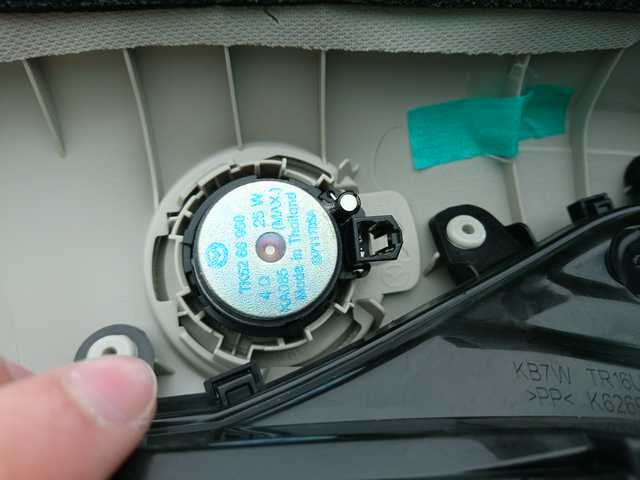
Because the OEM tweeters run in parallel with the door speakers and my installation required a dedicated crossover for each channel (and I didn't want to hack any OEM cabling - at all) it was easiest to mount the speaker crossovers under the dash where I could get the speaker signal to the doors through the OEM cabling and I could run a new wire from the tweeters, which are in the A pillars, to the crossovers under the dash. This keeps the cabling for the tweeter and woofer completely independent as required for the crossover install, without cutting any wires. Getting new cables down the corner of the dash to the under side of the dash was very simple.
I chose to mount both crossovers in the same location in the dash near the TAU for installation convenience and accessibility. As such I ran the tweeter cable from the driver's side zip-tied to an OEM cable chase that wend behind the pedal box. It was easy to remove the front driver's side piece of trans-tunnel shroud in the footwell to get the cable through to the passenger side. When I got it to the passenger side I continued fallowing the OEM harness to the passenger kick panel, turning up to the crossover location above the kick / in front of the TAU / beside the glove-box. Boom, done.
Please note: before proceeding be sure to heed Anchorman's caution in this thread about an important side impact sensor which could have it's performance affected by an improper speaker installation. That link also includes a link to a valuable PDF about how to get the door panel apart - which I totally used and were a MASSIVE help.
https://www.mazdas247.com/forum/showthread.php?123864877-2017-speaker-change-WARNING
The speakers I installed are Polk Audio DB6502 consisting of a 6.5" driver, 0.75" silk dome tweeter and crossover set.
Another part I used in the install is a PAC AOEM-MAZ2. The purpose of this adapter for my install is two-fold.
https://pac-audio.com/catalog/audio-interfacing/aoem-maz2
1 - Provide a place for me to interrupt and patch into OEM wiring without having to make a single cut or splice in an OEM wire - so everything is instantly and completely reversible if needed.
2 - Provide a low level output from the OEM stereo system into an amplified bass-box that I will be adding at a later time.
Although not officially supported in the vehicle I took a leap in trying it out with an educated guess that it would be just fine (and it has been). I had previously used this very same piece in my 2010 Mazda3 and have seen people using it in everything from Gen1 CX-5's (which had a near identical, if not identical infotainment system & TAU configuration) to Toyota Yaris' and CX-3's with Mazda's infotainment.
https://pac-audio.com/catalog/audio-interfacing/aoem-maz2
I chose those speakers because I like silk dome tweeters, like Polk in general (with past experiences) and this was a pretty economical / pretty efficient 4 Ohm speaker set to get a silk dome tweeter. A lot of other sets in this or lower price range are plastic or metal tweeters which I personally find a bit dull (plastic) and harsh (metal). That's just my personal opinion - I just like the sound of silk tweeters.
My install was broken up into 2 days due to external timing requirements, but total time input from opening car door to snapping the last panel in was probably about 4 hrs. And that included a proper install of my dash cam wiring while I had the pillar off. Admittedly I was pressured to finish on the second day in much less time than I had on the first day so my photos fell short when working on the car vs when I was modding / installing the speakers.
Step 1: Strip the car. I removed both door panels and both pillars to get me started. The car came apart and went back together very nicely. A pleasant surprise vs my old installer days. Trickiest 2 parts were:
- The tether on the A pillars - a long handled / long nose pair of needle nose pliers helps here, and getting them back in was tougher than getting them out for me.
(Credit to nonoabby123 for providing this pic in another thread)
- The stronger white clips in the upper outboard corner of the door panels. Having never dealt with these before it took a few seconds to figure out the right way to do it. I cracked the first one by putting too much outward pressure on the door panel when trying to get it off, but didn't fully break it and it went back together just fine. Instant learning moment and the second door came off perfectly fine in 1/3 the time.
I then also removed the under-tray under the glove-box (snaps out), the glove box itself (fold down, pop off the piston, pull out), and later the passenger side kick-panel (which required removing the door sill first). The door sill pops straight out. The kick panel had a plastic nut to remove in the footwell and needed the rubber door seal pulled out to release a hidden clip which covers the body seam @ the door frame.
Links to door panel removal tips can be found in these threads:
Step 2: Next I installed the PAC AOEM-MAZ2 to suit my speaker installation:
- The harness is an intercept of the factory wiring harness between the TAU (Tuner Amp Unit) and the car. It is installed by unplugging the harness from the TAU, plugging that car harness into the PAC harness, then plugging the other end of the PAC harness into the TAU. I modified the wiring between the PAC harness ends to suit my speaker installation.
- I carefully examined the PAC harness to pull out the front speaker + and - cables for the front 2 speakers which bridged the OEM harness.
- I then snipped those cables in the center, stripped the ends and extended the cables with some new speaker wire. These extensions will connect to 2 of the 3 crossover connections for each side. The end coming from the TAU is the "input" for that side on the crossover and the end going out to the car is the "output" for the woofer on the crossover. The output will send the woofer signals to the door speaker via the OEM cabling.
- I soldered and shrink-wrapped everything, because it's my car and I was taking my time to do it well. Plus, I was actually enjoying working on the car
- With the above completed I connected the PAC harness in place between the car's TAU connector and the TAU harness.
Step 3: Run new wires for the tweeters.
Because the OEM tweeters run in parallel with the door speakers and my installation required a dedicated crossover for each channel (and I didn't want to hack any OEM cabling - at all) it was easiest to mount the speaker crossovers under the dash where I could get the speaker signal to the doors through the OEM cabling and I could run a new wire from the tweeters, which are in the A pillars, to the crossovers under the dash. This keeps the cabling for the tweeter and woofer completely independent as required for the crossover install, without cutting any wires. Getting new cables down the corner of the dash to the under side of the dash was very simple.
I chose to mount both crossovers in the same location in the dash near the TAU for installation convenience and accessibility. As such I ran the tweeter cable from the driver's side zip-tied to an OEM cable chase that wend behind the pedal box. It was easy to remove the front driver's side piece of trans-tunnel shroud in the footwell to get the cable through to the passenger side. When I got it to the passenger side I continued fallowing the OEM harness to the passenger kick panel, turning up to the crossover location above the kick / in front of the TAU / beside the glove-box. Boom, done.
Last edited: