AWR Insert How To...
Good news! This is very easy! I did it alone in about 30 minutes. I don't yet have the passenger side inserts, but I am so happy with these I am getting those soon. I would guess installation would be nearly identical (obviously except for battery removal, etc) just from the other fender's perspective.
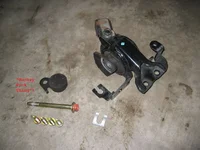
Tools required:
-"Normal Protege tool set":10,12,14,17mm in deep AND shallow sockets. 3/8" drive socket wrench with one or two extensions is fine.
-A medium sized flathead screwdriver
-A pair of pliers for the clutch line clip
-Plenty of WD-40.
-A friend is nice incase you need help with the positioning (read: fine tuning) of the jack when removing/installing the bolts holding the mount to the frame.
Anyway, on to installing the tranny side insert.
1) Do yourself a favor, disconnect and remove battery and tray! Also, I found removing portions of your intake may help depending on your setup; your choice.
2) Put car on jackstands (at least the front). Support transmission with jack (using block of wood so you don't damage tranny).
3) Find happy medium with jack height, where you are supporting tranny, but not raising it. Jacking it too high will make removal/installtion of mount difficult.
4) Once supported, lock the jack in place so it doesn't lower on accident.
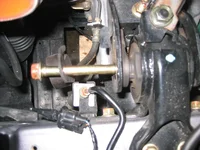
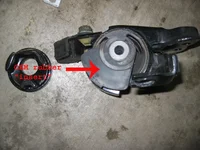
5) Remove Bolt #1. It is a 17mm head. There is a hockey pucked shaped, metal and rubber piece hanging off of the bolt, save this for reinstallation in step #14 if you choose to do so (I did). As with all bolts in this install, you will need some torque on the wrench, but once you break it lose, it just takes time going thru all the threads. I noticed this bolt was hard to remove, since the threads were catching even though they were no longer threaded in. (likely due to jack height). But after a few seconds of pulling and turning the bolt, I got it free.
6) With a pair of standard pliers, remove the clip holding the clutch line in.
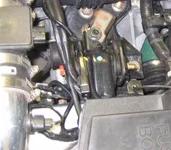
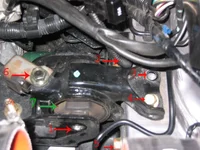
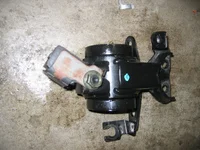
7) Refering to overview.jpg, remove bolts #2, #3, #4, #5. (I believe they are all 14mm) They are gold colored bolts holding the mount to the frame.
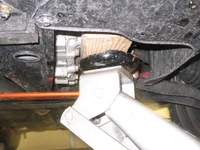
8) Being mindful of the clutch line, carefully pull mount straight up out of the car.
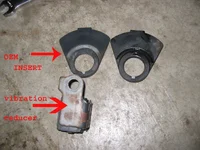
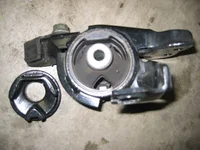
9) Set mount on ground. Remove two "pie shaped" rubber inserts from either side. Save them if you ever want to reinstall, otherwise discard as they will not be re-used.
10) Using a copious amount of WD-40, spray rubber portion of mount and your new poly inserts.
11) Slide inserts into place. The inserts are completely identical, so do not worry about which one goes on which side of the mount. Make sure they are fully seated.
12) If you want to, remove the rubber vibration isolator on top of the mount. It is held in placve by bolt #6. I did because mine was rusting and I can always reinstall as desired. There probably is no benefit to removing this other than a fractional weight reduction or aesthetics (I did it for both reasons)
13) Again, being mindful of the clutch line, carefully lower mount back into place. It may seem like it is now too wide with the poly inserts, but it will fit. What I did was "catch" one side at an angle, then wedge your flathead screwdriver into the remaining gap on the other side, then push straight down. Eventually, you will get it in with out any problems.
14) From here on out, you will have to do what works best for you. I did bolt #1 (17mm long one connecting the mount to the tranny) first. You may choose not to depending on how well everything lines up. I figured starting here was like doing the border of a puzzle, then the other remaining 4 bolts was like "filling in the rest". Do it in whatever order you want to. Just don't re-position the jack until you are POSITIVE you can't get it bolted in with the jack where you left it in Step 3-4.
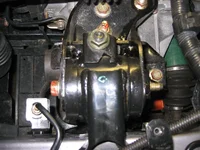
15) Continue with reinstalling bolts #2-5 (the 14mm gold ones). They are in one of the below pictures. Obviously, you will only do one at a time, and as such, you will be able to determine then if putting pressure on the mount from side to side (crowbar, etc) will be necessary or if raising or lowering the jack helps realignment of the bolts to their holes. If you can't get a bolt started, but the hole is *nearly* aligned but not all the way, just try putting more pressure on it as needed to help it seat itself as you turn it. It will eventually catch and screw in straight, they all will.
16) I found that installing each bolt to about 90% tightness helps. Then once you get all four in place, give all five bolts (#1-5) a final tightening.
17) Reinstall clutch line clip. Make sure it is fully installed.
18) Finally, you can lower the jack while observing mount to make sure everything is cool.
19) Once you are staisfied everything is tightened, reinstall battery and tray.
20) Take car out and see how wheel hop and vibration is reduced! Enjoy!
PM me for questions, etc. Please do a search if you want to know where to get these/pricing, etc.
Good news! This is very easy! I did it alone in about 30 minutes. I don't yet have the passenger side inserts, but I am so happy with these I am getting those soon. I would guess installation would be nearly identical (obviously except for battery removal, etc) just from the other fender's perspective.
Tools required:
-"Normal Protege tool set":10,12,14,17mm in deep AND shallow sockets. 3/8" drive socket wrench with one or two extensions is fine.
-A medium sized flathead screwdriver
-A pair of pliers for the clutch line clip
-Plenty of WD-40.
-A friend is nice incase you need help with the positioning (read: fine tuning) of the jack when removing/installing the bolts holding the mount to the frame.
Anyway, on to installing the tranny side insert.
1) Do yourself a favor, disconnect and remove battery and tray! Also, I found removing portions of your intake may help depending on your setup; your choice.
2) Put car on jackstands (at least the front). Support transmission with jack (using block of wood so you don't damage tranny).
3) Find happy medium with jack height, where you are supporting tranny, but not raising it. Jacking it too high will make removal/installtion of mount difficult.
4) Once supported, lock the jack in place so it doesn't lower on accident.
5) Remove Bolt #1. It is a 17mm head. There is a hockey pucked shaped, metal and rubber piece hanging off of the bolt, save this for reinstallation in step #14 if you choose to do so (I did). As with all bolts in this install, you will need some torque on the wrench, but once you break it lose, it just takes time going thru all the threads. I noticed this bolt was hard to remove, since the threads were catching even though they were no longer threaded in. (likely due to jack height). But after a few seconds of pulling and turning the bolt, I got it free.
6) With a pair of standard pliers, remove the clip holding the clutch line in.
7) Refering to overview.jpg, remove bolts #2, #3, #4, #5. (I believe they are all 14mm) They are gold colored bolts holding the mount to the frame.
8) Being mindful of the clutch line, carefully pull mount straight up out of the car.
9) Set mount on ground. Remove two "pie shaped" rubber inserts from either side. Save them if you ever want to reinstall, otherwise discard as they will not be re-used.
10) Using a copious amount of WD-40, spray rubber portion of mount and your new poly inserts.
11) Slide inserts into place. The inserts are completely identical, so do not worry about which one goes on which side of the mount. Make sure they are fully seated.
12) If you want to, remove the rubber vibration isolator on top of the mount. It is held in placve by bolt #6. I did because mine was rusting and I can always reinstall as desired. There probably is no benefit to removing this other than a fractional weight reduction or aesthetics (I did it for both reasons)
13) Again, being mindful of the clutch line, carefully lower mount back into place. It may seem like it is now too wide with the poly inserts, but it will fit. What I did was "catch" one side at an angle, then wedge your flathead screwdriver into the remaining gap on the other side, then push straight down. Eventually, you will get it in with out any problems.
14) From here on out, you will have to do what works best for you. I did bolt #1 (17mm long one connecting the mount to the tranny) first. You may choose not to depending on how well everything lines up. I figured starting here was like doing the border of a puzzle, then the other remaining 4 bolts was like "filling in the rest". Do it in whatever order you want to. Just don't re-position the jack until you are POSITIVE you can't get it bolted in with the jack where you left it in Step 3-4.
15) Continue with reinstalling bolts #2-5 (the 14mm gold ones). They are in one of the below pictures. Obviously, you will only do one at a time, and as such, you will be able to determine then if putting pressure on the mount from side to side (crowbar, etc) will be necessary or if raising or lowering the jack helps realignment of the bolts to their holes. If you can't get a bolt started, but the hole is *nearly* aligned but not all the way, just try putting more pressure on it as needed to help it seat itself as you turn it. It will eventually catch and screw in straight, they all will.
16) I found that installing each bolt to about 90% tightness helps. Then once you get all four in place, give all five bolts (#1-5) a final tightening.
17) Reinstall clutch line clip. Make sure it is fully installed.
18) Finally, you can lower the jack while observing mount to make sure everything is cool.
19) Once you are staisfied everything is tightened, reinstall battery and tray.
20) Take car out and see how wheel hop and vibration is reduced! Enjoy!
PM me for questions, etc. Please do a search if you want to know where to get these/pricing, etc.
Last edited: