TreyP
2018 Soul Red AWD Touring CX-5
This was done on my 2014 CX-5 Touring with Bose/Moonroof package and blind spot monitoring. I do not have the Tech Package. Your experience may vary if you do not have this exact year, model and options.
EDIT: THE PROCEDURE ALSO WORKED ON MY NEWER 2018 TOURING, AS SHOWN IN THE PROCESS BELOW
The good news is that Mazda has partially run the wires, which saves a ton of time having to install relays, add a fuse kits and running wires through the door and into the car.
The bad news is that it is still quite a process, but not nearly as bad as some other cars that I have done which took 8 hours to complete. This took me 4.5 hours - 3 hours for the first side, part of which was documenting the process, part of which was finding and testing the proper wires, and part of which was making stupid mistakes like realizing I left a piece of inner trim off after I had reinstalled the door panel and having to backtrack to fix it. The second side took 'only' 1.5 hours.
Here comes the Disclaimer: This is for informational purposes only, I am NOT responsible for any damage you do to yourself or your car if you attempt to follow this process and mess it up. When in doubt, hire a professional.")
Things you will need:


Begin by removing this piece of trim by popping it off with a screwdriver inserted as shown.

Remove the screw behind the trim.

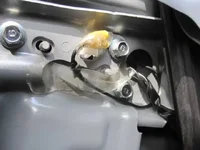
Take out this rubber piece inside of the door pull handle and the screw behind it.

Pull off this trim piece.

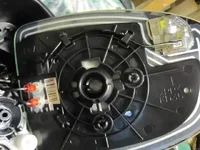
You can now pop the door panel off by starting at the lower rear corner and prying it off with your fingers. Some of the white plastic holders will most likely stay in the metal part of the door when you do this. Don't panic, they can be pulled out and reused even if they look mangled and broken. You could also buy some new ones if you prefer. Once all these are loose, lift the door panel up and out of the window groove.
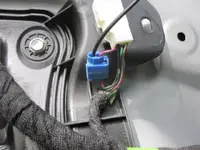
There are two connectors for the windows/locks to remove and the door handle itself just pushes easily out though the back of the panel. Once this is done the panel is completely unattached and can be set aside in a safe place. I put it in the trunk area while I was working.
CONTINUED BELOW
EDIT: THE PROCEDURE ALSO WORKED ON MY NEWER 2018 TOURING, AS SHOWN IN THE PROCESS BELOW
The good news is that Mazda has partially run the wires, which saves a ton of time having to install relays, add a fuse kits and running wires through the door and into the car.
The bad news is that it is still quite a process, but not nearly as bad as some other cars that I have done which took 8 hours to complete. This took me 4.5 hours - 3 hours for the first side, part of which was documenting the process, part of which was finding and testing the proper wires, and part of which was making stupid mistakes like realizing I left a piece of inner trim off after I had reinstalled the door panel and having to backtrack to fix it. The second side took 'only' 1.5 hours.
Here comes the Disclaimer: This is for informational purposes only, I am NOT responsible for any damage you do to yourself or your car if you attempt to follow this process and mess it up. When in doubt, hire a professional.
Things you will need:
- Heated Mirrors - I got mine from www.OEMMazdaParts.com Part # KE-40691G1B and KE-40691G7B ($126.59 total cost, with shipping)
- Around 6' of wire. I used 16 gauge, but 18 would have been a little easier to work with.
- Some quick splices. You can get by without them, but they speed up the process and make for a more professional job.
- Some of these.
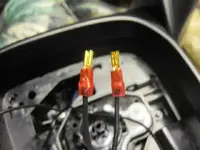
- 2 Ring Terminals, used for grounding, and pictured in the process below.
Begin by removing this piece of trim by popping it off with a screwdriver inserted as shown.
Remove the screw behind the trim.
Take out this rubber piece inside of the door pull handle and the screw behind it.
Pull off this trim piece.
You can now pop the door panel off by starting at the lower rear corner and prying it off with your fingers. Some of the white plastic holders will most likely stay in the metal part of the door when you do this. Don't panic, they can be pulled out and reused even if they look mangled and broken. You could also buy some new ones if you prefer. Once all these are loose, lift the door panel up and out of the window groove.
There are two connectors for the windows/locks to remove and the door handle itself just pushes easily out though the back of the panel. Once this is done the panel is completely unattached and can be set aside in a safe place. I put it in the trunk area while I was working.
CONTINUED BELOW
Last edited: