MN Speed3 in HDR

Parking ramp is at Lexington and Energy Park drive just north of 94. Honestly, I have no clue why it is there in the first place. I would like to find some junk yards and train yards to take more HDR photos...

Photos were slightly altered. My buddy used Photoshop to bend the light to create different color schemes. Yeah, it looks like a comic book, however there is no "painting" added to the photos. If you take a photo in "raw" format it looks nearly like those pictures above. Only thing he changed was the lighting...

Search the web for HDR photos and you will find many out there. If you are going to do it on your own, you will need an SLR camera to take the raw photos, otherwise you can fuse multiple exposures over top of eachother, however the quality is non-existant.
 
these are heavily photoshoped, that is what you have to do to obtain HDR photos, it is multiple exposures (not only in RAW) that are fused together to make it pop better
 
I don't want to sould like a dick but those photos are horrible. The reason they are so grainy is because they were not shot at the highest quality setting, or the program that was being used to process the images was not used properly. If your buddy has a Nikon I can post up for him the exact settings he should use to get some great shots of your car for you. When shooting HDR's with an SLR, there are a lot of things you have to look out for to make sure you get quality shots. Normally, when you bracket images for an HDR, you want to pre-focus the camera, and then set it to manual focus. If this is not done, and the camera is left to autofocus, the camera will slightly re-focus and all of your shots will be at different focus points. Not good for HDR's. This is why your images came out blurry. Then you also have to take into account metering. If the camera is allowed to meter the exposure for every shot taken, each shot will have a slightly different exposure. Also not good for HDR's. In post processing, especially if shot in RAW, nothing can be done to the photo before processing it in an HDR program such as Photomatix Pro, which is probably the best out there for HDR processing. Don't use just the plug-in for Photoshop, as this does not work nowhere near as well as the stand-alone program. Once you are done, the photos can have a clean look, as if they were not composed as an HDR, or the can have a very artistic look, such as the effect your friend was attempting. I will attach a couple recent HDR's I shot to give you an idea. Again, please don't take offence, I am really trying to help. I'm sure you would love to have some nice shots of that beautiful MS3. I can't wait till the weather here in Chicago lets me get a clean car out to get some!

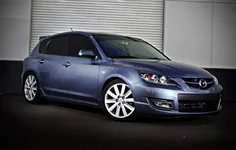
This was composed from a 7 shot bracket and processed in Photomatix and finished in CS3. Meant to have a more "artistic" look.

3275107947_dc6a3510e9_o.jpg


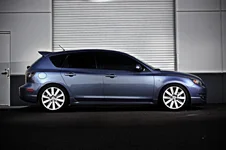
This was a single shot HDR, processed in Photomatix then finished in CS3. Meant to have a cleaner, "non-HDR" look.

3289952874_2382297b0b_o.jpg
 
Last edited:
friends cannon awhile ago..hdr slr I dont know
 

Attachments

  • car front shot.webp
    car front shot.webp
    46.5 KB · Views: 211
  • car side shot.webp
    car side shot.webp
    48.6 KB · Views: 187
  • rolling shot.webp
    rolling shot.webp
    38.3 KB · Views: 206
friends cannon awhile ago..hdr slr I dont know

Nice shots! It was taken with an SLR, however they are not HDR's. They were taken with a Canon 40D with a 38mm prime lens for the first two and an EF28-135mm f/3.5-5.6 lens for the last. However, they were all three processed in Photoshop Elements 6.0, so they are not HDR's. PSE6 does not have the ability to process HDR's. Beautiful shots though!
 
Yeah, a bit too much noise going on. Get a tripod, use AEB if you have it set to -1, 0, +1, use the highest ISO setting, shoot on Av mode, and use a self-timer or remote. Any movement is going to make the final image really hard to align, and you'll get ghosting or blurring.

If you want more range, first change the exposure setting to +2, then do an AEB...that would give a range of 0, +2, +4...then carefully change it to -2 and take another AEB shot with a range of -4, -2, 0. Throw out one of the 0EV pictures and merge with a good program (I use Dynamic Photo HDR, but Photomatrix is a really good one too).

Here are a couple I took at my mom's new house in AZ...these are all from 3 pictures at -1, 0, +1EV:

DisplayItemsKitchenHDRRESIZED.jpg


LampHDRRESIZED.jpg


OfficeHDRRESIZED.jpg


Now, I'm not saying I'm professional or even amateur level with this, but these are tips I learned while researching how to get better at the technique.
 
Back