$2008 GRM Challenge – Turbo AWD Mercury Tracer LTS

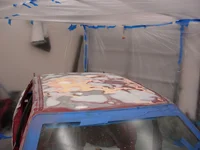
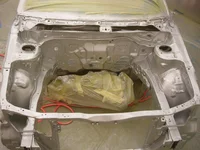
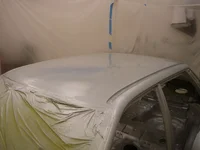
Painting sucks. The only thing worse is the prep work leading up to it. In all, we spent a total of 17 hours alone prepping the hail damaged and previously spray painted roof.

Even with a full breathing apparatus, the fumes are obnoxious; this paint is nasty. Without a mask, the booth would have been uninhabitable. Furthermore, painting the inside and outside of a car is a lot tougher than one might expect. It certainly wore me out. Holding a loaded spray gun at various angles and extensions really gave my shoulders a workout. Whodathunkit?

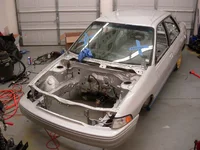
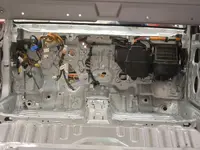
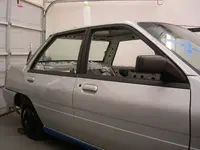
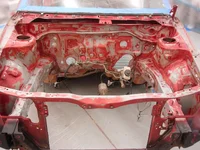
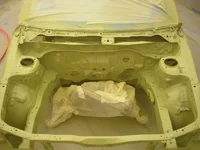
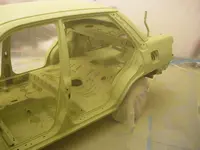
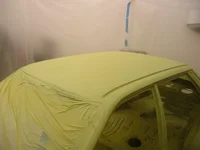
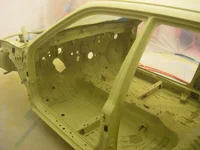
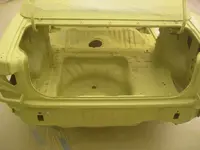
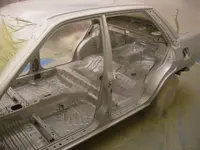
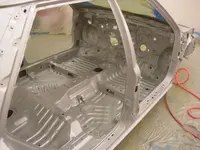
After 4 fumigated rounds, the shell is painted. I initially laid a bonding/sealer primer to bond with the various surfaces that existed on the car (I.E. 3 types of body filler, existing paint, existing clear coat, and bare metal). All my bases were covered. After the primer cured, the metallic silver was sprayed. The base coat laid quite nicely but once dry, it felt very rough. It turns out that was normal due to the metal flake in which the final clear coat would cure. I was worried that dust had settled into the paint. Indeed, the roughness was corrected upon the application of two rounds of clear coat. The paint looks surprisingly good in person with only a slight orange peal which was to be expected. The spray looks many times better than the paint applied to the Miata (though, I have yet to see the Tracer in direct sun light). Said orange peal will be corrected with a good buffing and compound.


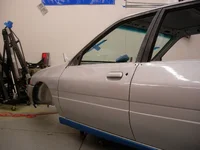
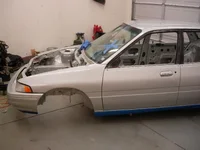
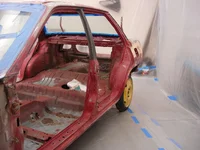
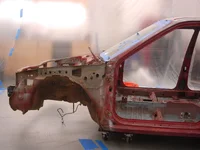
The most difficult portion of the spraying is complete; that being the chassis. I still have the doors, trunk lid, hood, fenders, and side skirts to paint. I'll complete that within the next few days as I'll be able to clear the booth of the chassis. I can't wait to start reassembling the bits and pieces. It feels as though a huge page has turned in the build of the car. :)
 

Attachments

  • DSCN5703.webp
    DSCN5703.webp
    161.9 KB · Views: 616
  • DSCN5708.webp
    DSCN5708.webp
    226.9 KB · Views: 588
  • DSCN5709.webp
    DSCN5709.webp
    161.9 KB · Views: 577
  • DSCN5714.webp
    DSCN5714.webp
    307.5 KB · Views: 596
Primer Application

Laying the primer:
 

Attachments

  • DSCN5719.webp
    DSCN5719.webp
    140.7 KB · Views: 573
  • DSCN5720.webp
    DSCN5720.webp
    122.4 KB · Views: 569
  • DSCN5722.webp
    DSCN5722.webp
    104.9 KB · Views: 558
  • DSCN5721.webp
    DSCN5721.webp
    125.6 KB · Views: 561
  • DSCN5723.webp
    DSCN5723.webp
    107.3 KB · Views: 555
Last edited:
The base coat...

The following pictures are prior to the clear coat. I'll post images of the final spray shortly.
 

Attachments

  • DSCN5726.webp
    DSCN5726.webp
    236.8 KB · Views: 584
  • DSCN5727.webp
    DSCN5727.webp
    212.2 KB · Views: 577
  • DSCN5729.webp
    DSCN5729.webp
    176.1 KB · Views: 563
  • DSCN5728.webp
    DSCN5728.webp
    170.5 KB · Views: 568
  • DSCN5735.webp
    DSCN5735.webp
    139.8 KB · Views: 614
Last edited:
wow!! you should post those pics in the thread where the guy "did it up right." :p
 
Shortly = when it's sunny enough to take pictards, tards. It's been cloudy from Fay and is now raining making body work miserable.

Quick update: The bumpers, front fenders, and side skirts are done. Aside from some freakin' runs, they look pretty good. I definately like the blue that went on the lower parts. I'll be spraying the doors tomorrow. As I don't have time right now to prep the hood and trunk lid, that's going to have to be a last minute spray, which really sucks. I've got to get the car back together. So as soon as the doors are cured, the booth comes down and the assembly resumes.
 
It looks like a car, but doesn't sound like one...

The fun begins....final assembly. Everything but the hood, trunk lid, grill, and trunk spoiler are painted. Due to time constraints, I will be painting those items after everything else is done. A fully painted car isn't as useful or fun as one that actually makes noise and moves itself. ;) I have 3 full weeks left to complete this thing as I will be away for the better part of a week for the SoloII Nationals.

After painting the bulk of the car, assembly has begun. The main cabin harness, blower assy, fenders, doors, door handles, side skirts and a few smaller items are assembled. It's starting to look like something again :). The paint looks pretty good, though it needs a good wet sanding and buffing to really bring it to life.


Assembly will progress throughout next week. Labor Day will yield significant cleaning of the engine and transmission. The turbo manifold has yet to be constructed, but will also be completed next week. Furthermore, the intercooler needs to be mounted and a drive shaft has arrived (YAY!).
 

Attachments

  • DSCN5750.webp
    DSCN5750.webp
    246 KB · Views: 956
  • DSCN5742.webp
    DSCN5742.webp
    156.3 KB · Views: 890
  • DSCN5741.webp
    DSCN5741.webp
    187 KB · Views: 929
  • DSCN5747.webp
    DSCN5747.webp
    250.6 KB · Views: 914
  • DSCN5748.webp
    DSCN5748.webp
    148.3 KB · Views: 919
Work is progressing and today I was able to accomplish a number of tasks. I completed the rear transmission mount, finalized the cross member, added the 4th steering rack mount to the subframe, cleaned the transmission, and trimmed the doors.

As stated in earlier posts, I would be finalizing the fourth transmission mount and fourth steering rack mount. I finally got around to completing them and am glad to be done with it. The subframe is now finalized as is the cross member.

Due to the space constraints between the transmission and firewall, neither the GTX nor Tracer rear mount would fit. After significantly trimming the rear bracket, I rigged in an Energy Suspension sway bar bushing and employed a 1/2 piece of rigid gas pipe. The combo seems to line up properly, but that will ultimately be seen when everything is assembled.

The transmission is in a lot better state, at least cosmetically than it was previously. After an hour of scrubbing, power washing, scrubbing, and wire wheeling, it's as good as it's going to get. I'll say that it definitely looks a lot better. At least it has some shine :).

While I was working on the above items, a friend worked on applying vinyl to the window surrounds and lower window trim pieces. In all, it came out great and added a touch of newness to the car. Later, I assembled the loose trim and mirrors...it's definitely coming together.
 

Attachments

  • DSCN5799.webp
    DSCN5799.webp
    235.5 KB · Views: 961
  • DSCN5800.webp
    DSCN5800.webp
    302.4 KB · Views: 983
  • DSCN5803.webp
    DSCN5803.webp
    152.7 KB · Views: 939
  • DSCN5806.webp
    DSCN5806.webp
    198.5 KB · Views: 922
  • DSCN5810.webp
    DSCN5810.webp
    148.7 KB · Views: 975
I was still working on mine the night before.

Of course...I had worse problems the next day LOL.
 
u have one month... r u on schedule?

Umm...sure? ;) I've been busting my hump getting this thing ready. It's gonna be a tight squeeze, but I think I'll have it finished in time. The driveline goes back in this week. The engine is starting to shine up pretty good. This weekend, the turbo assy begins.

I was still working on mine the night before.

Of course...I had worse problems the next day LOL.

I don't plan on running 19+ degrees of base advance, either. If anything lets go, it'll be the center diff. :)

Dang the car is looking pretty good!

Thanks! She'll be making noise soon enough.
 
Make sure you record a vid clip for those you cant see the start in person.
<-----------ME
Again wicked sick build.
 
Back