Hard Pipes install??

genius

Member
Contributor
:
MazdaSpeed Protege
Ok guys,
I bought a bunch of 2 inch sections and some silicone couplers. I beaded the pipes and epoxied the couplers to the pipes. Right now I just have the lower I/C pipe complete. The lower pipe uses three sections of pipe, the reason was to hopefully give a little bit of flex, however I didn't have any hump copuplers.

I hear nightmare stories of pipes popping off... I am running about 8 psi. Is this truly going to be a concern? I can't imagine it, but I leave it to the experts:)
 
Ooooh...sounds like it may look ghetto, post some pics. As far as the popping goes, it happened to me once while my girlfriend was driving. It's pretty ******* scary to say the least. She was in third gear and the car was bucking like crazy, then when she took it out of gear, it just died. Took me about five minutes to fix. My advice would be to keep the tools you need to put it back on in your trunk for awhile.
 
epoxied hard pipes?????? wow. good luck. do you have motor mounts? FYI i had epoxied my bov to my stock pipes initially, didn't want to pay for real hard pipes at that time, worked well for about 4 months, and weather it was the heat from the engine or bucking of the engine but the epoxie seal broke and my bov was just kinda hanging there half way. word of advice, with our engine bucking as hard as it does. just buy the hard pipes. dsm's $200 pipes are awesome, inexpensive and look nice.
 
Last edited:
OK... here is the deal with pics.

I inadvertanly cracked my original factory pipe when I was doing the coolant bypass. I filled the crack with epoxy, but it always leaked so I had to do something.

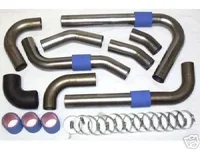
I went on Ebay and bought a universal hardpipe set for $115. Came with 6 couplers, 12 worm clamps, a 90 degree rubber bend (not sure I would use that), and probably about 9 sections of 2 inch pipe bent in several diffferent patterns.

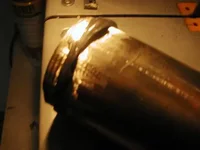
After choosing the pipes, we (my wife helped, she loves cutting metal, mostly for the sparks) washed them out, and deburred them with a dremel. We then used the dremel to sand a ring around both ends of every pipe to rough it up. I then used duct tape and made two stripes on every end, leaving a 1/4 inch gap between. I then ran a bead of J-B weld in the gap and then pulled the tape before it dried (no I am not leaving duct tape on my car). I did that to each pipe that I used. The picture is of a pipe I thought I was going to use but changed my mind.

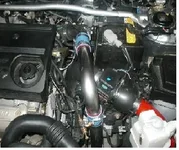
I then simply assembled the pipes by using the silicone and sliding them over my J-B weld humps. On a select few, I added epoxy on the back side of the humps and then worm clamped them all down.

Now we did run into a hitch. I spent a year reading and learning from you guys, (sorry if you feel used :) 
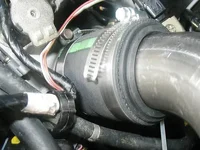
) but one thing I didn't read about was that the thottle bottle had an outer diameter of 2.5 inches (doh) and all I had was 2" pipe and 2" silicone.

My poor car was broke down for 2 days, I had to drive my wife's automatic prelude while I figured out how to resolve that one, because I cracked the OEM pipe again as I was digging it out. Then it hit me, radiator hose! I took a 4 inch length of the best 2.5" ID radiator hose money can buy. I bought 2.5" to 2" rubber hose bushing and some worm clamps and wallah!!!

My boost holds at 8.5 psi with no drop!!! And that is with just the lower I/C completed. That was the cracked pipe and also the softest. My turkey is slightly muffled (which is unfortunate because I like my turkey).

I need a vacation from this stress, I am looking for an excuse to leave the upper I/C pipe alone because I don't know how to do the nipple for the recirculating hose... I can't squeeze the pipe, isn't the factory upper I/C hard enough?!?

I never posted pics on here before, hopefully this works, I attached 4 of them.
 

Attachments

  • new pipes.webp
    new pipes.webp
    13.8 KB · Views: 286
  • final.webp
    final.webp
    34.7 KB · Views: 345
  • thottle body.webp
    thottle body.webp
    27.1 KB · Views: 324
  • pipe end.webp
    pipe end.webp
    7.8 KB · Views: 301
Last edited:
go to the link in my sig,by your self some real couplers,and clamps.

the drive your self to your nearest welding shop,and have all of it welded proper

you know you can get some cheap pipes from DSM,or some alluminum pipes from WWW.TURBOHOSES.COM
 
mspdfreak said:
Ooooh...sounds like it may look ghetto, post some pics. As far as the popping goes, it happened to me once while my girlfriend was driving. It's pretty ******* scary to say the least. She was in third gear and the car was bucking like crazy, then when she took it out of gear, it just died. Took me about five minutes to fix. My advice would be to keep the tools you need to put it back on in your trunk for awhile.

what kind of pipes do you have?
 
They look pretty good, I was expecting much worse.
 
not bad for $115. I give thumbs up for doing something yourself. I wanted to do this before my fmic but pussied out and got byhondspeed pipes. i dont think you would ever tell a difference between yours and the top of the line hard pipes, as long as they dont expand your fine.
 
Diy

noclue119 said:
115? damn you could of gotten them from dsmconvert for 200.

Moeny isn't really the issue, however, I don't have $1100 for the top of the line. I wish I could get a FMIC, but then I would have to redo all the pipes.

I get more satisfaction out making things work from scratch. I bought the raw pipes and ieced them together to make the engine look the way I want it to look, not what another company has decided.

One of the responses is a good one. I would like to weld one of the joints together to eliminate one coupler. I still want to keep one coupler in so that there is room for movement.

I don't want to take it to a shop, I want to either buy or borrow a MIG or atleast a Flux core welder and do it myself.

But this is just my personal opinion:)
 
Why not get a ban saw cut some mandrel bends and pay some welder like $20-50 to weld them for you? I dont think it would be a problem if the copler is secured tight enough.
 
Back