As I got my car back, I decided once and for all to hardwire my Dashcam. I got quoted around $150 Canadian for a professional installation; decided I could do it on my own — at least try.
I have a VIOFO A129 Pro Duo and I’ve been meaning to get it hardwired since day 1. I didn’t have it on since I got the windshield tinted, so I got some 3M double-sided (exterior) tape to stick it. The built-in sticker was no longer adhesive.
I decided not to get a mirror adapter as one, I didn’t want to worry about draining my battery, and two there is an adapter for Viofos that (from my understanding) allows the camera to automatically go into parking mode when the car is off.
I followed a manual for CX9 dashcam installation as well as the Bogdan Berg write-up.
Getting the rear camera to work ended up being much easier than I initially thought. I routed the cable underneath the front door sill, and let it run freely under the passenger seat. I then got a little bit lazy and didn't remove the rear left door sill, instead tried to shove as much of the cable as possible underneath it to make sure it's not really visible. It worked. I then went up the rear left door seal and managed to hide it in between two trim pieces on the C pillar. That's when it was going to get complicated if I wanted to blindly follow Bogdan Berg's guidelines, but I decided to let some cable show. To me, it wasn't worth the hassle and I was scared the cable wouldn't be long enough.
Anyway, the bigger issue was tapping into the fuse box. It took me some time to figure out what kind of wire-a-circuit adapter I would need. Turns out it's a low-profile Mini, I had got a regular Mini instead. So I'm still powering the camera through a cigarette lighter socket, but at least the rear camera works.
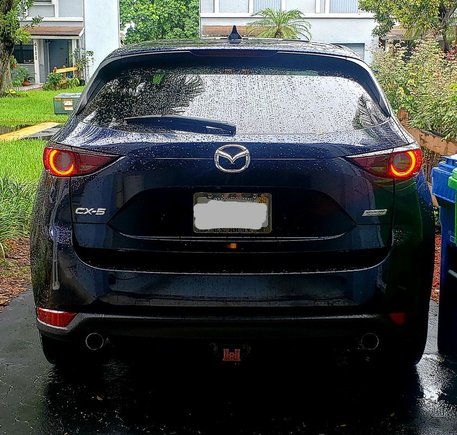
Rear camera placement:
It's not great, and it's not covered by the wiper; but the cable was too short so I couldn't move it towards the middle. It took me around 2 hours to do everything (except tapping the fuse box) and I was getting tired towards the end, so I had initially decided to route the cable under the gasket but vertically. (So water would undoubtedly leak through there when it rains) Don't ask me why I did that, I don't know. I noticed that was stupid as I was taking pictures, and fixed it.
View attachment 312291
Driver side C-pillar: Didn't need to remove any trim pieces, there was enough give for me to hide a cable in between.
View attachment 312292
Driver-side C pillar, different angle
View attachment 312295
Rear left door sill: Cable runs freely between front left door sill and rear left door sill. I could (and maybe will) clean this up by removing the door sill and routing underneath the rubber seal.
View attachment 312293
Front left door sill: I could spend an extra 15-20 minutes to hide the cable better, but it's barely visible to begin with so I let it be for now.
View attachment 312300
Driver's side A pillar: This took me some time to figure out. Initially I routed the cable above the trim, then I decided to remove the trim piece and route it properly.
View attachment 312298
And the camera: Ignore the cable going down, it's temporarily there as I still need to tap the fuse box.
View attachment 312299
I didn't want to pay a shop to do this for me because although it's obvious they would do a better job than I did, I believe I did an acceptable job and that I can improve it over time.
EDIT:
https://www.amazon.com (commissions earned) did the trick for the fuse box, and I managed to fully hardwire the dashcam.
PS: This isn't necessarily the best option.
This video does a great job explaining how you should route cables from the dashcam to the fusebox and beyond. There was a weird rattle coming from somewhere (because of the dashcam cables), so I took the time to remove the A pillar completely and route the cables properly. Whether there are any rattles, time will tell -- I did a quick test drive and the noise seems to have disappeared.

") if only I could use it.
if only I could use it.