Thanks for sharing! Disappointing to hear about the butt dyno results though.

You are using an out of date browser. It may not display this or other websites correctly.
You should upgrade or use an alternative browser.
You should upgrade or use an alternative browser.
2016~2023 Ultimate “Grand Tourer”
- Thread starter MGMGT16
- Start date
- :
- 2016 CX-9 GT
I’m not dissatisfied at all! From 2500 to 3500/4000ish it feels similar to stock. From 3500/4000 to 5500/6000 it feels so much better. IIRC, there’s also a 50-100 mile “break in period.” I’ve only got about 15 on it so far so maybe it’ll change sometime this week?Thanks for sharing! Disappointing to hear about the butt dyno results though.
I should also mention this is the fastest vehicle I’ve owned. Drove a 2000 suburban for years then traded up to an underpowered Ford Escape. Our other vehicle right now is a 2017 4Runner with a ton of extra weight in the form of armor along with a lift and larger tires. That thing is a pig. While the CX-9 is by no means tunnel vision inducing, my butt dyno could probably use some recalibrating since it’s used to slow, slower, and we-will-get-to-60-eventually. The CX-9 just feels quick. I know @sm1ke still has his to install so that would be another point of reference
Got it and thanks. Look forward to hear what you think after the break in and sm1ke’s thoughts.
- :
- 2016 CX-9 GT
Update! I noticed some other issues so reached out to Terry at BMS. Turns out I missed the direction to click the box next to “bit6.” That fixed everything. Way more power across the whole rev range and butt dyno is much happier! Went from 7.8 second 0-60 down to 6.5 seconds. I have AT tires and they squealed so could probably get faster with sticker tiresGot it and thanks. Look forward to hear what you think after the break in and sm1ke’s thoughts.
- :
- 2016 CX-9 GT
Had to pick up a 14ft ladder yesterday so I took my wife’s 4Runner with the roll down back window. She used mine for errand running while I was doing that and called to let me know how much quicker the car felt. She was afraid she wasn’t going to realize how fast she was going and get a ticket! I’d say JB4 was worth it
- :
- 2016 CX-9 GT
Worked on the rear fogs today. Used a Dremel engraving bit so it’s not as clean as it could be, but you don’t see the roughness from the outside. I think I’m going to wire them in to come on with the front fogs even though that’s not really the rear fog spec.
Diode Dynamics SSC1 flood pattern mounted behind the rear reflectors:

Reflector carved to match. Will seal off with RTV silicone later if water becomes an issue:

At night, plenty bright for fog use:

Diode Dynamics SSC1 flood pattern mounted behind the rear reflectors:
Reflector carved to match. Will seal off with RTV silicone later if water becomes an issue:
At night, plenty bright for fog use:
- :
- 2016 CX-9 GT
Did an oil change a bit over a week ago. Changed to 7500 mile interval because I am putting more long trips on it so figured the oil is going through fewer heating and cooling cycles. Black stone confirmed that was fine with the oil sample and suggested a 9000 mile interval. Unsure if I’ll try that. Gas % went down too so I’m going to chalk the last sample up to the weather being colder around here. No issues to report
Attachments
- :
- Canada
I'm at my wits end with my own JB4 install. My hands are mangled from trying to get the connector off of the intercooler. I don't want to take the bumper off, I just want to get this one connector out and the rest will be a breeze.
Any tips? The space is too small to get anything but my hand in there. Plastic panel is off (I got frustrated and ripped it out, and the retaining clip is broken). Everyone mentions where the sensor is and how to get to it, but nobody mentions how it comes out. Is there a tab on top? Do you push on the end closest to the wire, or closer to the end of the sensor? Do you push down or pull up? Graaahhh.. I'm giving up for the day. I got everything mounted and I just need the one damn connector out
Any tips? The space is too small to get anything but my hand in there. Plastic panel is off (I got frustrated and ripped it out, and the retaining clip is broken). Everyone mentions where the sensor is and how to get to it, but nobody mentions how it comes out. Is there a tab on top? Do you push on the end closest to the wire, or closer to the end of the sensor? Do you push down or pull up? Graaahhh.. I'm giving up for the day. I got everything mounted and I just need the one damn connector out
Attachments

- :
- 2016 CX-9 GT
I took my bumper off for it so it was significantly easier to install, but IIRC, there is a tab to push on the wire side of the connector and that tab is on the opposite side of where you can see. I’m wondering if it would be easier to peel back the splash guard and come at it from the bottom? The connectors on the JB4 should also give some indication of how the connector is made. Any chance you have a pic of those? Sorry I’m not of more helpI'm at my wits end with my own JB4 install. My hands are mangled from trying to get the connector off of the intercooler. I don't want to take the bumper off, I just want to get this one connector out and the rest will be a breeze.
Any tips? The space is too small to get anything but my hand in there. Plastic panel is off (I got frustrated and ripped it out, and the retaining clip is broken). Everyone mentions where the sensor is and how to get to it, but nobody mentions how it comes out. Is there a tab on top? Do you push on the end closest to the wire, or closer to the end of the sensor? Do you push down or pull up? Graaahhh.. I'm giving up for the day. I got everything mounted and I just need the one damn connector out
- :
- Canada
I took my bumper off for it so it was significantly easier to install, but IIRC, there is a tab to push on the wire side of the connector and that tab is on the opposite side of where you can see. I’m wondering if it would be easier to peel back the splash guard and come at it from the bottom? The connectors on the JB4 should also give some indication of how the connector is made. Any chance you have a pic of those? Sorry I’m not of more help
Oh yeah that's a good point about the connectors, I'll take a look at those and see if I can get a better idea. I did try removing the splash guards on the bottom, but there are additional pieces and some hard plastic that make the area hard to get to. Thanks for the suggestions
- :
- 2016 CX-9 GT
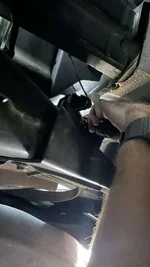
So I went out to quickly see if I could confirm where the tab is. It is on the wire side on the opposite side from where you took your pic, so the same place I though it was. I also was able to reach the connector through the splash guard and disconnect and reconnect it. The tab is very firm and takes quite a bit of force to push. There was one position I was laying in where I could reach the connector through the splash guard with my left hand and touch it through the front of the bumper with my right hand at the same time. Not comfortable at all, but doable. I am 6’1” and 180 lbs. Crappy pic that may or may not help; I couldn’t see the camera when taking the picOh yeah that's a good point about the connectors, I'll take a look at those and see if I can get a better idea. I did try removing the splash guards on the bottom, but there are additional pieces and some hard plastic that make the area hard to get to. Thanks for the suggestions
Attachments
- :
- Canada
So I went out to quickly see if I could confirm where the tab is. It is on the wire side on the opposite side from where you took your pic, so the same place I though it was. I also was able to reach the connector through the splash guard and disconnect and reconnect it. The tab is very firm and takes quite a bit of force to push. There was one position I was laying in where I could reach the connector through the splash guard with my left hand and touch it through the front of the bumper with my right hand at the same time. Not comfortable at all, but doable. I am 6’1” and 180 lbs. Crappy pic that may or may not help; I couldn’t see the camera when taking the pic
Thanks @MGMGT16, that description and picture helps a lot, very much appreciated. If I do it this way, I should be able to push down on the right area of the connector with my left hand while pulling the other end of the connector out with my right, correct?
Hope this works. Once the weather cooperates I'll give it another go.
- :
- 2016 CX-9 GT
The tab to push is on the part of the connector that comes off. You can use whatever combo of hands makes it come off. I found that trying to squeeze/push the stiff tab and wiggle it out with the same hand was difficult. Left hand/thumb to squeeze and right hand to pull/wiggle. Coming from this angle will let you at least use your thumb on the tab, which should be easier than trying to use a finger to depress the tabThanks @MGMGT16, that description and picture helps a lot, very much appreciated. If I do it this way, I should be able to push down on the right area of the connector with my left hand while pulling the other end of the connector out with my right, correct?
Hope this works. Once the weather cooperates I'll give it another go.
- :
- 2016 CX-9 GT
While not strictly something I did to the CX-9, I did purchase a Yakima Skybox 16 on FB Marketplace. They were letting it go for well under the other used options as it was sun faded, had a blemish on the top, and they mangled one of the lid supports. A heat gun and some persuading from various tools straightened out the lid support. https://www.amazon.com (commissions earned) was used to “undo” the sun fading.
Here’s the bottom before the cerakote:

And the top after the cerakote:

Plan is to get some sort of decal to cover the blemish, but haven’t arrived on exactly what it will be yet.
All mounted up:

Here’s the bottom before the cerakote:
And the top after the cerakote:
Plan is to get some sort of decal to cover the blemish, but haven’t arrived on exactly what it will be yet.
All mounted up:
- :
- 2016 CX-9 GT
Rear fog lights are wired up! Shots in the dark are hard to capture well, but these fog lights are a bit brighter than the taillights.

They also have DRLs. Not super useful, but cool nonetheless

There is a bit of light coming out and around the reflectors so I’ll add some rubber seals to keep that in check. Also sealed up the reflectors with some clear silicone since they were occasionally getting water in them
They also have DRLs. Not super useful, but cool nonetheless
There is a bit of light coming out and around the reflectors so I’ll add some rubber seals to keep that in check. Also sealed up the reflectors with some clear silicone since they were occasionally getting water in them
- :
- 2016 CX-9 GT
I did a bit of searching and couldn’t find the answer to this, so hoping someone who’s been here longer knows of a thread with the answer. Anybody mounted an auxiliary light bar in the grille? I know on the newer 4Runners, some placements mess with the adaptive cruise control so I figured that would be the same on the CX-9
Jack Rabbit
Banned
- :
- 18 Mazda CX5 AW
If it happens to my CX5 after warranty, then my choices would be:
View attachment 312470
Thought I smelled burning coolant after driving today. Did some poking and looks like I’ve fallen victim to the coolant leak. Now to decide what to do…
Trade in? DIY the fix? Dealership? Independent mechanic? Let the phone calls begin
1. Indy mechanic - older, wiser & just plain tired to DIY
2. Tradein- if get a decent value
3. DIY- if my only other choice is the dealer prices.
4. Dealership.
Think it's worth the stretch to have an local wrench fix before trade/sell, if not keeping. However my frame is fluid filmed so I would probably have it fixed and then keep.
View attachment 312470
Thought I smelled burning coolant after driving today. Did some poking and looks like I’ve fallen victim to the coolant leak. Now to decide what to do…
Trade in? DIY the fix? Dealership? Independent mechanic? Let the phone calls begin
The parts to perform the repair are listed in the TSB (the head and 4 gasket kits). All in, the parts are around $900 if purchased online (this is about 30% off of list). After adding in things like antifreeze and other miscellaneous stuff the total will creep over a grand if you do it yourself. Beyond the money, though, the problem is that you have to disassemble a lot of crap to get the head off, it's going to take a long time, and it looks like the kind of thing I would really want a lift to do and good tools.
If you go the independent mechanic route, the price will easily go up 2.5x. The dealer route will be even worse - there was a repair estimate for $5k posted elsewhere.
If it were me, I'd fix it and sell it while used valuations are still sky high. I'm always wary of replacing heads on aluminum engines - the blocks can warp slightly over time, making getting a good seal difficult.
Will Carvana or some such site buy a car with a coolant leak? I'd see if they will give you an offer just to see what makes financial sense.
Jack Rabbit
Banned
- :
- 18 Mazda CX5 AW
They most likely will offer junkyard salvage prices. But it's worth a shot to see what the offer would be.The parts to perform the repair are listed in the TSB (the head and 4 gasket kits). All in, the parts are around $900 if purchased online (this is about 30% off of list). After adding in things like antifreeze and other miscellaneous stuff the total will creep over a grand if you do it yourself. Beyond the money, though, the problem is that you have to disassemble a lot of crap to get the head off, it's going to take a long time, and it looks like the kind of thing I would really want a lift to do and good tools.
If you go the independent mechanic route, the price will easily go up 2.5x. The dealer route will be even worse - there was a repair estimate for $5k posted elsewhere.
If it were me, I'd fix it and sell it while used valuations are still sky high. I'm always wary of replacing heads on aluminum engines - the blocks can warp slightly over time, making getting a good seal difficult.
Will Carvana or some such site buy a car with a coolant leak? I'd see if they will give you an offer just to see what makes financial sense.
Similar Threads and Articles
New Posts and Comments
- Replies
- 80
- Views
- 9K
- Replies
- 9
- Views
- 393
- Replies
- 95
- Views
- 23K


- Replies
- 82
- Views
- 11K