Sorry about not replying sooner, I've been to 3 Red Sox games this weekend in Texas. There are some close up pictures below, I still need to do a little touchup where the powder didn't hit the metal right. The white specks and other debris are dirt from driving so much. The process isn't all that hard its just time consuming.
The Process in Story Form:
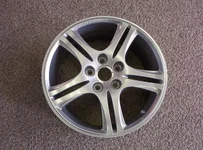
The stock rims come up with a clear coat on them so you have to get that taken off. I called 3 different shops in the area and only 1 did media blasting. Sand, Sugars, and walnut shells all would leave the surface too ruff so you gotta use the plastic stuff to get it off. I paid $80 to have the 4 wheels done and they were ready 2 days later. I neglected to remember that the center caps are plastic, and the media blaster didn't know either. Needless to say the caps got eaten alive during the blasting.
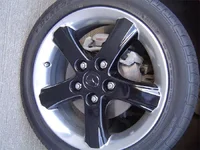
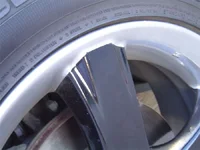
Next up I drove to Austin to have my brother in law powdercoat them, he has the kit you can get from Eastwood and an extra oven from when they remodeled the kitchen. We pinstriped the spokes as best as we could and taped up everything we didn't want the powder to touch. When we did it we couldn't find tape that won't burn up in the oven when you bake the powder but now Eastwood sells the stuff which would have made the process easier. So we sprayed the powder on the wheels and carefully removed the tape leaving the powder on the spokes, set the wheel in the oven and bake for 20-30 minutes. Removing the tape with the powder still being powder is by far the hardest thing ever. One little knick of your knuckle against the powder will screw it all up.
I took the wheels home and they sat in the dining room for a few months until I could sand down the aluminum part. To prevent scratches I taped down the black spokes. Going in steps from 400-1200 grit sand paper I used a lot of elbow grease, each wheel took about 2-3 hours. I next used some Mother's aluminum polish which is about 1500 grit and worked it in. Removed all the tape and sprayed the wheels down with my favorite wheel cleaner and water and they were good to go.
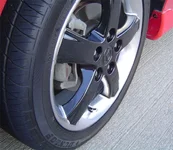
Since the wheel caps got eaten I called up the stealership and bought some new ones for $30. I sprayed them down with Krylon Fusion paint for plastic that was a dead on match.
Had them mounted and rebalanced at Discount Tire for a whopping $80. And bam new rims.
Steps:
1. Remove old rubber tires.
2. Sand Blast Rims
3. Tape off design on the rim
4. Spray powder on the rim
5. Remove tape unless you have heat safe tape.
6. Polish up the lip
7. Remount.
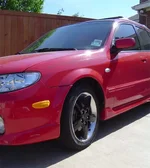
The process would have been a lot shorter had I not been lazy, and school and work interfered. I would say the total cost came to about $200 with everything. My pinstriping isn't perfect but to me they still look good and if I curb one I won't feel as bad. The best thing to is if the rims you have are a little dinged up you can get that out when you sand them down.
I hope that explains everything, anything else ask away. Its nice seeing a big project like this done though.