
iamThames
2010 Mazda2 TS
Introduction
Hi people, I see that there are multiple guides already out there about what to do when swapping out for a new cluster, but most of these guides are either incomplete and doesn’t explain how to program the new cluster for your car, are for the Mazda3 BL, are very hard to find and requires alot of digging, or steps have to be implied from Ford instrument cluster instructions. So, I want to create this guide incase somebody has a Mazda2 DE and would like to upgrade...
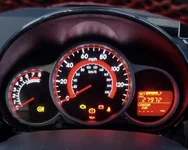
From this...

 ...to this!
for around $60-70USD (prices obviously vary depending on how/where you source them).
With an upgrade like this, you will be able to:
- See your fuel economy statistics
- See your miles remaining on current fuel level
- See your current ambient temperature
- Enjoy a way better looking cluster in your Mazda2

This upgrade also preserves your current odometer data and other basic car information without any requirement of using proprietary tools or software; I literally did this with an OBD2 scanner and FORScan. I think the red instrument cluster design can go really well with an interior theme.
Edit: I understand that this can be a confusing process. If there any any parts of this tutorial that you seem to cannot get your head around, I am able to do this for you if you are willing to ship your instrument clusters. PM me!
PLEASE NOTE: I am not in any way qualified or am an "expert" at this. Rather I have gathered my findings and would like to share it with you all because it worked for my 2010 Mazda2 TS. If you do not feel confident in doing this then maybe that's a sign. If any of these methods can be simplified or you know something that should have been mentioned here, please feel free to leave your comments in this discussion.
This is a moderately intensive project but the outcome is very much worth it. Please read this guide in full before performing any steps. Good luck on your attempt! Any questions just leave a comment in the discussion and I might be able to help you.
Objectives and Equipment Required
When swapping an instrument cluster, either to upgrade or to replace/repair, you must:
- Program the car's immobilizer to the new instrument cluster.
- Transfer old instrument cluster's necessary information to the new cluster.
- Correct the new odometer mileage reading to be accurate with the car's actual mileage.
you will need:
- £15-£30 | New instrument cluster (duh)
- Odometer reading on the new cluster does not have to be lower than your current car's mileage.
- Ensure the new cluster's car is as close of a match to specs of your current car as possible. E.g the sports cluster can have a diesel variant where the maximum rpm is 6000 instead of the required 8500 for my Mazda2 TS Petrol, automatic or manual etc. Do your own research!
- £20 | FORScan-compatible ELM327 OBD2 reader/programmer
- Ensure your OBD2 reader supports HS-CAN protocol (most do)
- FORScan themself may recommend you different adapters, but so long as the OBD2 reader says its compatible with FORScan, then it's no problemo.
- I used ELMConfig OBD2 Adapter USB Scanner with MS-CAN/HS-CAN switch (Amazon)
- £5-£10 | CH341A Mini Programmer
- Ensure when buying a set that it comes with a clip that you can easily attach to the EEPROM (a chip that stores your odometer value) and prongs that you can manually wire to different pins yourself, something like this:
- If your set comes with a 93XXX to 25XXX adapter (or the set youre buying explicitly supports 93XXX type chip), then that will make your life easier.
- I used this set (did not come with any adapters).
- £2-3 | x7 2.54mm Male-Female jumper wires and a jumper bridge
- A small jumper bridge to give the CH341A full 5V for programming, and jumper wires to make the CH341A read/write compatible with the cluster EEPROM.
- If your CH341A programmer set explicitly says compatible with 93XXX chips with a 93XXX to 25XXX adapter, then jumper wires may not be required. However you still need a small jumper bridge like this to give the EEPROM a 5V supply.
- FREE | FORScan software with Extended Licence
- Required to transfer data to the new cluster. You can get a free Extended Licence for 2 months via this link here.
- FREE | CH341A Mini Programmer Software
- Required to read the cluster's EEPROM.
- I used IMSProg. Other programs exist for Windows such as neoProgrammer etc. on the internet. I've tried multiple versions of asProgrammer but I couldn't get it to work.
- WARNING! MAKE SURE YOU ARE NOT DOWNLOADING A VIRUS! Be very vigilant when finding software from the internet.
you might need:
- £10 | Additional Mazda keys
- To reprogram the car's immobilizer, you must have 2 working keys with a chip (4D63 433MHz AFTS) that is compatible with the Passive Anti Theft System (PATS).
- If you have two ignition keys that turns the car on, you do not need to purchase anymore.
- I purchased a key off Aliexpress for £12, ensure you read reviews carefully.
- £5 | G518-61-764 Ambient Air Temperature Sensor
- FORScan will pull a trouble code if you are upgrading your cluster to a larger LCD with ambient temperature view and your car does not come with the temperature sensor as standard.
- The best way to check if your car has this sensor or not is to physically look through your car vent. The sensor is located on the left side of the vehicle near your radiator:
- Obviously if your original cluster already has an outside temperature reading (the bigger LCD) or your car has automatic climate control, then you don't need to purchase this. You will only need this when you are upgrading your instrument cluster with smaller LCD screen to a cluster with bigger LCD screen.
- You can buy this sensor for as low as £5 from China on eBay.
- "FREE" | Tachosoft or other programs to calculate hex values
- If you cannot access your old cluster's EEPROM (odometer reading), then you need to calculate the corresponding hex values for your mileage reading to the new cluster.
- I was able to "legally" obtain Tachosoft and got my values. However Tachosoft is not always going to give you an accurate corresponding hex value, and it is recommended to purchase an automatic calculator from carhexedit.com (if you don't understand what this means it is better explained later in the guide).
WARNING: You MUST have 2 working PATS keys in order to proceed with the steps below. If you continue to program the immobiliser with only one PATS key, YOUR CAR WILL NOT START!
If you have purchased a new key, you can easily check if the new key has the chip compatible with the PATS immobiliser. Check this video out. Basically:- Insert your unprogrammed key into the car's ignition.
- A car with padlock icon should now start flashing red on the instrument cluster. Looks like this:
- Wait for the icon to stop rapidly flashing, then count the flashes, where a long pause starts a new count. This is your instrument cluster communicating a certain code with you.
- If your instrument cluster gives you a 1-5 code (one flash, pause, five continuous flashes), this means that the instrument cluster can understand your new key and is not programmed to the car (ready to be programmed!)
1st | Saving Old Odometer Data
This section, you will save all the necessary data from your old cluster.
1. Locate your OBD2 port. (Video)2. Plug your ELM327 OBD2 reader into the car and connect the reader to your computer. Ensure you download the necessary drivers so that your computer can communicate with your adapter. Check your OBD2 reader's manual.
3. Launch FORScan with Extended Licence. Just press yes on all prompts even if the vehicle identifcation from FORScan might be slightly incorrect. If successful, you should see the word "Ready" on the bottom left of your screen.
4. Click the "DTC" icon and understand any trouble codes. Once rectified, clear all codes with the button below. If the trouble codes doesnt appear back it's probably okay. For example, my RCM and IC are giving trouble codes because they can't communicate between each other, but that's purely because I disconnected the battery prior. Make sure you understand what you're doing though, deleting codes and not understanding/rectifying correctly can lead to issues along the line.
5. Click the Configuration & Programming tab (the icon below the wrench). You should see at least 2 modules for the "IC", Central Configuration (Main) and Module Configuration (AS BUILT Format).
6. Click on Central Configuration (Main), then run the service procedure (play icon below), follow all instructions, and once you get to the data page, click "Save All" and save the file somewhere accessible. Do the same thing for Module Configuration (AS BUILT Format). Ensure you name these files so that it is clear for you which file is from the old cluster and which file is from the new cluster.
7. If there is another module simply called "Module Configuration", you should save data from it too. It wasn't required for my car but maybe for other trims.
You should now have the necessary cluster data. Now you need to get your odometer data.
If you do not have your original cluster's odometer, I recommend using TachoSoft or carhexedit.com to get the odometer hex data. However you still need to follow the steps below since you need to connect to the new cluster's EEPROM.
Edit: I understand that this can be a confusing process, but I am able to do this for you if you are willing to ship your instrument clusters. PM me!
1. Remove the instrument cluster. Learn how to remove the instrument cluster using this YouTube video. No need to disconnect 12V battery.
2. Remove the back cover of the instrument cluster. Slowly pry the case whilst you pop the white plastic wedges on the side.
3. Locate the EEPROM. The cluster's EEPROM is an 8-legged little chip usually next to a really bigger chip (MCU). You will know you found it when the chip has the marking 93c66. My EEPROM was made by Seiko so its marked S93C66, but so long as the chip has "93c66" then you're in business.
Different clusters may have different locations, but here is my old cluster's location:
You should now have located the EEPROM. This is the tricky part.
If you do not have the 93XXX to 25XXX chip adapter, you must now do the following (or follow this video):
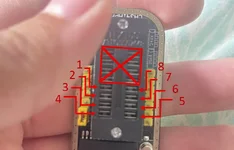
1. Grab your EEPROM clip. Connect your EEPROM clip to the breakout board provided making sure that pin 1 (red wire) on the EEPROM clip connects to pin 1 on the breakout board. You can identify which pin on the EEPROM clip connector is pin 1 by finding a triangle pointing to one of the edge pins.
2. On the CH341A board, bridge the 3.3V to the 5V. The two pins are next to each other and they are both located near the "25XXX 24XXX" diagram.
3. Using the 2.54mm jumper wires, connect the male-end to the CH341A board (25XXX side; 4 rows closest to USB), and the female-end to the breakout board as follows:
It is imperative that you take your time with this.
| Breakout board (Female) | <-----> | CH341A board (Male) |
|---|---|---|
| 1 | Chip Select | <-----> | 1 |
| 2 | Clock | <-----> | 6 |
| 3 | Data In | <-----> | 5 |
| 4 | Data Out | <-----> | 2 |
| 5 | Vss | <-----> | 4 (squeeze with 6) |
| 6 | ORG (93CXX is 8-bit) | <-----> | 4 (squeeze with 5) |
| 7 | PE (NOT USED) | <--/--> | NOT USED |
| 8 | Vcc (5V) | <-----> | 8 |
4. Once correctly wired, use the EEPROM clip and )clip onto the cluster EEPROM. Mazda engineers are nice enough to put numbers on the edge of EEPROMs to show you which pin number is which; make sure that pin 1 on the clip (red wire) connects to pin 1 of the EEPROM. This may take some time as it can be very fiddly. Be patient. You will know when a complete connection is made when the green RUN light on the CH341A board is lit. You may have to hold onto the EEPROM clip to ensure good contact with the EEPROM.
Take extreme caution when trying to clip the EEPROM. I recommend disconnecting the USB whilst you are trying to clip the EEPROM, then connect the USB and see if the green light is on. Every small little adjustment can run the risk of shorting the EEPROM, meaning you have bricked your cluster.
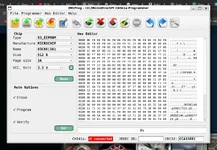
5. Select your chip (_93C66), set Vcc to 5V if necessary and press read. You should get something like this:
Verify integrity of the file by checking the VIN data on the EEPROM (line 120). This data should somewhat correspond to your car’s VIN number. If the VIN data on EEPROM isn’t matching your car or is gibberish then something is wrong with your software IC settings. (My VIN is JMZDE14K200277238 like in the picture above)
For NeoProgrammer: _93C66 (16bits) [5.0V]
(IC->Microwire->Generic->_93C66_16-bits)
For IMSProg: 93_EEPROM MICROCHIP 93C66 (16)
Make sure Voltage Vcc is set to 5.0V
For asProgrammer: ???
I've tried multiple versions of asProgrammer but I couldn't get it to work. When I verify the dump with my car's VIN number, it's scrambled and just wrong.
WARNING: Flashing new data onto an EEPROM is a PERMANENT change! ALWAYS save all EEPROM dumps you come accross, and name the dump files clearly before proceeding to make any permanent changes.
6. In line 0040, copy the first 16 characters (as highlighted in the above picture). That is your hex data for your odometer value.
You now have all the data necessary to be transferred. Now you need to program the odometer for the new cluster.
1. Connect to the EEPROM of the new instrument cluster and save the EEPROM dump to your computer.
2. Replace the same bytes of data on line 0040 with the value you copied over from your old cluster.
3. Hit write/program, make sure you verify the IC afterwards to ensure that the EEPROM has been sucessfully flashed.
Your new instrument cluster can now be installed to the car.
2nd | The Immobilizer
This section, you will program the new cluster for your car's immobilizer system.
1. Plug your new instrument cluster in.
2. Plug your OBD2 ELM327 reader in.
3. Launch FORScan and connect to the car.
4. Click on the wrench icon. You should see a module called "PATS Programming". Click it then click "Run service procedure".
5. Say no to keyless push-start system, then you should be presented with a menu. Click "Erase and Program Keys". Ensure you have 2 working (PATS) keys ready.
6. Follow the instructions given from FORScan.
7. When done, return to the menu by doing step 4. Then click "Module Initialization" and follow the instructions given from FORScan.
Your car should now be able to start. Give it a try.
3rd | The configuration data
This section, you will transfer all data corresponding to your old cluster to your new cluster.
1. Launch FORScan and connect as usual.
2. Click the Configuration & Programming tab (the icon below the wrench).
3. Launch the IC Central Configuration (Main).
4. "Save All" data in case something goes wrong, this is important.
5. Do the same for Module Configuration (AS BUILT Format).
6. Go back into Central Configuration Module but now click "Load All" and select your old cluster's central configuration.
7. Click "Write All" and acknowledge all prompts. Follow all instructions afterwards.
8. Go back into Module Configuration (AS BUILT Format).
9. Line-by-line edit all hex values to the old cluster's data. I say this because Block 2 is write-protected so you can't just simply load all and then write all. Edit Block 1, Block 3, and Block 4 then pressing "Write" when you have completed a block. You can open the AS BUILT .abd file by opening with notepad.
Once all the blocks are written, odometer confirmed correct, and both keys starting the car, you are done!
I have read in a Mazda3 forum that if you copy over all data from the old EEPROM to the new EEPROM it would also replace the AS BUILT data, making line-by-line edit in FORScan unnecessary. I have not tried that so maybe if somebody has they can let me know down in the discussion.
If you got new keys, you need to program the remote buttons by doing this.
I hope I was able to help some of you! Enjoy your new cluster
Attachments
Last edited:
 I figured some people might be stuck and want to do the same thing as me.
