CaptainCrunch
Member
- :
- Mazda 5, Mazda Tribute, & 1996 Miata MX-5
Tools needed: 7mm hex wrench with 3/8" ratchet drive, pliers, special homemade tool (see below), coat hanger wire, emery cloth
Step 1 With the vehicle in park on a level area, set the parking brake, and block the front driver side wheel to prevent the car from rolling when lifted on the jack. Slightly loosen both rear driver side and passenger side lugs.
Step 2 Raise rear passenger side of car on jack and place this corner on a jack stand. Remove rear passenger side wheel. Release the parking brake so that the rotor can rotate freely.
Step 3 Hang a 12 piece of coat hanger wire bent in an S on a bolt hole inside the wheel well as a place to hang the caliper when the time comes. Using a pair of pliers, pull off the large brake spring clip on the outer face of the brake caliper assembly. Using a pair of pliers, gently pull off the plastic caps covering the two brake caliper bolts on the back of the brake caliper. Using a 7mm hex wrench in a 3/8 ratchet drive socket, loosen and remove both brake caliper bolts. Gently slide the caliper off the outer brake pad and rotor. Hang the caliper onto the S hook made of coat hanger wire.
Step 4 - Pull the inner brake pad out of the caliper by hand, being careful not to damage the rubber seal around the piston of the brake caliper. Discard inner brake pad, outer brake pad, and old brake spring clip.
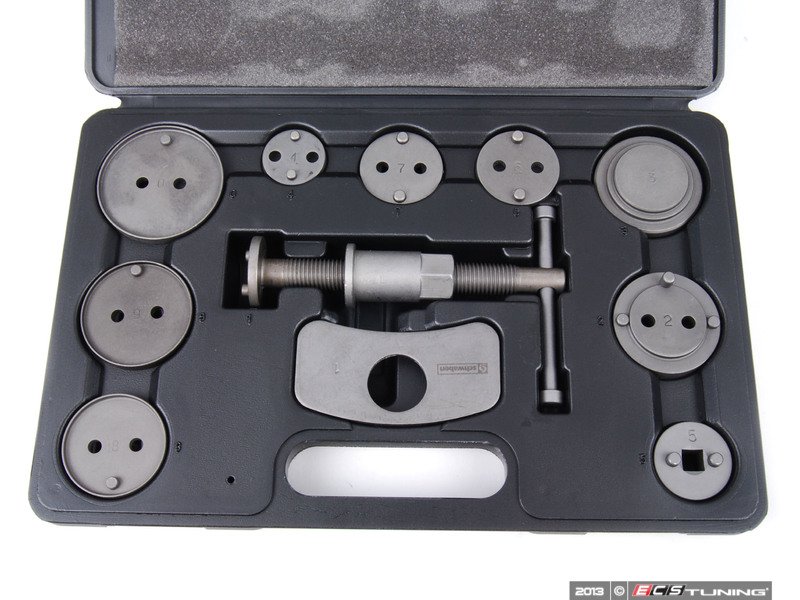
Step 5 You now need to push the caliper cylinder back into the caliper with a large amount of pressure and a slow clockwise turning motion. There are two 5mm holes set 18mm apart in the face of the caliper cylinder that can be used to grip and turn the cylinder. At first, I tried using a pair of needle nose pliers, and could turn the caliper cylinder, but could not apply enough pressure to move it inward. I purchased a brake cube tool for $12 at the local auto parts store, only to learn that the tool did not fit the Mazda 5 brake caliper hole pattern. You can buy an expensive tool kit (more than $50) to do this, or fashion one of your own for real cheap like I did. I took 12 x 1 wide by 1/8 aluminum bar stock, and drilled two 3/16 holes 18mm apart and from the end of the bar. I then drilled a 5/16 hole centered between the 3/16 holes. Aluminum bar stock is available at most big chain hardware stores. A drawing for the tool is shown below:

Two #8-32 x aluminum bolts and nuts are fastened through the 3/16 holes and serve as the pins that will grip the holes in the face of the caliper cylinder to turn it clockwise, using the 12 length of the flat aluminum bar as the handle and leverage for this homemade wrench. A x 1 hex head bolt is placed in the center hole, and pressed against the center of the caliper cylinder with the threaded tip and stock of a Craftsman 2-jaw gear puller I had in my tool box. A photo showing the tool parts, and a second photo of the tool pushing against the brake caliper cylinder are shown below:


The caliper cylinder will travel inward by several turns of the threaded pushing tool for every half turn of the homemade wrench. So you need to continually thread in the pushing tool to apply pressure as you slowly turn the caliper cylinder clockwise. The caliper cylinder moves inward quite easily with this tool, and I only needed hand threading of the pushing tool to get inward movement.
If you dont have the parts from the gear puller, you could easily use a 4 x bolt, a nut, and 3 x x 1/8 aluminum bar stock with a 5/16 centered hole as your pushing mechanism. Epoxy the nut to the aluminum bar to keep the nut from spinning. You could also use aluminum C channel in place of the bar stock. This will provide a stiffer tool, and can be sized so that the nut fits inside the C channel and will not turn. Aluminum C channel is available at most common big chain hardware stores. Ive drawn the pushing tool below:

Step 6 Take a 4 x 4 sheet of 180 grit emery cloth and gently hand sand the inner and outer surfaces of the rotor to remove old brake deposits. Turn the rotor several times to allow you to sand the full surfaces of the rotor. Use a paper towel to wipe the rotor surfaces clean.
Step 7 Place the new inner and outer brake pads into the caliper, and position the caliper back onto the rotor. Tighten both brake caliper bolts with the 7mm hex wrench. Replace the plastic caps that cover these bolts. Remove the coat hanger wire from hanging on the coil spring. Install a new brake spring clip with the aid of a pair of pliers.
Step 8 - Set the parking brake several times until the rear caliper holds the rotor tight. Replace the wheel and lightly snug up the wheel lugs. Lower the car off the jack stand until the wheel is just in contact with the road surface, and fully tighten the wheel lugs. Lower the car off the jack completely.
Step 9 Move the block from the front driver side to the front passenger side of the vehicle. Raise the rear driver side of the car on jack and place this corner on a jack stand. Remove the rear driver side wheel.
Step 10 Repeat steps 3 through 8 to complete the opposite side of the car. Remove the block from the front of the car before attempting to drive. (2thumbs)
Step 1 With the vehicle in park on a level area, set the parking brake, and block the front driver side wheel to prevent the car from rolling when lifted on the jack. Slightly loosen both rear driver side and passenger side lugs.
Step 2 Raise rear passenger side of car on jack and place this corner on a jack stand. Remove rear passenger side wheel. Release the parking brake so that the rotor can rotate freely.
Step 3 Hang a 12 piece of coat hanger wire bent in an S on a bolt hole inside the wheel well as a place to hang the caliper when the time comes. Using a pair of pliers, pull off the large brake spring clip on the outer face of the brake caliper assembly. Using a pair of pliers, gently pull off the plastic caps covering the two brake caliper bolts on the back of the brake caliper. Using a 7mm hex wrench in a 3/8 ratchet drive socket, loosen and remove both brake caliper bolts. Gently slide the caliper off the outer brake pad and rotor. Hang the caliper onto the S hook made of coat hanger wire.
Step 4 - Pull the inner brake pad out of the caliper by hand, being careful not to damage the rubber seal around the piston of the brake caliper. Discard inner brake pad, outer brake pad, and old brake spring clip.
Step 5 You now need to push the caliper cylinder back into the caliper with a large amount of pressure and a slow clockwise turning motion. There are two 5mm holes set 18mm apart in the face of the caliper cylinder that can be used to grip and turn the cylinder. At first, I tried using a pair of needle nose pliers, and could turn the caliper cylinder, but could not apply enough pressure to move it inward. I purchased a brake cube tool for $12 at the local auto parts store, only to learn that the tool did not fit the Mazda 5 brake caliper hole pattern. You can buy an expensive tool kit (more than $50) to do this, or fashion one of your own for real cheap like I did. I took 12 x 1 wide by 1/8 aluminum bar stock, and drilled two 3/16 holes 18mm apart and from the end of the bar. I then drilled a 5/16 hole centered between the 3/16 holes. Aluminum bar stock is available at most big chain hardware stores. A drawing for the tool is shown below:
Two #8-32 x aluminum bolts and nuts are fastened through the 3/16 holes and serve as the pins that will grip the holes in the face of the caliper cylinder to turn it clockwise, using the 12 length of the flat aluminum bar as the handle and leverage for this homemade wrench. A x 1 hex head bolt is placed in the center hole, and pressed against the center of the caliper cylinder with the threaded tip and stock of a Craftsman 2-jaw gear puller I had in my tool box. A photo showing the tool parts, and a second photo of the tool pushing against the brake caliper cylinder are shown below:
The caliper cylinder will travel inward by several turns of the threaded pushing tool for every half turn of the homemade wrench. So you need to continually thread in the pushing tool to apply pressure as you slowly turn the caliper cylinder clockwise. The caliper cylinder moves inward quite easily with this tool, and I only needed hand threading of the pushing tool to get inward movement.
If you dont have the parts from the gear puller, you could easily use a 4 x bolt, a nut, and 3 x x 1/8 aluminum bar stock with a 5/16 centered hole as your pushing mechanism. Epoxy the nut to the aluminum bar to keep the nut from spinning. You could also use aluminum C channel in place of the bar stock. This will provide a stiffer tool, and can be sized so that the nut fits inside the C channel and will not turn. Aluminum C channel is available at most common big chain hardware stores. Ive drawn the pushing tool below:
Step 6 Take a 4 x 4 sheet of 180 grit emery cloth and gently hand sand the inner and outer surfaces of the rotor to remove old brake deposits. Turn the rotor several times to allow you to sand the full surfaces of the rotor. Use a paper towel to wipe the rotor surfaces clean.
Step 7 Place the new inner and outer brake pads into the caliper, and position the caliper back onto the rotor. Tighten both brake caliper bolts with the 7mm hex wrench. Replace the plastic caps that cover these bolts. Remove the coat hanger wire from hanging on the coil spring. Install a new brake spring clip with the aid of a pair of pliers.
Step 8 - Set the parking brake several times until the rear caliper holds the rotor tight. Replace the wheel and lightly snug up the wheel lugs. Lower the car off the jack stand until the wheel is just in contact with the road surface, and fully tighten the wheel lugs. Lower the car off the jack completely.
Step 9 Move the block from the front driver side to the front passenger side of the vehicle. Raise the rear driver side of the car on jack and place this corner on a jack stand. Remove the rear driver side wheel.
Step 10 Repeat steps 3 through 8 to complete the opposite side of the car. Remove the block from the front of the car before attempting to drive. (2thumbs)