How To : Replace Front Caliper Dust and Piston Seals

Action Jackson

Member
Contributor
If you've ever changed your brake pads, you might notice a rip or tear in the dust piston seal like the picture below.
 

Attachments

  • 01 Cut Dust Seal.webp
    01 Cut Dust Seal.webp
    20 KB · Views: 2,569
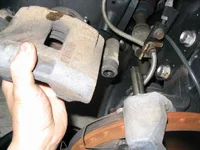
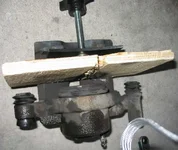
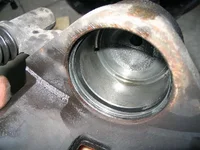
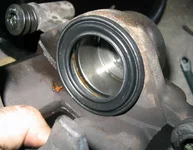
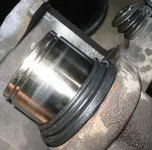
What to do? Replace those seals.
If you can change brake pads, then it's a matter of a few more steps and equipment.

Here's what you'll need (you may use something else but this is what I used):

- Socket Set
- Wrenches
- Allen Keys
- A OEM Front Caliper Seal Kit # GAYR 33 26Z [I'd suggest getting 2 of these in case you screw up like I did]
- Jack and stands
- New Brake Fluid
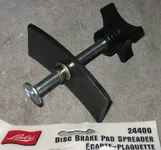
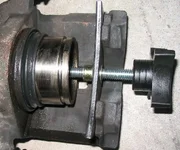
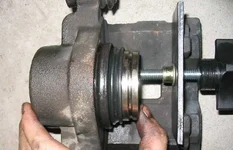
- Disc Brake Spreader Tool [works better than a C Clamp]
- Brake Parts Cleaner Fluid/Spray
- Good Lighting
- Good Ventilation
- Bin to Catch Used Brake Fluid
- Several Clean Lintless rags
- Someone to help bleed the brakes (and maybe the clutch) unless you have Speedbleeders :)
- Gloves If You Wish
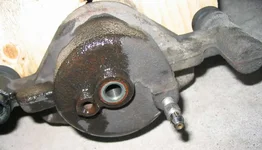
- A Small Thin Tool to Remove Piston Seal like a Dull Putty Scraper
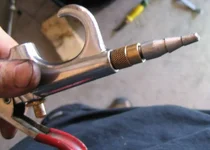
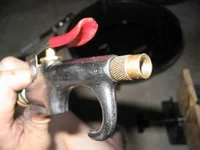
- Air Compressor suggested
- Brake Slider Lube of Your Choice
- Eye and Ear Protection If You Wish.
 
Below are pictures of some the tools and equipment.

One is the brake spreader tool. You'll probably need either an old brake pad you don't need, or a thin piece of metal to help compress the piston.

The other picture is the seal kit from any Mazda dealership.
Cost is about $48 CDN + tax.
Each kit is enough to do both front calipers.
 

Attachments

  • 02 Disc Brake Spreader.webp
    02 Disc Brake Spreader.webp
    75.6 KB · Views: 1,017
  • 03 Seal Kit GAYR 33 26Z.webp
    03 Seal Kit GAYR 33 26Z.webp
    75.9 KB · Views: 1,321
Here we go:

1.
- Spray everything down with Brake Cleaner. Wipe if necessary.
- Have something ready to catch the brake fluid.
- Remove the Brake Lines from the back of the caliper :
 

Attachments

  • 04 Rear Caliper Brake Line Removed.webp
    04 Rear Caliper Brake Line Removed.webp
    80 KB · Views: 1,051
2.
- It's just like changing the brake pads, so I'll skip some of that explanation, but in a nutshell it takes an Allen Key to do that part.
- You'll need to slide up the caliper:
 

Attachments

  • 05 Drivers Front Caliper Angled Up.webp
    05 Drivers Front Caliper Angled Up.webp
    30.8 KB · Views: 1,008
3.
- This part is like changing the rotors. Remove the caliper off it's slider:
 

Attachments

  • 06 Drivers Front Caliper Removed From Slider.webp
    06 Drivers Front Caliper Removed From Slider.webp
    50.8 KB · Views: 977
4.
- The air compressor will come in handy. You might recognize this as an air nozzle to blow off debris.

- The 2nd picture shows that you'll need to remove off the tapered nozzle.
 

Attachments

  • 07 Standard Air Nozzle.webp
    07 Standard Air Nozzle.webp
    34.4 KB · Views: 873
  • 08 Air Nozzle Removed.webp
    08 Air Nozzle Removed.webp
    41.5 KB · Views: 869
5.
- It's a good idea to clean the caliper that you removed with Brake Cleaner.
 

Attachments

  • 09 Rear Of Front Caliper Ready To Be Blown.webp
    09 Rear Of Front Caliper Ready To Be Blown.webp
    49 KB · Views: 1,043
6.
- Don't use pieces of wood shown here. Instead use a whole bunch of rags b/c the piston will blow out with a bang.
 

Attachments

  • 10 Spreader and Wood To Catch Piston.webp
    10 Spreader and Wood To Catch Piston.webp
    70.4 KB · Views: 1,173
7.
- Gently insert the air nozzle
- using short bursts, gently blow air into the hole
- Be careful as it can blow out with a real bang!
 

Attachments

  • 11 A Perfect Fit - Nozzle and Caliper.webp
    11 A Perfect Fit - Nozzle and Caliper.webp
    67.4 KB · Views: 1,011
8.
- don't know if the piston seal was already damaged, or damaged from having the piston popped out with air, but here it is:

- The 2nd picture shows when it's removed:
 

Attachments

  • 12 Inside Front Caliper Note Cracked Piston Seal.webp
    12 Inside Front Caliper Note Cracked Piston Seal.webp
    53 KB · Views: 1,334
  • 13 Front Caliper Piston Seal - Note Torn Piece.webp
    13 Front Caliper Piston Seal - Note Torn Piece.webp
    16.1 KB · Views: 1,272
9.
- 2 shots of the caliper piston:
 

Attachments

  • 14 Side Of Front Caliper Piston.webp
    14 Side Of Front Caliper Piston.webp
    48.4 KB · Views: 1,321
  • 15 Rear Of Front Caliper Piston.webp
    15 Rear Of Front Caliper Piston.webp
    40.7 KB · Views: 999
10.
- After cleaning out the caliper, insert the new seal. I used some fresh brake fluid to lube the seals:
 

Attachments

  • 16 After Cleaning - Lube With Fresh Brake Fluid - Insert.webp
    16 After Cleaning - Lube With Fresh Brake Fluid - Insert.webp
    78.1 KB · Views: 1,134
11.
- and clean off the piston as well. Lube the piston with fresh brake fluid:
 

Attachments

  • 17 After Cleaning - Lube Up Piston.webp
    17 After Cleaning - Lube Up Piston.webp
    30.6 KB · Views: 960
12.
- Lube up the new dust seal with fresh brake fluid. This photo shows the supplied grease, I don't use it anymore, just fresh brake fluid.
 

Attachments

  • 18 After Cleaning and Lubing - Put Dust Seal Over Piston.webp
    18 After Cleaning and Lubing - Put Dust Seal Over Piston.webp
    36.4 KB · Views: 1,390
13.
- slide the dust seal near the end (but not off) the piston:
 

Attachments

  • 19 Dust Seal Over Piston - Perfect Fit.webp
    19 Dust Seal Over Piston - Perfect Fit.webp
    35.3 KB · Views: 925
14.
- if you're wondering, installing the seal this way makes it extremely difficult to install so I don't recommend it.
 

Attachments

  • 20 The Wrong Way - Dust Seal Without The Piston.webp
    20 The Wrong Way - Dust Seal Without The Piston.webp
    49.6 KB · Views: 1,001
15.
Now for the way I recommend which is a bit easier.
- carefully insert the piston with the seal near it's bottom into the caliper:
I'm showing a repeat picture to show you the positioning of the dust seal.
 

Attachments

  • 19 Dust Seal Over Piston - Perfect Fit.webp
    19 Dust Seal Over Piston - Perfect Fit.webp
    35.3 KB · Views: 901
  • 21 Insert Everything Carefully.webp
    21 Insert Everything Carefully.webp
    95.9 KB · Views: 934
16.
- gently use your hands to push the piston into the caliper, but there came a point where I had to use the brake spreader to help out:
 

Attachments

  • 22 Disc Spreader Carefully Pushing In Piston.webp
    22 Disc Spreader Carefully Pushing In Piston.webp
    97.6 KB · Views: 867
17.
- I had to gently offset the spreader and manually help push in the piston. I had to change the position of the disc spreader varying from dead centre to offset numerous times in order to inch in the piston.
 

Attachments

  • 23 Offset Pushing In With Manual Help.webp
    23 Offset Pushing In With Manual Help.webp
    75.8 KB · Views: 877

New Threads and Articles

Back