- :
- 2011 Mustang GT
Ok, couldn't find a how-to so I decided to write my own. It's not a terribly difficult install, but having an idea of what's involved makes it easier.
DISCLAIMER: I am not responsible for any damage you cause to your own vehicle. Do this procedure at your own risk!
Tools Used:
1. Take the rag andcover the end of the screwdriver with it. This is to prevent any damage to your paint. I would recommend putting the tip of the screwdriver right in the middle of the rag and pulling the rest back.
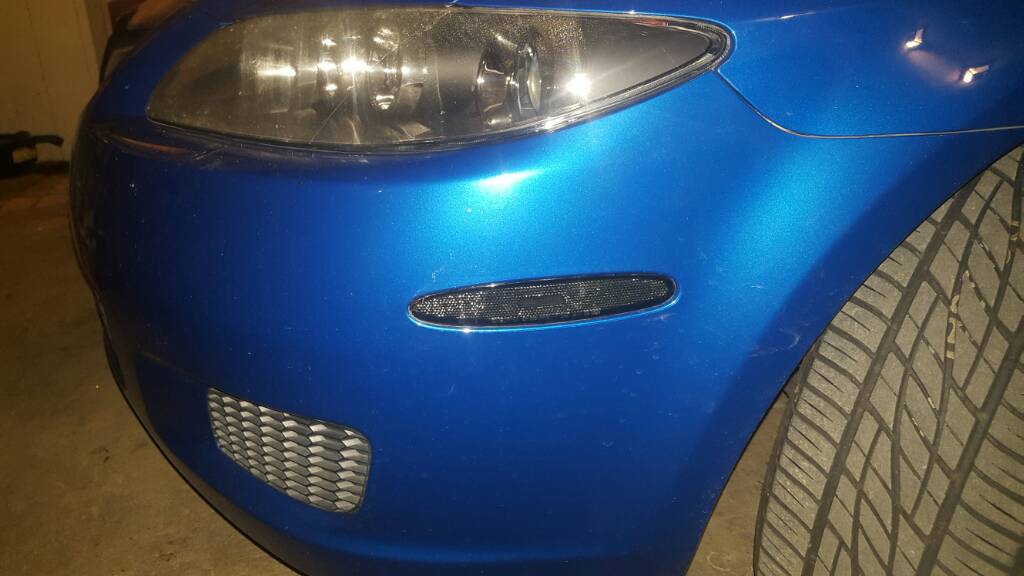
2. Using the covered end, carefully push between the lens and the bumper on the rear facing side of the lens. You will need to apply a decent amount of pressure, so don't be scared. Push in a forward diagonal manner (IE, if you are working on the left, push to the front right, and vice versa). The lens should pop out. (see finger in pic for where to push)

3. Turn bulb housing 90 degrees to counterclockwise to remove bulb.
If installing LED corners:
4. Using the pair of pliers, carefully clamp down on the retaining tab on the top of the bulb harness. With a slight tug, the bulb housing on the harness should come out, exposing a two terminal plug.
Reinstallation:
1. Plug new end of LED harness into bumper side, make sure it is fully seated, you should hear a click.
2. Insert the front hook end into the front edge of the crevasse where the corner lens sits on the bumper, then swing the new lens in and push the back side in until fully seated. Again, you should hear a click, and the lens should sit flush.
3. Test and verify normal operation.
4. Enjoy!
Precautions when installing:
Picture of bulb housing removed from car. Notice tab on top that needs to be cleared to release this piece

Picture of original (amber) lens. Note the hook on the front edge and pressure clip on back edge. This shows that the front needs to be inserted and hooked first.

DISCLAIMER: I am not responsible for any damage you cause to your own vehicle. Do this procedure at your own risk!
Tools Used:
- Flat screwdriver
- Cloth rag (somewhat thick)
- Pliers (standard or needle nose)
- RPM smoked LED corner lenses (you may have a different set)
- 5-10 minutes at most
1. Take the rag andcover the end of the screwdriver with it. This is to prevent any damage to your paint. I would recommend putting the tip of the screwdriver right in the middle of the rag and pulling the rest back.
2. Using the covered end, carefully push between the lens and the bumper on the rear facing side of the lens. You will need to apply a decent amount of pressure, so don't be scared. Push in a forward diagonal manner (IE, if you are working on the left, push to the front right, and vice versa). The lens should pop out. (see finger in pic for where to push)
3. Turn bulb housing 90 degrees to counterclockwise to remove bulb.
If installing LED corners:
4. Using the pair of pliers, carefully clamp down on the retaining tab on the top of the bulb harness. With a slight tug, the bulb housing on the harness should come out, exposing a two terminal plug.
Reinstallation:
1. Plug new end of LED harness into bumper side, make sure it is fully seated, you should hear a click.
2. Insert the front hook end into the front edge of the crevasse where the corner lens sits on the bumper, then swing the new lens in and push the back side in until fully seated. Again, you should hear a click, and the lens should sit flush.
3. Test and verify normal operation.
4. Enjoy!
Precautions when installing:
- Make sure you have a decent rag, that is what is protecting your paint from scratching it when removing the lens.
- Make sure the clip is seated in the wiring harness before reinstalling. I wouldn't recommend repeatedly removing the lenses.
Picture of bulb housing removed from car. Notice tab on top that needs to be cleared to release this piece
Picture of original (amber) lens. Note the hook on the front edge and pressure clip on back edge. This shows that the front needs to be inserted and hooked first.