Went to do a rear brake job on my wife's '19 CX-9 and learned some hard lessons. I've wrenched on a number of cars in the past, but this one got me.
Don't:
1) Omit the most crucial step of putting the parking brake in maintenance mode. Tip: the parking brake needs to be disengaged before trying to put it in maintenance mode.
2) Take off the parking brake motor from the caliper. Assuming you've successfully put the car in parking maintenance mode, it's completely unnecessary. I've seen this in some youtube vids and don't understand why people started doing this.
3) Engage the parking brake or press the brake pedal with the pads and rotors off!!
4) Use the little cube to try to turn the brake piston in. This will accomplish nothing and may damage the internal seal, pop the dust boot seal out, or mess up the electric motor.
Do:
1) Make sure the car is in parking maintenance mode! You should hear the motors running and the dash light illuminate. If you don't hear the motors, the e-parking brake isn't in maintenance mode
2) Resurface or replace the rotors with a pad change. I've seen vids of people just changing the pads without touching the rotors and this is incorrect.
3) Take off the caliper slider first, and then the brake piston housing. No need to remove electric parking brake motors.
If you happen to be a complete dummy like me who didn't bother to look up tutorials on how to do a rear brake pad and rotor change on a CX-9, AND happen to extend the brake piston all the way without pads or rotor and now it can't be pushed back in I have special instructions for you:
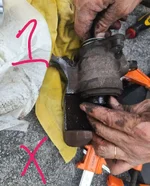
1) You'll need to remove the brake caliper from the car; no way around this. Drain the brake fluid from the caliper, remove the electric motor, and remove entirely from the car.
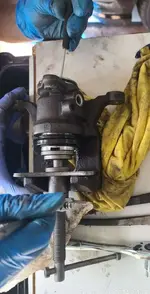
2) Remove the piston by hand from the caliper. It will be tight so have patience and avoid using tools that will damage the piston surface or dust boot.
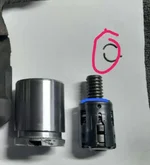
3) If the internal screw that moves the piston inside the caliper has become separated from the collar, you'll need to remove the small circlip around the hex shaft in order to slide the shaft out of the caliper. You'll need a small set of circlip/snap ring pliers to do this; I got a set at Lowes that comes with multiple heads so check your local stores if you don't have this in your toolbox.
4) Assemble the internal screw into collar and screw all the way in. Slide screw/collard assembly back into the caliper. Re-install the circlip on hex shaft.
5) Lube internal seal with some clean brake fluid.
6) Slide dust boot to end of piston. The dust boot lip will need to be installed first before sliding the piston back into the caliper.
7) Align the piston into the bore and carefully push in using a brake piston tool. If done correctly and carefully, the dust boot will stay in place and you'll be able to push the piston in all the way using the brake piston tool. I would not recommend using a c-clamp since you want to align the piston in the bore as straight as possible when pushed in.
8) Reinstall brake caliper into the car attaching e-parking brake motor and brake line (don't lose the washers that go on both sides of the banjo bolt!)
9) Put in new pads, new or resurfaced rotor, and proceed to bleed the brake caliper using a vacuum pump (lots of videos available on how to do this)
Sorry that I don't have pictures since I was too pissed off, frustrated, etc and just needed to get the car back on the road asap, but I found a lot of useful info on this site as to what I did wrong, what the correct procedure is, etc so I wanted to return the favor in case anyone else messed this up in a similar way.
Don't:
1) Omit the most crucial step of putting the parking brake in maintenance mode. Tip: the parking brake needs to be disengaged before trying to put it in maintenance mode.
2) Take off the parking brake motor from the caliper. Assuming you've successfully put the car in parking maintenance mode, it's completely unnecessary. I've seen this in some youtube vids and don't understand why people started doing this.
3) Engage the parking brake or press the brake pedal with the pads and rotors off!!
4) Use the little cube to try to turn the brake piston in. This will accomplish nothing and may damage the internal seal, pop the dust boot seal out, or mess up the electric motor.
Do:
1) Make sure the car is in parking maintenance mode! You should hear the motors running and the dash light illuminate. If you don't hear the motors, the e-parking brake isn't in maintenance mode
2) Resurface or replace the rotors with a pad change. I've seen vids of people just changing the pads without touching the rotors and this is incorrect.
3) Take off the caliper slider first, and then the brake piston housing. No need to remove electric parking brake motors.
If you happen to be a complete dummy like me who didn't bother to look up tutorials on how to do a rear brake pad and rotor change on a CX-9, AND happen to extend the brake piston all the way without pads or rotor and now it can't be pushed back in I have special instructions for you:
1) You'll need to remove the brake caliper from the car; no way around this. Drain the brake fluid from the caliper, remove the electric motor, and remove entirely from the car.
2) Remove the piston by hand from the caliper. It will be tight so have patience and avoid using tools that will damage the piston surface or dust boot.
3) If the internal screw that moves the piston inside the caliper has become separated from the collar, you'll need to remove the small circlip around the hex shaft in order to slide the shaft out of the caliper. You'll need a small set of circlip/snap ring pliers to do this; I got a set at Lowes that comes with multiple heads so check your local stores if you don't have this in your toolbox.
4) Assemble the internal screw into collar and screw all the way in. Slide screw/collard assembly back into the caliper. Re-install the circlip on hex shaft.
5) Lube internal seal with some clean brake fluid.
6) Slide dust boot to end of piston. The dust boot lip will need to be installed first before sliding the piston back into the caliper.
7) Align the piston into the bore and carefully push in using a brake piston tool. If done correctly and carefully, the dust boot will stay in place and you'll be able to push the piston in all the way using the brake piston tool. I would not recommend using a c-clamp since you want to align the piston in the bore as straight as possible when pushed in.
8) Reinstall brake caliper into the car attaching e-parking brake motor and brake line (don't lose the washers that go on both sides of the banjo bolt!)
9) Put in new pads, new or resurfaced rotor, and proceed to bleed the brake caliper using a vacuum pump (lots of videos available on how to do this)
Sorry that I don't have pictures since I was too pissed off, frustrated, etc and just needed to get the car back on the road asap, but I found a lot of useful info on this site as to what I did wrong, what the correct procedure is, etc so I wanted to return the favor in case anyone else messed this up in a similar way.