
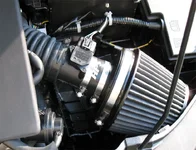
I put together a customized SRI intake, much like the Cobb SF Intake, only it utilizes the stock MAF housing and stock air straightener. The end goal was to ensure that is was easily swappable for dealer visits and would retain ideal MAF function while unrestricting the intake. Pictures are linked below and the parts used/steps I took were:
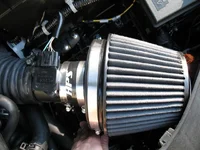
1. AEM Dryflow Air Filter - 6" Inlet, 5" Element, Part #AVM-21-209EDK, $57 shipped
http://store.summitracing.com/partdetail.asp?autofilter=1&part=AVM-21-209EDK&N=700+0&autoview=sku
I used this filter because it is not oiled and therefore there was no risk of getting any oil on the MAF sensor at all. Plus, the dark grey color of the filter matched my exterior perfectly. The 6" inlet was to accommodate the...
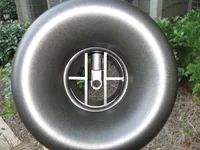
2. BPi Performance Velocity Stack - 6" Outside Mounting Size, 3" Outlet, $47 shipped
http://www.bpinitiatives.com/stacks.php
I used the velocity stack to ensure that the airflow maintained a laminar flow and high velocity. These stacks are well built and are very sturdy. To connect this to the MAF housing, I used a..
3. HPS 3" Silicone Coupler - 3" on both ends, black, $17 shipped
Silicone is much better than rubber. I trimmed this to fit perfectly and so that the lip detailed below is held firmly in place. And now for the most important piece..
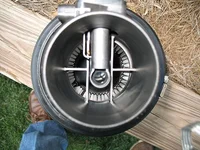
4. Stock MAF Housing (Modified) - $6 for the saw, MAF housing came stock obviously (although I bought a second airbox so i still have a complete stock intake if I need it)
So the trick was to cut the housing out of the stock airbox without cutting into the round tube, and yes, it worked wonderfully. First I removed the MAF sensor and put it somewhere safe with its two screws. I just took a medium grade mini saw and cut hunks out of the top portion of the airbox, very carefully of course, until I got the MAF section free. Next I trimmed all around the MAF tube to get rid of the extra plastic. The stock air straightener is built into the tube but there is a lip that bolts onto the MAF tube to smooth the air hitting the straightener. When you trim the housing out, there is no longer anything for this lip to bolt to. So, I trimmed all around the lip until all I had was a sturdy lip with no mounting flanges. Next, I cleaned up all of the edges very thoroughly and cleaned out the tube. Nothing inside of the tube was modified AT ALL, as this would affect the functioning of the MAF. This whole process took about an hour and only cost me $6 for the saw from Home Depot. This may sound ghetto, but believe me it looks great. See the pictures to see how it turned out, including the piece installed, the SRI inlet and the outlet..
So how does it all go together?
The MAF sensor goes back into the housing the way it originally was. The air filter goes onto the BPi flow stack and is clamped tightly. The silicone coupler goes on the MAF housing and is tightened. The lip for the edge of the MAF housing is pushed into the coupler until it is tightly flush against the MAF housing. The inlet to the MAF housing is now completely stock. The silicone coupler is trimmed so that when the flow stack outlet goes in, the outlet will push the lip against the MAF housing tightly so it could not possibly move. Believe me, it's not going anywhere! Tighten the last clamp on the coupler/BPi stack. The other end of the MAF goes back into the stock accordian piece. Hook the MAF connection back up and start her up.
Impressions:
The sounds is amazing! Very quiet at idle. A nice sucking sound when you get on it and a whoosh from the stock BPV when you let off. Power is linear and stronger. There was no hiccuping, no hesitation, no backfiring, nothing. Started up like a charm, throttle response is much better and the car is faster for sure. The best thing, it cost me about $127 total shipped and everything was in stock. See pictures for further detail. I do also feel very proud of making such a nice (and unique for now, although it is similar to Cobb's piece) intake by myself that runs so well. Also, there is a ton of room for any type of BPV that I wanted to add later. I also trimmed the stock bottom airbox piece so that it would fit under the filter to prevent radiant heat from whatever that hot freaking metal thing with the warning sticker is from heating the filter. This was not a just in case, I noticed that without the box, that thing was pouring heat on the filter. The first drive was prior to me fixing this aspect.
1. AEM Dryflow Air Filter - 6" Inlet, 5" Element, Part #AVM-21-209EDK, $57 shipped
http://store.summitracing.com/partdetail.asp?autofilter=1&part=AVM-21-209EDK&N=700+0&autoview=sku
I used this filter because it is not oiled and therefore there was no risk of getting any oil on the MAF sensor at all. Plus, the dark grey color of the filter matched my exterior perfectly. The 6" inlet was to accommodate the...
2. BPi Performance Velocity Stack - 6" Outside Mounting Size, 3" Outlet, $47 shipped
http://www.bpinitiatives.com/stacks.php
I used the velocity stack to ensure that the airflow maintained a laminar flow and high velocity. These stacks are well built and are very sturdy. To connect this to the MAF housing, I used a..
3. HPS 3" Silicone Coupler - 3" on both ends, black, $17 shipped
Silicone is much better than rubber. I trimmed this to fit perfectly and so that the lip detailed below is held firmly in place. And now for the most important piece..
4. Stock MAF Housing (Modified) - $6 for the saw, MAF housing came stock obviously (although I bought a second airbox so i still have a complete stock intake if I need it)
So the trick was to cut the housing out of the stock airbox without cutting into the round tube, and yes, it worked wonderfully. First I removed the MAF sensor and put it somewhere safe with its two screws. I just took a medium grade mini saw and cut hunks out of the top portion of the airbox, very carefully of course, until I got the MAF section free. Next I trimmed all around the MAF tube to get rid of the extra plastic. The stock air straightener is built into the tube but there is a lip that bolts onto the MAF tube to smooth the air hitting the straightener. When you trim the housing out, there is no longer anything for this lip to bolt to. So, I trimmed all around the lip until all I had was a sturdy lip with no mounting flanges. Next, I cleaned up all of the edges very thoroughly and cleaned out the tube. Nothing inside of the tube was modified AT ALL, as this would affect the functioning of the MAF. This whole process took about an hour and only cost me $6 for the saw from Home Depot. This may sound ghetto, but believe me it looks great. See the pictures to see how it turned out, including the piece installed, the SRI inlet and the outlet..
So how does it all go together?
The MAF sensor goes back into the housing the way it originally was. The air filter goes onto the BPi flow stack and is clamped tightly. The silicone coupler goes on the MAF housing and is tightened. The lip for the edge of the MAF housing is pushed into the coupler until it is tightly flush against the MAF housing. The inlet to the MAF housing is now completely stock. The silicone coupler is trimmed so that when the flow stack outlet goes in, the outlet will push the lip against the MAF housing tightly so it could not possibly move. Believe me, it's not going anywhere! Tighten the last clamp on the coupler/BPi stack. The other end of the MAF goes back into the stock accordian piece. Hook the MAF connection back up and start her up.
Impressions:
The sounds is amazing! Very quiet at idle. A nice sucking sound when you get on it and a whoosh from the stock BPV when you let off. Power is linear and stronger. There was no hiccuping, no hesitation, no backfiring, nothing. Started up like a charm, throttle response is much better and the car is faster for sure. The best thing, it cost me about $127 total shipped and everything was in stock. See pictures for further detail. I do also feel very proud of making such a nice (and unique for now, although it is similar to Cobb's piece) intake by myself that runs so well. Also, there is a ton of room for any type of BPV that I wanted to add later. I also trimmed the stock bottom airbox piece so that it would fit under the filter to prevent radiant heat from whatever that hot freaking metal thing with the warning sticker is from heating the filter. This was not a just in case, I noticed that without the box, that thing was pouring heat on the filter. The first drive was prior to me fixing this aspect.
Attachments
Last edited:


