Chris' Audio Install Thread.

chuyler1

goes to eleven
:
2013 CX-9
Hi all, I've been mentioning pieces of my install in various threads so I thought I would concetrate the topic to a single thread...I had this week off so I made great progress.

Components
Stock Head Unit (for now)
KnuKoncepts Wires, Terminals, and Interconnects
MTX Thunder 302 (75x2) for highs
MTX Thunder 500d (500x1) for lows
Eclipse 8062 6.5" Components
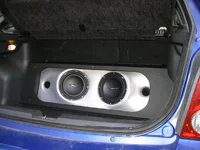
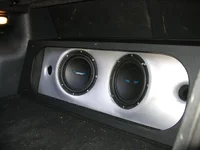
ImageDynamics ID8d2v3 subwoofers (2).

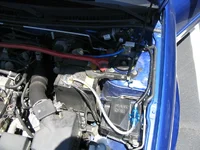
First step was to run the wiring...I did that a few weeks ago. All KnuKoncepts.
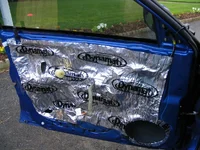
Second step was to install the speakers in the doors. Stock locations for now.
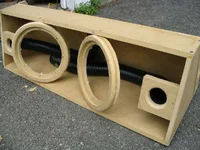
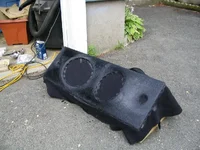
And now I'm on step three, the subwoofer box.

The box is a trapazoid shape and will fit up against the rear seat. It is for 2 8"s so it is very small depth and height wise. I finished the box on tuesday, and fabricated mdf rings and started on my first layer of fiberglass today. The photos show all. I stapled black fleece to the box for the first layer. I will be pulling the staples out once I am ready to start sanding. Before anyone asks, the ports in the photos have not been cut yet, they will be about 12" long when all is said and done. I plan to sand, bondo, sand, sand some more, and paint it silver. I have black vinyl for the trim pieces.

Comments welcome as usual. I am done for the week but I will be working on it again next week. I will post pictures here as it progresses.
 

Attachments

  • IMG_0170.webp
    IMG_0170.webp
    107.5 KB · Views: 284
  • IMG_0204.webp
    IMG_0204.webp
    136 KB · Views: 290
  • IMG_0223.webp
    IMG_0223.webp
    131.5 KB · Views: 278
  • IMG_0224.webp
    IMG_0224.webp
    124.8 KB · Views: 271
  • IMG_0226.webp
    IMG_0226.webp
    159.5 KB · Views: 328
I ordered 2.5" flex-ports from selectproducts and they shipped me 3" ports because the 2.5"s were out of stock (they were supposed to call and confirm but they didn't. I was kinda pissed because I don't have all the time in the world to work on this). I took the 3" ports and unraveled them (they are made out of a coiled up molding) then rewound them for 2" after finding out that 2.5" wouldn't flex enough. ID's site suggests 2" ports anyway. That left me with no port ends so I used the beveled router bit to make my own. I hope it comes out ok when I'm done with the fiberglass.
 
Finished the box this weekend. Forgot to take a picture and its still at my parent's house so I'll get one up tomorrow night. I gave up when my electric sander s*** the bed (it was my dad's and it had to be 10-20 years old). I did alot by hand but I wasn't very smooth with my layers of body filler and I couldn't get many of the divits and imperfections out. So I did the best I could then moved to 150 grit, then on to I think 200. 2 coats of primer spray paint from Walmart, 2 coats of silver spray paint with wet sanding in between. The silver doesn't quite match the interior but I don't care at this point...my arms are throbbing from all the sanding.

Next step is to make the trim panels and mount the amps to the back. I still haven't decided where the capacitor is going...its too tall to fit on the box.
 
when sanding down fiberglass/bondo, i use a 3D-sander from craftsman to knock most of it down, then spray a light mist of dark spray paint on the box and let it dry. then go at it with hand sanding and 100 grit sand paper. the paint will sand away on the higher areas, showing you any ripples and imperfections;) do that 3-5 times and you are usually set to primer it, and once primered you won't have any sanding to do, unless you get a run or something like that.
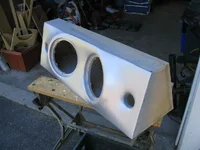
i didn't see any dynamat on the outer door skin? i'd suggest putting at least a layer or 2 right behind where the speaker mounts. also, stiff mesh grating works great for covering the holes in your door, then dynamat over them. it really reinforces the dynamat over the holes;)

everything is looking good, though. how do you like the flex ports?
 
Well I'll hold off on commenting on the flex ports until I hear how they sound. They should be pretty easy to tune though because I can just unravel the end a little bit at a time until I get the right frequency. Just be forwarned that they don't bend very well at 2.5" and 3" diameters.
 
First of all I wanna say "That custom box looks nice, Great job". (rockon)

Ok now for my questions..........
How do you figure on the airspace required for the speakers and how did you go about designing the box????
 
I used the volume, port size and length recommended by Image Dynamic's website and built the box as if there would be no fiberglass. I am asuming that the volume will be pretty close when finished since the sub points out just as much as it points in. When I am finished, I will adjust the length of the ports so it is tuned at the right frequency.
 
did you use FG? or jsut a layer of fleece and then bondo over that?

and is there any reason you removed the staples? I guessif you answer that you only used the 1 layer of fleece then you probably removed them for aesthetic reasons.

I am fleecing my box next weekend and I was planning on stapling the fleece right to the face of my rings and leaving the staples in there permanently to help the FG bond to the wood so lemme know if theres some reason why i shouldnt do this.
 
the fiberglass bond to the wood will be 10x stronger then the staples. once the finberglass is dry the staples won't be doing anything to help keep the two together, wether you remove them or not just depends on wether it will be coverd with more fiberglass or not. allot of guys will lay the fleece on and do the first layer, then to thicken and stiffen it up they will add more layers to the backside of the box.
 
I only used the staples to keep the fleece taunt around the edges of my rings. They did not pull the fabric tight enough around the inside edge of the ring and since I didn't leave very much extra space around my woofer when I measured it, I didn't want to fill it with uneven fibrglass and layers of bondo to make it look round again.

After my thick application of fiberglass to the fleece, I let it dry over night (well several nights until I had time to work on it again). Then I applied about 3-4 layers of fiberglass matt, which I cut into small strips and squares. When that was dry I pulled the staples and cut away the extra fabric and sanded the edges so they were flush. I sanded the rest of the box to remove any major bumps. I applied a thick layer of bondo, let it dry, and sanded til my arms got tired. Then I repeated the bondo on areas that I could not sand. I finally gave up with the sanding and applied two coats of primer and two coats of silver paint.

When you bondo, I highly recommend buying those plastic applicators...it is not a waist of money. They will help you make a smooth coat that requires less sanding in the end.

Also, leaving the back side of your box open is a good idea. I forgot to and it just made for more sanding because I had to apply the fiberglass layers to the top. If I do another box, I will definatly leave the back open.
 
Last edited:
I cant leave the back open on mine i dont think. Mine is just a base of MDF with a FG hill on it if you can picture that as opposed to yours which I would describe as a box with a FG side. Also my rings are already permanently attached to the base (screws and liquid nails), so I dont know how i could go about fiberglassing the inside...guess im in for some serious sanding when its all done...

how hard was your fleece once it was done drying (when it was just the fleece and resin, no matte) hard as a rock or just like a stiff fabric?
 
hard as a rock...and about as rigid as a thick plastic panel, which is why you need extra fiberglass layers to strengthen it. Just make sure you stretch the fleece as much as you possibly can because you don't want to end up with wrinkles when you apply the resin.
 
because of the design of my box i know wrinkles are going to be inevitable........i posted a thread over at carsound.com looking for tips on how to deal with them......
 
pull it even tighter, wrinkles are a serious pain. if i'm working on an area with wrinkles i'll use super stretchy material instead of fleece, basically its like speaker grill but stretches forever. allot easier then fleece, but also allot thinner material. if you have odd bends youlle sometimes have to cut some wood and mount it so u have a spot to staple the material too. esp. on curved areas.
 
what he said.

any wrinkle you see before you start fiberglassing will only be magnified by the process. Fleece is pretty stretchy, so keep stretching and stapling/gluing until it is smooth and taunt across every surface.
 
Had all day to work on my box....The front is all done. I still have to finish the back side where the amps will be mounted and find a place for my capacitor. I also need to fix the screw holes for the subs...I accidently got bondo in a few of them and the threading is all messed up.

Whaddaya Think?
 

Attachments

  • IMG_0296.webp
    IMG_0296.webp
    60.1 KB · Views: 268
  • IMG_0300.webp
    IMG_0300.webp
    68.7 KB · Views: 258
  • IMG_0301.webp
    IMG_0301.webp
    65.2 KB · Views: 150
  • IMG_0302.webp
    IMG_0302.webp
    43.6 KB · Views: 302
looks really good!

i just fleeced mind today hope it comes out as well as yours did :)

and you were right, after a whole lot of thumb-tacking and pulling we were able to get the fleece tight with no wrinkles. applied the resin and i couldnt be happier. Then we sanded it down so its ready for some layers of FG next weekend.
 
Ok, now that everything is at least hooked up (being finished is another story) I can critique the sound quality some more.

The stock head unit has got to go. It has a really high noise floor that I can't get rid of and the volume doesn't vary enough to handle amplification...basically if you set the gains for max listening, you can't listen to it softly and vice versa. Other than the noise floor it sounds fine though. I think i mentioned this in another thread when I first connected my front stage.

The bass is great. 8 inch subs are soooo under-appreciated in the car audio world. At 50% gain on the amp they make my nose hairs tingle. This is my first ported enclosure also, so the following statement may be a mixture of ported and small subwoofers: Although my box punches out bass kicks and lays down bass lines cleanly; it has trouble doing both at the same time. The bass gets muddy when too much is happening in the low end. At full tilt, if a real loud bass line is being played, you don't really feel the bass kicks any more.

The 500 watt MTX amplifier is a good match for the subs. I have it at 50% gain and my ears can barely handle 90% on the head unit. There was no bottoming out that I could hear so I'll bet I could bump it to 66% if I were trying to get decent SPL numbers. I need to fix the crossover point on the 75x2 MTX amp I'm using for the front stage because it was causing my Eclipse speakers to bottom out at high volumes (at first I thought it was the subs but the noise went away when I turned the fader to the rear).

I put in a few familiar cds on my way to work. Madonna's Music album is a great test cd. The recording is perfect and there is plenty of bass along with acoustic guitar and lots of techno style sound effects to keep the high end working. I also threw in Moby's Play album. Some of Moby's synthesized bass lines were a little too low for my ported enclosure and they made the tuning frequency of the box fairly obvious. I will see what I can do to fix this. Finally, I put in Master P's Ghetto D to really put the subs to the test. The subs filled the cabin of my P5 almost as well as my friend's trio of Eclipse aluminums filled his Caddy. The bass line in "Lets Get Em" (track 2) was precise and I felt each kick of the line hit me in the back. When I got to "We Riders" (track 4) I started noticing the muddyness. There is supposed to be a heavy bass line and your generic synth bass drum beat but every once in a while there is a really, i mean really, deep bass hit. My friend's Eclipses would make your balls rattle on this note (sorry ladies don't have an analogy for you) but I didn't even hear it with my 8"s. Throughout the song the drum beat got lost within the bass line and the two were not distinguishable. Some of the other songs on the album sounded better, the intros always sounding the best and then things would get muddy as layers were added.
 
Back