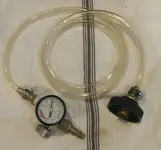
Here's my homemade, one man brake bleeder. Just takes approx. 1-2 psi air pressure. I break each brake bleeder screw (valve) free with a socket wrench before I begin so you don't strip the valve. This also tells you exactly what size wrench you need.
I can attach up close pictures of specific parts need to attach the bleeder cap if needed.
1.) Remove all wheels
2.) Fill reservoir with fresh fluid (after removing any existing brake fluid from reservoir).
3.) Attach brake bleeder, I inserted a rubber gasket, so it is a good seal.
After attaching to air source, just getting air to start flowing.
4.) Have the bleeding bottle and wrench pre-attached to the passenger rear.
5.) Slowly open valve until fluid begins to flow, when color changes clear, close valve.
6.) Tighten just a bit with socket.
7.) Detach cap from reservoir, leave air flow alone, top back off with fluid and repeat.
8.) After cleanup, start the car and pump the brakes (Do Not Skip This Step)
NOTE:
1.) Never let the reservoir run dry, you can close the valve during bleeding to check it or top off if needed.
2.) You only need a very small amount of air pressure. If the pressure is to high, it can blow the cap off of the reservoir,
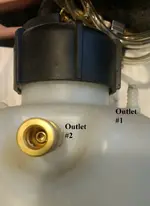
3.) You can also make this setup with a pump up sprayer, from Home Depot, Lowe's etc., by simply removing the pressure pop off valve and attaching an air pressure hose adapter to existing hole, Outlet #2 or using the existing hose nipple Outlet #1


2- 1/4" brass threaded male barbed nipples
1- 1/4" brass female adapter fitting
1- 1/4" brass female air supply adapter
1- Air Flow Regulator with Gauge ($7.99 Harbor Freight)
1- PVC hose (from Lowe's)
2- small hose clamps
1- OEM Mazda Brake Fluid Cap
1- Rubber washer inside diameter of cap
2- 1/4" ID metal washers
1- Compressor
If you have any questions, I would be happy to assist you.