A. OEM Parts Required
D. Tips

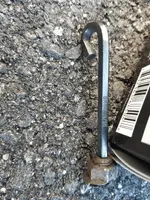
What should've worked but didn't because of the amount of rust. Ultimately, the nut started to spin freely and I knew that it was toast.

The biggest issue is this little washer on the opposite end that will keep spinning if you try to just loosen the nut.

Rubber Boot Removed from Stabilizer Link

Passenger (Rear) Bottom Stabilizer Link + Nut Removed using Oscillating Tool

Passenger (Rear) Top Stabilizer Link Nut partially cut


Passenger (Rear) Fully Torqued Down:

Passenger (Rear) End Link + Nut Removal


Driver (Rear) End Link + Nut Removal


- (4) Stabilizer Link Nuts (9YB0-41-031): There is a very high probability that you will not be able to reuse your old nuts due to the conditions they have to undergo and there is a high probability that you will need to destroy the nuts on the either side (driver/passenger) in order to remove the stabilizer link ends.
- (1) Passenger Rear Stabilizer Link (KD31-28-170): Not interchangeable for the driver side due to the angle of the links.
- (1) Driver Rear Stabilizer Link (KD31-28-190): Not interchangeable for the passenger side due to the angle of the links.
- (Optional) Long reach 5 mm 90 degree Allen Key: Used to hold the bolt steady when you are attempting to loosen the stabilizer link. Each end of the stabilizer link has a pre-cut hole for the Allen key but assuming that you have tons of rust on yours, there's probably no reason to bother with the Allen key.
- 14 mm socket: Used to loosen/tighten/torque down the bottom bolt of either side of the stabilizer link.
- 14 mm crow foot socket: Used to torque down the top bolts of the stabilizer links. This is the only way you would be able to torque these bolts as the clearance is EXTREMELY tight. You will not be able to use a 14mm socket + torque wrench as the tip of the torque wrench will be touching the frame of the vehicle.
- 14 mm ratcheting box end wrench: Used to tighten the new bolts of the replacement stabilizer links.
- (Optional) 14 mm flare nut wrench: Used to tighten the new bolts of the replacement stabilizer links. The only reason you would use this is if you were afraid of stripping the bolts as the tolerance is much better than a box end.
- Angle Grinder/Oscillating Tool: Either one would work but it has to be compact enough to fit and cut the nut. I used the Oscillating tool in addition to 1-3/8 in. Carbide Universal Fit Extreme Metal Cutting Multi-Tool Oscillating Blades (2-Pack). What I can say is that each individual bolt practically destroyed the cutting tips of each blade and perhaps an angle grinder may have been a better choice.
| Name | Torque Specification |
| Rear Stabilizer Link(s) | 34 - 40 ft•lbf |
D. Tips
- You will most likely have to chop off the top and bottom bolts of the rear stabilizer links. I would highly recommend having a Oscillating tool or Angle grinder handy before starting this replacement.
- You can choose to cut the nut or washer side off, it's totally up to you as the stabilizer link end will fall off immediately once either side is removed assuming it's a clean cut.
- You will not be able to access the top nut of the stabilizer link using the long portion of Allen key as there is not enough clearance and the only way would be using the 90 degree portion.
- When cutting, always double check that you are cutting the nut at the correct angle. There is probably no way to not damage the mounting plate for the stabilizer link for this removal but try your best not to.
- You may have to pivot the stabilizer link head in order to fully seat the nut into position before tightening/torqueing down. They can rotate but you would need to apply enough force for it to do so.
- I really thought it would be a simple bolt and unbolt and then I could remove the stabilizer links but I was totally wrong and unprepared for it.
What should've worked but didn't because of the amount of rust. Ultimately, the nut started to spin freely and I knew that it was toast.
The biggest issue is this little washer on the opposite end that will keep spinning if you try to just loosen the nut.
Rubber Boot Removed from Stabilizer Link
Passenger (Rear) Bottom Stabilizer Link + Nut Removed using Oscillating Tool
Passenger (Rear) Top Stabilizer Link Nut partially cut
Passenger (Rear) Fully Torqued Down:
Passenger (Rear) End Link + Nut Removal
Driver (Rear) End Link + Nut Removal